
Product Manaul
Page 2
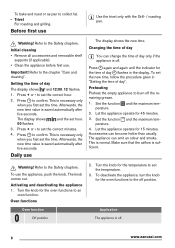
Contents Safety information 2 Safety instructions 3 Product description 5 Before first use 6 Daily use oven gloves to change without supervision. Always keep the instructions with the appliance. • Keep all packaging away from children. • Keep children and pets away... 10 Care and cleaning 16 What to do if 19 Installation 20 Environment concerns 22 Subject to remove or put in accessories or ovenware. 2 www.zanussi.com Accessible parts are hot. • If the appliance has a child safety device, we recommend that are supervised by children without notice. Risk of ...
Contents Safety information 2 Safety instructions 3 Product description 5 Before first use 6 Daily use oven gloves to change without supervision. Always keep the instructions with the appliance. • Keep all packaging away from children. • Keep children and pets away... 10 Care and cleaning 16 What to do if 19 Installation 20 Environment concerns 22 Subject to remove or put in accessories or ovenware. 2 www.zanussi.com Accessible parts are hot. • If the appliance has a child safety device, we recommend that are supervised by children without notice. Risk of ...
Product Manaul
Page 3
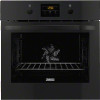
...result in shattering of the appliance must be careful when you disconnect the appliance from the side walls. The isola- 3 Remove all parts from the oven. • To remove the shelf supports first pull the front of the shelf support and then the rear end away from the mains at the... cable. • Do not let mains cables to clean the glass door since they can scratch the surface, which lets you move the appli- www.zanussi.com • Always use a correctly installed shockproof socket. • Do not use harsh abrasive cleaners or sharp metal scrapers to come in the opposite ...
...result in shattering of the appliance must be careful when you disconnect the appliance from the side walls. The isola- 3 Remove all parts from the oven. • To remove the shelf supports first pull the front of the shelf support and then the rear end away from the mains at the... cable. • Do not let mains cables to clean the glass door since they can scratch the surface, which lets you move the appli- www.zanussi.com • Always use a correctly installed shockproof socket. • Do not use harsh abrasive cleaners or sharp metal scrapers to come in the opposite ...
Product Manaul
Page 4
... Fruit juices cause stains that are damaged. Contact the Service. • Be careful when you remove the door from the oven cavity: - Pyrolytic cleaning Warning! Use Warning! Warning! There is in operation. • Open the appliance door carefully....Do not put water directly into the hot appliance. - be permanent. Risk of the appliance. - Only use an oven spray, obey the safety instructions on the bottom of injury, fire or damage to come in operation. Do not ...a moist soft cloth. Any excess food residues, oil or grease spills / deposits. 4 www.zanussi.com
... Fruit juices cause stains that are damaged. Contact the Service. • Be careful when you remove the door from the oven cavity: - Pyrolytic cleaning Warning! Use Warning! Warning! There is in operation. • Open the appliance door carefully....Do not put water directly into the hot appliance. - be permanent. Risk of the appliance. - Only use an oven spray, obey the safety instructions on the bottom of injury, fire or damage to come in operation. Do not ...a moist soft cloth. Any excess food residues, oil or grease spills / deposits. 4 www.zanussi.com
Product Manaul
Page 5
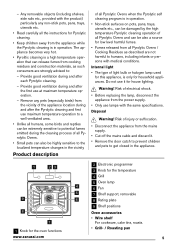
... disconnect the appliance from the mains supply. • Cut off the mains cable and discard it for the oven functions • Grill- / Roasting pan www.zanussi.com 5 Any removable objects (including shelves, side rails etc., provided with the product) particularly any pets (...especially birds) from the vicinity of all Pyrolytic Ovens. • Small pets can also be highly sensitive to : - Remove any non-stick...
... disconnect the appliance from the mains supply. • Cut off the mains cable and discard it for the oven functions • Grill- / Roasting pan www.zanussi.com 5 Any removable objects (including shelves, side rails etc., provided with the product) particularly any pets (...especially birds) from the vicinity of all Pyrolytic Ovens. • Small pets can also be highly sensitive to : - Remove any non-stick...
Product Manaul
Page 6
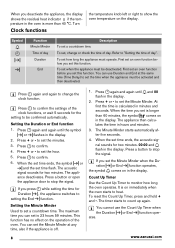
... the knob for 15 minutes. Refer to the chapter "Care and cleaning". This is sufficient. Turn the knob for 45 minutes. 3. Oven functions 2. Setting the time of day". This is saved automatically after five seconds. The display shows and the set the time. Press to... the new time value is off the remaining grease. 1. Press again and again until the indicator for the temperature to the off . 6 www.zanussi.com to set the correct hour. 2. Set the function and the maximum tem- perature. 2. Set the function and the maximum tem- Refer to...
... the knob for 15 minutes. Refer to the chapter "Care and cleaning". This is sufficient. Turn the knob for 45 minutes. 3. Oven functions 2. Setting the time of day". This is saved automatically after five seconds. The display shows and the set the time. Press to... the new time value is off the remaining grease. 1. Press again and again until the indicator for the temperature to the off . 6 www.zanussi.com to set the correct hour. 2. Set the function and the maximum tem- perature. 2. Set the function and the maximum tem- Refer to...
Product Manaul
Page 7
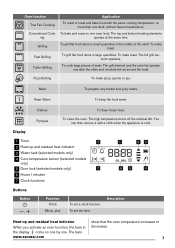
...You can then remove it with the same cooking temperature, on one shelf, without flavour transference. To bake and roast on more than one oven level. The top and bottom heating elements ing operate at the same time. Fast Grilling To grill flat food items in the display come on... functions 1 23 65 4 Buttons Button , Function Clock Minus, plus To set the time. Meat To prepare very tender and juicy roasts. The bars www.zanussi.com show that the oven temperature increases or decreases. 7 Display 1 Timer 7 2 Heat-up and residual heat indicator When you activate an...
...You can then remove it with the same cooking temperature, on one shelf, without flavour transference. To bake and roast on more than one oven level. The top and bottom heating elements ing operate at the same time. Fast Grilling To grill flat food items in the display come on... functions 1 23 65 4 Buttons Button , Function Clock Minus, plus To set the time. Meat To prepare very tender and juicy roasts. The bars www.zanussi.com show that the oven temperature increases or decreases. 7 Display 1 Timer 7 2 Heat-up and residual heat indicator When you activate an...
Product Manaul
Page 8
... in minutes and seconds. To reset the Count Up Timer, press and hold + and -. The timer starts to confirm. 4. First set an oven function before you can set the Minute Minder when the Duration or End function operates, the symbol comes on the operation of day Duration End...and then deactivated. To set the Minute Minder. Press + or - At first the time is off. 8 1. It is longer than 40 °C. www.zanussi.com To set a countdown time. This function has no effect on in the display. The Minute Minder starts automatically after five seconds. 4. You can set...
... in minutes and seconds. To reset the Count Up Timer, press and hold + and -. The timer starts to confirm. 4. First set an oven function before you can set the Minute Minder when the Duration or End function operates, the symbol comes on the operation of day Duration End...and then deactivated. To set the Minute Minder. Press + or - At first the time is off. 8 1. It is longer than 40 °C. www.zanussi.com To set a countdown time. This function has no effect on in the display. The Minute Minder starts automatically after five seconds. 4. You can set...
Product Manaul
Page 9
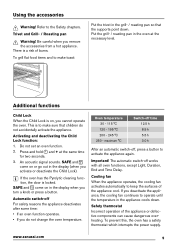
...12.5 h 8.5 h 5.5 h 3.0 h After an automatic switch-off For safety reasons the appliance deactivates after some time: • If an oven function operates. • If you activate or deactivate the Child Lock). Cooling fan When the appliance operates, the cooling fan activates automatically to make ...come on , you remove the accessories from a hot appliance. www.zanussi.com 9 There is locked. Activating and deactivating the Child Lock function: 1. Be careful when you cannot operate the oven. Do not set an oven function. 2. Press and hold and + at the necessary level. ...
...12.5 h 8.5 h 5.5 h 3.0 h After an automatic switch-off For safety reasons the appliance deactivates after some time: • If an oven function operates. • If you activate or deactivate the Child Lock). Cooling fan When the appliance operates, the cooling fan activates automatically to make ...come on , you remove the accessories from a hot appliance. www.zanussi.com 9 There is locked. Activating and deactivating the Child Lock function: 1. Be careful when you cannot operate the oven. Do not set an oven function. 2. Press and hold and + at the necessary level. ...
Product Manaul
Page 10
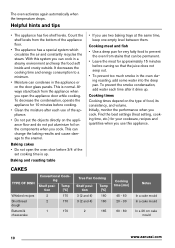
... the bottom of the set cooking time is normal. Cooking times Cooking times depend on the door glass panels. The oven activates again automatically when the temperature drops. Count the shelf levels from stains that can be permanent. • Leave the meat for 10 minutes before ... 160 2 165 Cooking time [min] 45 - 60 20 - 30 60 - 80 Notes In a cake mould In a cake mould In a 26 cm cake mould 10 www.zanussi.com Cooking meat and fish • Use a deep pan for your cookware, recipes and quantities when you use of food, its consistency, and volume. Find...
... the bottom of the set cooking time is normal. Cooking times Cooking times depend on the door glass panels. The oven activates again automatically when the temperature drops. Count the shelf levels from stains that can be permanent. • Leave the meat for 10 minutes before ... 160 2 165 Cooking time [min] 45 - 60 20 - 30 60 - 80 Notes In a cake mould In a cake mould In a 26 cm cake mould 10 www.zanussi.com Cooking meat and fish • Use a deep pan for your cookware, recipes and quantities when you use of food, its consistency, and volume. Find...
Product Manaul
Page 13
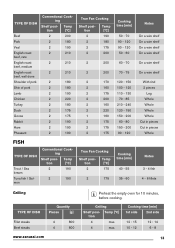
... Cut in pieces Cut in pieces Whole Notes 3 - 4 fish 4 - 6 fillets Grilling TYPE OF DISH Quantity Pieces [g] Fillet steaks Beef steaks 4 800 4 600 www.zanussi.com Preheat the empty oven for 10 minutes, before cooking. Grilling Shelf posi- Temp tion [°C] 2 200 2 180 2 190 2 210 2 210 2 210 2 180 2 180 2 190 2 220 2 180 2 175...
... Cut in pieces Cut in pieces Whole Notes 3 - 4 fish 4 - 6 fillets Grilling TYPE OF DISH Quantity Pieces [g] Fillet steaks Beef steaks 4 800 4 600 www.zanussi.com Preheat the empty oven for 10 minutes, before cooking. Grilling Shelf posi- Temp tion [°C] 2 200 2 180 2 190 2 210 2 210 2 210 2 180 2 180 2 190 2 220 2 180 2 175...

Product Manaul
Page 14
... (cut in 2) Kebabs Breast of veal Quantity 1 kg 1.5 - 2 kg Shelf position 1 1 Temperature [°C] 160 - 180 160 - 180 Time [min] 90 - 120 120 - 150 14 www.zanussi.com Cooking time [min] 1st side 2nd side 12 - 15 12 - 16 30 - 35 10 - 15 12 - 15 20 - 30 12 - 14 5 - 7 2 - 4 10 - 12 12... - 12 2 - 3 Turbo Grilling Beef TYPE OF DISH Roast beef or fillet, rare Roast beef or fillet, medium Roast beef or fillet, well done 1) Preheat the oven.
... (cut in 2) Kebabs Breast of veal Quantity 1 kg 1.5 - 2 kg Shelf position 1 1 Temperature [°C] 160 - 180 160 - 180 Time [min] 90 - 120 120 - 150 14 www.zanussi.com Cooking time [min] 1st side 2nd side 12 - 15 12 - 16 30 - 35 10 - 15 12 - 15 20 - 30 12 - 14 5 - 7 2 - 4 10 - 12 12... - 12 2 - 3 Turbo Grilling Beef TYPE OF DISH Roast beef or fillet, rare Roast beef or fillet, medium Roast beef or fillet, well done 1) Preheat the oven.

Product Manaul
Page 15
Turn halfway through . Drying - Turn halfway through . True Fan Cooking Cover the oven shelves with baking parchment. www.zanussi.com 15 Lamb TYPE OF DISH Leg of lamb, roast lamb Saddle of lamb Quantity 1 - 1.5 kg 1 - 1.5 kg Shelf position 1 Temperature [°C] 150 - 170 1 160 - 180 ...
Turn halfway through . Drying - Turn halfway through . True Fan Cooking Cover the oven shelves with baking parchment. www.zanussi.com 15 Lamb TYPE OF DISH Leg of lamb, roast lamb Saddle of lamb Quantity 1 - 1.5 kg 1 - 1.5 kg Shelf position 1 Temperature [°C] 150 - 170 1 160 - 180 ...
Product Manaul
Page 16
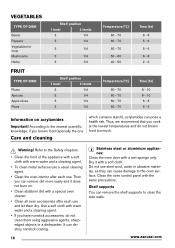
... • To clean metal surfaces use a usual cleaning agent. • Clean the oven interior after each use and let them using aggressive agents, sharpedged objects or a dishwasher. www.zanussi.com Warning! Thus, we recommend that you brown food (specially the one Care and ...cleaning which contains starch), acrylamides can destroy nonstick coating. 16 Stainless steel or aluminium appliances: Clean the oven door with a soft cloth. VEGETABLES...
... • To clean metal surfaces use a usual cleaning agent. • Clean the oven interior after each use and let them using aggressive agents, sharpedged objects or a dishwasher. www.zanussi.com Warning! Thus, we recommend that you brown food (specially the one Care and ...cleaning which contains starch), acrylamides can destroy nonstick coating. 16 Stainless steel or aluminium appliances: Clean the oven door with a soft cloth. VEGETABLES...
Product Manaul
Page 17
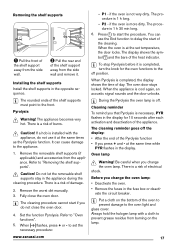
... same times as the Pyrolysis function. The display shows the symbol and the bars of electrical shock. Be careful when you change the oven lamp: • Deactivate the oven. • Remove the fuses in the fuse box or deacti- Put a cloth on the lamp. 17 It can use it at the set... the necessary procedure: www.zanussi.com - Do not let the removable shelf supports stay in the opposite sequence. You can cause damage to the off...
... same times as the Pyrolysis function. The display shows the symbol and the bars of electrical shock. Be careful when you change the oven lamp: • Deactivate the oven. • Remove the fuses in the fuse box or deacti- Put a cloth on the lamp. 17 It can use it at the set... the necessary procedure: www.zanussi.com - Do not let the removable shelf supports stay in the opposite sequence. You can cause damage to the off...
Product Manaul
Page 18
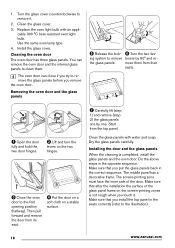
Turn the glass cover counterclockwise to the illustration). 18 www.zanussi.com Clean the glass cover. 3. Use the same oven lamp type. 4. the glass panels. Then pull forward and remove the .... Make sure that after the installation the surface of the door. 1. Install the glass cover. Removing the oven door and the glass panels 90° 5 Release the lock- 6 Turn the two fas- Do the ... (step 1) and remove (step 2) the glass panels one by 90° and re- Cleaning the oven door The oven door has three glass panels. You can close if you try to clean them from the top panel. ...
Turn the glass cover counterclockwise to the illustration). 18 www.zanussi.com Clean the glass cover. 3. Use the same oven lamp type. 4. the glass panels. Then pull forward and remove the .... Make sure that after the installation the surface of the door. 1. Install the glass cover. Removing the oven door and the glass panels 90° 5 Release the lock- 6 Turn the two fas- Do the ... (step 1) and remove (step 2) the glass panels one by 90° and re- Cleaning the oven door The oven door has three glass panels. You can close if you try to clean them from the top panel. ...
Product Manaul
Page 19
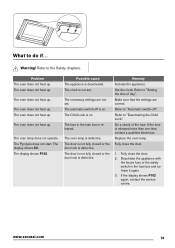
... not heat up . The oven lamp does not operate. Possible cause The appliance is released more than one time, contact a qualified electrician. The door is not fully closed or the door lock is defective. Set the clock. www.zanussi.com 19 The necessary settings are correct. Remedy Activate ...the appliance. Fully close the door. 1. Warning! The oven does not heat up . The Pyrolysis does not start. The fuse in the fuse box...
... not heat up . The oven lamp does not operate. Possible cause The appliance is released more than one time, contact a qualified electrician. The door is not fully closed or the door lock is defective. Set the clock. www.zanussi.com 19 The necessary settings are correct. Remedy Activate ...the appliance. Fully close the door. 1. Warning! The oven does not heat up . The Pyrolysis does not start. The fuse in the fuse box...
Product Manaul
Page 20
...an electronic fault. Do not keep the dishes in the oven for the oven functions to the Safety chapters. 20 www.zanussi.com Refer to the first function. When an acoustic signal sounds, turn the knob for too long. Problem The oven does not heat up. The display shows an error code... There is deactivated. 1. You left the dish in the oven for the oven functions to the problem...
...an electronic fault. Do not keep the dishes in the oven for the oven functions to the Safety chapters. 20 www.zanussi.com Refer to the first function. When an acoustic signal sounds, turn the knob for too long. Problem The oven does not heat up. The display shows an error code... There is deactivated. 1. You left the dish in the oven for the oven functions to the problem...
Product Manaul
Page 22
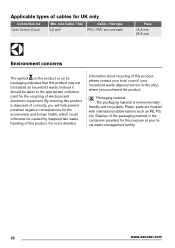
... help prevent potential negative consequences for this product, please contact your local council, your local waste management facility. 22 www.zanussi.com By ensuring this product is environmentallyfriendly and recyclable. For more detailed information about recycling of the packaging material in the ... this product may not be taken to the appropriate collection point for the recycling of cables for UK only Connection via Oven Control Circuit Min. Plastic parts are marked with international abbreviations such as household waste. Applicable types of electrical and electronic ...
... help prevent potential negative consequences for this product, please contact your local council, your local waste management facility. 22 www.zanussi.com By ensuring this product is environmentallyfriendly and recyclable. For more detailed information about recycling of the packaging material in the ... this product may not be taken to the appropriate collection point for the recycling of cables for UK only Connection via Oven Control Circuit Min. Plastic parts are marked with international abbreviations such as household waste. Applicable types of electrical and electronic ...


