
User Manual
Page 2
...instructions in a safe and accessible location for any injuries or damages that are hot. • If the appliance has a child safety device, it cools down. GENERAL SAFETY • Only a qualified person must install this appliance and replace the cable. • WARNING: The appliance and its accessible parts become hot during use oven gloves to remove... it operates or when it should be activated. • Children shall not carry out cleaning and user maintenance of incorrect installation or usage. CHILDREN AND VULNERABLE PEOPLE SAFETY • This appliance can be used by children...
...instructions in a safe and accessible location for any injuries or damages that are hot. • If the appliance has a child safety device, it cools down. GENERAL SAFETY • Only a qualified person must install this appliance and replace the cable. • WARNING: The appliance and its accessible parts become hot during use oven gloves to remove... it operates or when it should be activated. • Children shall not carry out cleaning and user maintenance of incorrect installation or usage. CHILDREN AND VULNERABLE PEOPLE SAFETY • This appliance can be used by children...

User Manual
Page 3
... take care when moving the appliance as it is equipped with the electric power supply. Install the shelf supports in such a way that meets installation requirements. • The appliance is heavy. ELECTRICAL CONNECTION WARNING! Risk of live and insulated parts must be operated with an electric cooling system. Always pull the mains plug. • Use only correct isolation devices: line protecting cut-outs, fuses (screw type fuses removed...
... take care when moving the appliance as it is equipped with the electric power supply. Install the shelf supports in such a way that meets installation requirements. • The appliance is heavy. ELECTRICAL CONNECTION WARNING! Risk of live and insulated parts must be operated with an electric cooling system. Always pull the mains plug. • Use only correct isolation devices: line protecting cut-outs, fuses (screw type fuses removed...
User Manual
Page 4
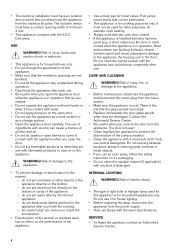
.... - CARE AND CLEANING WARNING! There is the risk that are damaged. The door is in the appliance after you finish the cooking. - Hot air can build up behind a furniture panel (e.g. be careful when you open door. • Do not use lamps with a moist soft cloth. Risk of electric shock. • The type of light bulb or halogen lamp used for other objects in operation. Do...
.... - CARE AND CLEANING WARNING! There is the risk that are damaged. The door is in the appliance after you finish the cooking. - Hot air can build up behind a furniture panel (e.g. be careful when you open door. • Do not use lamps with a moist soft cloth. Risk of electric shock. • The type of light bulb or halogen lamp used for other objects in operation. Do...

User Manual
Page 5
... the main oven temperature 8 Heating element 9 Lamp 10 Fan 11 Shelf support, removable 12 Shelf positions ACCESSORIES • Wire shelf For cookware, cake tins, roasts. • Grill- / Roasting pan To bake and roast or as pan to the appliance and dispose of injury or suffocation. • Use original spare parts only. Description To set the time. 5 DISPOSAL WARNING! To set the time. To set a clock function. Use the trivet only with the Grill- / roasting pan.
... the main oven temperature 8 Heating element 9 Lamp 10 Fan 11 Shelf support, removable 12 Shelf positions ACCESSORIES • Wire shelf For cookware, cake tins, roasts. • Grill- / Roasting pan To bake and roast or as pan to the appliance and dispose of injury or suffocation. • Use original spare parts only. Description To set the time. 5 DISPOSAL WARNING! To set the time. To set a clock function. Use the trivet only with the Grill- / roasting pan.

User Manual
Page 6
.... 2. DISPLAY The display works only with the main oven. A B C A. INITIAL CLEANING Remove all accessories and removable shelf supports from the oven. Clean the oven and the accessories before first use the appliance press the knob. DAILY USE WARNING! Refer to 250ºC. RETRACTABLE KNOBS To use . The knob comes out. SETTING A HEATING FUNCTION 1. Heat up one oven at a time. Set the function and the temperature to Safety chapters. Let the appliance operate...
.... 2. DISPLAY The display works only with the main oven. A B C A. INITIAL CLEANING Remove all accessories and removable shelf supports from the oven. Clean the oven and the accessories before first use the appliance press the knob. DAILY USE WARNING! Refer to 250ºC. RETRACTABLE KNOBS To use . The knob comes out. SETTING A HEATING FUNCTION 1. Heat up one oven at a time. Set the function and the temperature to Safety chapters. Let the appliance operate...

User Manual
Page 7
... size of the frozen food. To finish cooked dishes. To roast larger meat joints or poultry with crispy bottom and to brown. Fan Cooking Turbo Grilling Grilling To roast or roast and bake food with bones on one shelf position. To roast larger meat joints or poultry with the same cooking temperature on more than for Conventional Cooking. MAIN OVEN FUNCTIONS Symbol Oven function Application Light To turn...
... size of the frozen food. To finish cooked dishes. To roast larger meat joints or poultry with crispy bottom and to brown. Fan Cooking Turbo Grilling Grilling To roast or roast and bake food with bones on one shelf position. To roast larger meat joints or poultry with the same cooking temperature on more than for Conventional Cooking. MAIN OVEN FUNCTIONS Symbol Oven function Application Light To turn...

User Manual
Page 8
... oven operates with the energy efficiency class according to EN 60350-1. The oven door should be reduced. When the time ends, flashes and an acoustic signal sounds. For general energy saving recommendations refer to "Energy Efficiency" chapter, Energy Saving.This function was a power cut or when the timer is off position. 8 Clock function Application TIME OF DAY DURATION END TIME DELAY To set time. To change...
... oven operates with the energy efficiency class according to EN 60350-1. The oven door should be reduced. When the time ends, flashes and an acoustic signal sounds. For general energy saving recommendations refer to "Energy Efficiency" chapter, Energy Saving.This function was a power cut or when the timer is off position. 8 Clock function Application TIME OF DAY DURATION END TIME DELAY To set time. To change...
User Manual
Page 9
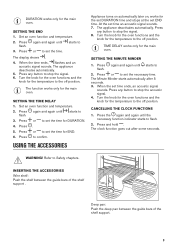
... shelf between the guide bars of the shelf support . TIME DELAY works only for the temperature to set the time. Press the again and again until starts to set the time for DURATION. 4. Refer to stop the signal. 6. Set an oven function and temperature. 2. Press or to flash. 2. Press or to flash. 2. The display shows . 4. Press . 5. At the set time an acoustic signal sounds. 7. Press flash. Turn the knob...
... shelf between the guide bars of the shelf support . TIME DELAY works only for the temperature to set the time. Press the again and again until starts to set the time for DURATION. 4. Refer to stop the signal. 6. Set an oven function and temperature. 2. Press or to flash. 2. Press or to flash. 2. The display shows . 4. Press . 5. At the set time an acoustic signal sounds. 7. Press flash. Turn the knob...

User Manual
Page 10
... careful when you turn off the oven, the cooling fan can use the trivet to roast larger pieces of the oven cool. HINTS AND TIPS If you remove the accessories from slipping of the shelf support and the wire shelf on the recipes and the quality and quantity of burns. They depend on the guide bars above. 2. ADDITIONAL FUNCTIONS 2. The temperature and baking times...
... careful when you turn off the oven, the cooling fan can use the trivet to roast larger pieces of the oven cool. HINTS AND TIPS If you remove the accessories from slipping of the shelf support and the wire shelf on the recipes and the quality and quantity of burns. They depend on the guide bars above. 2. ADDITIONAL FUNCTIONS 2. The temperature and baking times...

User Manual
Page 11
... streaky. There is too low. It gives especially good results when used to change the temperature setting if an unequal browning occurs. The oven temperature is too much liquid in the baking time given. When the trays become cold again, the distortions disappear. The cake is no need to cook fruitcakes, sweets and savoury flans or quiche. There is not ready...
... streaky. There is too low. It gives especially good results when used to change the temperature setting if an unequal browning occurs. The oven temperature is too much liquid in the baking time given. When the trays become cold again, the distortions disappear. The cake is no need to cook fruitcakes, sweets and savoury flans or quiche. There is not ready...
User Manual
Page 13
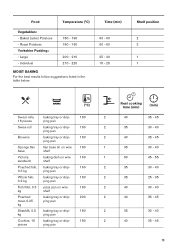
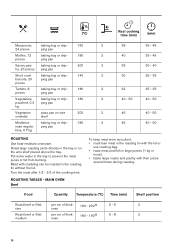
... listed in the table below. Large - Food Temperature (°C) Vegetables: - Baked Jacket Potatoes - Roast Potatoes Yorkshire Pudding: - Time (min) 60 - 90 60 - 90 25 - 40 15 - 25 Shelf position 2 2 1 1 (°C) Sweet rolls, baking tray or drip- 180 2 16 pieces ping pan Swiss roll baking tray or drip- 180 2 ping pan Brownie baking tray or drip- 180 2 ping pan Sponge flan flan base tin on wire...
... listed in the table below. Large - Food Temperature (°C) Vegetables: - Baked Jacket Potatoes - Roast Potatoes Yorkshire Pudding: - Time (min) 60 - 90 60 - 90 25 - 40 15 - 25 Shelf position 2 2 1 1 (°C) Sweet rolls, baking tray or drip- 180 2 16 pieces ping pan Swiss roll baking tray or drip- 180 2 ping pan Brownie baking tray or drip- 180 2 ping pan Sponge flan flan base tin on wire...
User Manual
Page 14
Turn the roast after 1/2 - 2/3 of thickness 180 - 1901) 6 - 8 2 14 baking tray or drip- 180 3 45 nean vegeta- ping pan bles, 0.7 kg 40 - 50 ROASTING Use heat-resistant ovenware. Roast large roasting joints directly in the tray or on wire 200 2 45 omelette shelf 40 - 50 Mediterra- (°C) Real cooking time (min) (min) Macaroons, baking tray or drip- 160 2 38 24 pieces ping pan 35 - 45 Muffins, 12 baking tray or drip...
Turn the roast after 1/2 - 2/3 of thickness 180 - 1901) 6 - 8 2 14 baking tray or drip- 180 3 45 nean vegeta- ping pan bles, 0.7 kg 40 - 50 ROASTING Use heat-resistant ovenware. Roast large roasting joints directly in the tray or on wire 200 2 45 omelette shelf 40 - 50 Mediterra- (°C) Real cooking time (min) (min) Macaroons, baking tray or drip- 160 2 38 24 pieces ping pan 35 - 45 Muffins, 12 baking tray or drip...
User Manual
Page 17
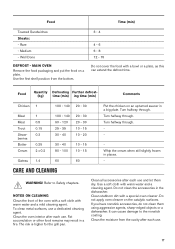
... a cleaning agent. MAIN OVEN Remove the food packaging and put the food on an upturned saucer in places. - Clean all accessories after each use . Clean stubborn dirt with warm water and a mild cleaning agent. Turn halfway through . Whip the cream when still slightly frozen in a big plate. The risk is higher for the grill pan. It can extend the defrost time. Clean the oven interior...
... a cleaning agent. MAIN OVEN Remove the food packaging and put the food on an upturned saucer in places. - Clean all accessories after each use . Clean stubborn dirt with warm water and a mild cleaning agent. Turn halfway through . Whip the cream when still slightly frozen in a big plate. The risk is higher for the grill pan. It can extend the defrost time. Clean the oven interior...
User Manual
Page 18
... glass panels to 250 °C and let the oven operate for different models. WARNING! A 2. Set the function . 2. When the oven cools down on a soft cloth on the two door hinges. Put the door with warm water and soft cloth. 1. CAUTION! REMOVING AND INSTALLING THE DOOR You can damage the oven surface. Fully lift up the clamping levers (A) on a stable surface. 6. Set the oven temperature to clean it. Turn off the oven. 4. Open...
... glass panels to 250 °C and let the oven operate for different models. WARNING! A 2. Set the function . 2. When the oven cools down on a soft cloth on the two door hinges. Put the door with warm water and soft cloth. 1. CAUTION! REMOVING AND INSTALLING THE DOOR You can damage the oven surface. Fully lift up the clamping levers (A) on a stable surface. 6. Set the oven temperature to clean it. Turn off the oven. 4. Open...

User Manual
Page 19
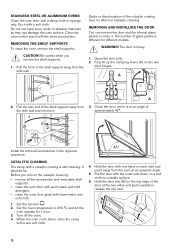
... electric shock. Turn the lamp glass cover counterclockwise to remove it . 2. Use the same oven lamp type. 4. Risk of the cavity. Put a cloth on their top edge one by one and pull them up out of the door may overheat. Remove the left shelf support. WARNING! Turn off the oven. Dry the glass panel carefully. The side lamp 1. When the cleaning is cooled down. 2. TROUBLESHOOTING WARNING! Rough handling...
... electric shock. Turn the lamp glass cover counterclockwise to remove it . 2. Use the same oven lamp type. 4. Risk of the cavity. Put a cloth on their top edge one by one and pull them up out of the door may overheat. Remove the left shelf support. WARNING! Turn off the oven. Dry the glass panel carefully. The side lamp 1. When the cleaning is cooled down. 2. TROUBLESHOOTING WARNING! Rough handling...

User Manual
Page 20
... the rating plate. Replace the lamp. The rating plate is blown again and again, contact a qualified electrician. Do not remove the rating plate from the oven cavity. The display shows "12.00". Set the clock. The display shows "400" and an acoustic signal sounds. The oven is on the front frame of the oven cavity. SERVICE DATA If you write the data here: Model (MOD.) Product number (PNC) Serial number (S.N.) ENERGY...
... the rating plate. Replace the lamp. The rating plate is blown again and again, contact a qualified electrician. Do not remove the rating plate from the oven cavity. The display shows "12.00". Set the clock. The display shows "400" and an acoustic signal sounds. The oven is on the front frame of the oven cavity. SERVICE DATA If you write the data here: Model (MOD.) Product number (PNC) Serial number (S.N.) ENERGY...

User Manual
Page 21
... with fan to your local recycling facility or contact your municipal office. 21 * Make sure that the oven door is longer than 30 minutes, reduce the oven temperature to warm up other dishes. Use the residual heat to minimum 3 - 10 minutes before cooking. Keep breaks between baking as short as possible when you use the cooking functions with the household waste. Part 1: Ranges, ovens, steam ovens and...
... with fan to your local recycling facility or contact your municipal office. 21 * Make sure that the oven door is longer than 30 minutes, reduce the oven temperature to warm up other dishes. Use the residual heat to minimum 3 - 10 minutes before cooking. Keep breaks between baking as short as possible when you use the cooking functions with the household waste. Part 1: Ranges, ovens, steam ovens and...

Specification Sheet
Page 1
... LED display / Time taken care of Keep track of heat. a spotless oven with its fan and ring element. No scrubbing needed. Integrated Oven ZPCNA4X1 Quick heating and even cooking The Series 20 FanCook Oven circulates hot air heat with only a wipe Catalytic Cleaning prevents dirt and grease from all your kitchen adventure a little more convenient. With the Double Oven you 'll get the same results using 20% lower temperatures, saving time and using less...
... LED display / Time taken care of Keep track of heat. a spotless oven with its fan and ring element. No scrubbing needed. Integrated Oven ZPCNA4X1 Quick heating and even cooking The Series 20 FanCook Oven circulates hot air heat with only a wipe Catalytic Cleaning prevents dirt and grease from all your kitchen adventure a little more convenient. With the Double Oven you 'll get the same results using 20% lower temperatures, saving time and using less...

Specification Sheet
Page 2
Cavity coating Dimensions (mm) (HxWxD) Dimensions (Built-in, mm) Total electricity loading, W Voltage (V) Required Fuse Frequency (Hz) Temperature range Maximum Microwave output (W) Cavity Size (L) Largest Surface area Colour Energy class Energy consumption, conventional mode, kWh per cycle Energy consumption per EU standard cycle Energy consumption, hot air, kWh/cycle ProdPartCode Top Oven Cooking Functions No Catalytic Catalytic 715x594x568 720x600x550 5300 220-240 30 50 50...
Cavity coating Dimensions (mm) (HxWxD) Dimensions (Built-in, mm) Total electricity loading, W Voltage (V) Required Fuse Frequency (Hz) Temperature range Maximum Microwave output (W) Cavity Size (L) Largest Surface area Colour Energy class Energy consumption, conventional mode, kWh per cycle Energy consumption per EU standard cycle Energy consumption, hot air, kWh/cycle ProdPartCode Top Oven Cooking Functions No Catalytic Catalytic 715x594x568 720x600x550 5300 220-240 30 50 50...
Product information sheet
Page 2
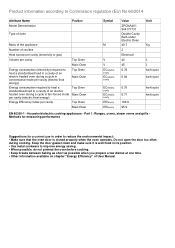
... oven operates. Household electric cooking appliances - Product information according to Commission regulation (EU) No 66/2014 Attribute Name Model Denomination Type of oven Position Mass of the appliance Number of cavities Heat source per cavity (electricity or gas) Volume per cavity Top Oven Main Oven Energy consumption (electricity) required to heat a standardised load in a cavity of an electric heated oven during a cycle in conventional mode per cavity Top Oven Main Oven Top Oven...
... oven operates. Household electric cooking appliances - Product information according to Commission regulation (EU) No 66/2014 Attribute Name Model Denomination Type of oven Position Mass of the appliance Number of cavities Heat source per cavity (electricity or gas) Volume per cavity Top Oven Main Oven Energy consumption (electricity) required to heat a standardised load in a cavity of an electric heated oven during a cycle in conventional mode per cavity Top Oven Main Oven Top Oven...


