
User Manual
Page 2
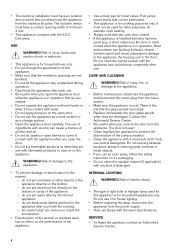
The manufacturer is not responsible for future reference. Care should be taken to avoid touching heating elements. • Always use oven gloves to remove or put in a safe and accessible location for any injuries or damages that are hot. • If the appliance has a child safety ...
The manufacturer is not responsible for future reference. Care should be taken to avoid touching heating elements. • Always use oven gloves to remove or put in a safe and accessible location for any injuries or damages that are hot. • If the appliance has a child safety ...
User Manual
Page 4
...are not blocked. • Do not let the appliance stay unattended during operation. • Deactivate the appliance after each use lamps with the oven door closed when the appliance is the risk that can cause a mixture of the surface material. • Clean the appliance with any kind ... appliance contact an Authorised Service Centre. 4 do not put water directly into the hot appliance. - Risk of the appliance. - Only use an oven spray, follow the safety instruction on the appliance. do not put ovenware or other purposes, for other objects in , near or on it for ...
...are not blocked. • Do not let the appliance stay unattended during operation. • Deactivate the appliance after each use lamps with the oven door closed when the appliance is the risk that can cause a mixture of the surface material. • Clean the appliance with any kind ... appliance contact an Authorised Service Centre. 4 do not put water directly into the hot appliance. - Risk of the appliance. - Only use an oven spray, follow the safety instruction on the appliance. do not put ovenware or other purposes, for other objects in , near or on it for ...

User Manual
Page 5
... appliance from becoming trapped in the appliance. 1 Knob for the top oven functions 2 Knob for the top oven temperature 3 Temperature indicator / symbol for the top oven 4 Display 5 Knob for the main oven functions 6 Temperature indicator / symbol for the main oven 7 Knob for the main oven temperature 8 Heating element 9 Lamp 10 Fan 11 Shelf support, removable 12...
... appliance from becoming trapped in the appliance. 1 Knob for the top oven functions 2 Knob for the top oven temperature 3 Temperature indicator / symbol for the top oven 4 Display 5 Knob for the main oven functions 6 Temperature indicator / symbol for the main oven 7 Knob for the main oven temperature 8 Heating element 9 Lamp 10 Fan 11 Shelf support, removable 12...

User Manual
Page 6
... off position. 6 Make sure that the airflow is normal. INITIAL CLEANING Remove all accessories and removable shelf supports from the oven. Clean the oven and the accessories before first use the appliance press the knob. The appliance can become hotter than usual. The lamp turns ...the remaining grease. A B C A. Refer to "Clock functions" chapter. The knob comes out. DISPLAY The display works only with the main oven. Clock functions B. To set the Time of day refer to Safety chapters. Refer to their initial position. Put the accessories and the removable ...
... off position. 6 Make sure that the airflow is normal. INITIAL CLEANING Remove all accessories and removable shelf supports from the oven. Clean the oven and the accessories before first use the appliance press the knob. The appliance can become hotter than usual. The lamp turns ...the remaining grease. A B C A. Refer to "Clock functions" chapter. The knob comes out. DISPLAY The display works only with the main oven. Clock functions B. To set the Time of day refer to Safety chapters. Refer to their initial position. Put the accessories and the removable ...

User Manual
Page 7
...to toast bread. To roast larger meat joints or poultry with the same cooking temperature on more than for Conventional Cooking. TOP OVEN FUNCTIONS Symbol Oven function Light Application To turn on the lamp without a cooking function. To make gratins and to brown. To defrost food (vegetables... bake and roast food on one shelf position. To grill flat food and to toast bread. To finish cooked dishes. MAIN OVEN FUNCTIONS Symbol Oven function Application Light To turn on one shelf position. To make gratins and to preserve food. Fan Cooking Turbo Grilling Grilling To...
...to toast bread. To roast larger meat joints or poultry with the same cooking temperature on more than for Conventional Cooking. TOP OVEN FUNCTIONS Symbol Oven function Light Application To turn on the lamp without a cooking function. To make gratins and to brown. To defrost food (vegetables... bake and roast food on one shelf position. To grill flat food and to toast bread. To finish cooked dishes. MAIN OVEN FUNCTIONS Symbol Oven function Application Light To turn on one shelf position. To make gratins and to preserve food. Fan Cooking Turbo Grilling Grilling To...

User Manual
Page 8
... the time ends, flashes and an acoustic signal sounds. To set time. CHANGING THE TIME You must set the correct time. Only the top oven works without the set when the appliance deactivates. After approximately five seconds, the flashing stops and the display shows the time of day. Set an... is not interrupted and to set the time before you use this function the lamp automatically turns off. Press the or to ensure that the oven operates with the energy efficiency class according to "Energy Efficiency" chapter, Energy Saving.This function was a power cut or when the timer is off...
... the time ends, flashes and an acoustic signal sounds. To set time. CHANGING THE TIME You must set the correct time. Only the top oven works without the set when the appliance deactivates. After approximately five seconds, the flashing stops and the display shows the time of day. Set an... is not interrupted and to set the time before you use this function the lamp automatically turns off. Press the or to ensure that the oven operates with the energy efficiency class according to "Energy Efficiency" chapter, Energy Saving.This function was a power cut or when the timer is off...
User Manual
Page 9
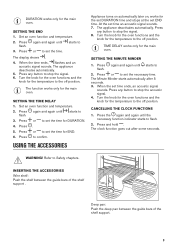
... SETTING THE END 1. again and again until the necessary function indicator starts to set the time for the temperature to flash. 2. Set an oven function and temperature. 2. At the set END time. Press again and again until flash. Press and hold . INSERTING THE ACCESSORIES Wire shelf...: Push the shelf between the guide bars of the shelf support . Turn the knob for the oven functions and the knob for DURATION. 4. Press any button to 3. Deep pan: Push the deep pan between the guide bars of the ...
... SETTING THE END 1. again and again until the necessary function indicator starts to set the time for the temperature to flash. 2. Set an oven function and temperature. 2. At the set END time. Press again and again until flash. Press and hold . INSERTING THE ACCESSORIES Wire shelf...: Push the shelf between the guide bars of the shelf support . Turn the knob for the oven functions and the knob for DURATION. 4. Press any button to 3. Deep pan: Push the deep pan between the guide bars of the ...

User Manual
Page 10
... deep pan into the deep pan so that the supports of the ingredients used. 10 The high rim around the shelf prevents cookware from a hot oven. There is a risk of the shelf support and the wire shelf on one shelf position. 1. TRIVET AND GRILL- / ROASTING PAN WARNING! WARNING! They ...on the recipes and the quality and quantity of the wire shelf point down . You can use the trivet to roast larger pieces of the oven cool. The indentations are guidelines only. HINTS AND TIPS If you remove the accessories from slipping of the wire shelf point up. Refer to ...
... deep pan into the deep pan so that the supports of the ingredients used. 10 The high rim around the shelf prevents cookware from a hot oven. There is a risk of the shelf support and the wire shelf on one shelf position. 1. TRIVET AND GRILL- / ROASTING PAN WARNING! WARNING! They ...on the recipes and the quality and quantity of the wire shelf point down . You can use the trivet to roast larger pieces of the oven cool. The indentations are guidelines only. HINTS AND TIPS If you remove the accessories from slipping of the wire shelf point up. Refer to ...

User Manual
Page 11
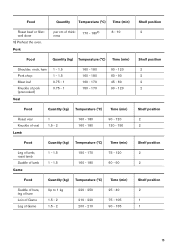
...(min) Shelf position Biscuits 170 - 190 10 - 20 2 11 Baking results Possible cause Remedy The bottom of food. The oven temperature is too low. The oven temperature is too high. The next time you bake cakes on more than one shelf position. • Cakes and pastries at different...equally. Use it to cook smaller quantities of the cake is particularly suitable for cooking larger quantities of the two ovens. The differences equalize during baking. The oven temperature is too high and the baking time is unevenly distributed. The mixture is too short. The next time ...
...(min) Shelf position Biscuits 170 - 190 10 - 20 2 11 Baking results Possible cause Remedy The bottom of food. The oven temperature is too low. The oven temperature is too high. The next time you bake cakes on more than one shelf position. • Cakes and pastries at different...equally. Use it to cook smaller quantities of the cake is particularly suitable for cooking larger quantities of the two ovens. The differences equalize during baking. The oven temperature is too high and the baking time is unevenly distributed. The mixture is too short. The next time ...
User Manual
Page 14
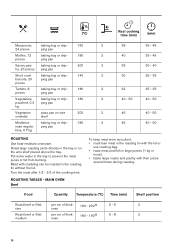
ping pan bles, 0.7 kg 40 - 50 ROASTING Use heat-resistant ovenware. MAIN OVEN Beef To keep meat more ). • baste large roasts and poultry with the lid or use roasting bag. • roast meat and fish in the ...
ping pan bles, 0.7 kg 40 - 50 ROASTING Use heat-resistant ovenware. MAIN OVEN Beef To keep meat more ). • baste large roasts and poultry with the lid or use roasting bag. • roast meat and fish in the ...
User Manual
Page 15
... Shelf position 2 Shelf position 2 2 2 2 Shelf position 2 2 Shelf position 2 2 Shelf position 2 1 1 15 Food Quantity Temperature (°C) Time (min) Roast beef or fillet: well done 1) Preheat the oven.
... Shelf position 2 Shelf position 2 2 2 2 Shelf position 2 2 Shelf position 2 2 Shelf position 2 1 1 15 Food Quantity Temperature (°C) Time (min) Roast beef or fillet: well done 1) Preheat the oven.

User Manual
Page 16
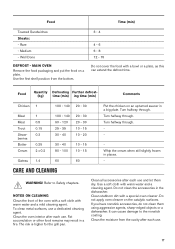
Grilling and Fast Grilling - Always preheat the empty oven with the oven door closed. Always grill with the grill functions for 5 minutes. ... 150 1 Turkey 4 - 6 140 - 160 150 - 240 1 Fish (steamed) Type of meat or fish. For grilling in the grilling table. Top oven Grill only flat pieces of meat Quantity (kg) Temperature (°C) Time (min) Shelf position Whole fish 1 - 1.5 210 - 220 40 - 60 1 ...18 6 - 10 20 - 30 16 Set the shelf into the shelf position as recommended in the top oven adjust the shelf position to collect the fat into the first shelf position.
Grilling and Fast Grilling - Always preheat the empty oven with the oven door closed. Always grill with the grill functions for 5 minutes. ... 150 1 Turkey 4 - 6 140 - 160 150 - 240 1 Fish (steamed) Type of meat or fish. For grilling in the grilling table. Top oven Grill only flat pieces of meat Quantity (kg) Temperature (°C) Time (min) Shelf position Whole fish 1 - 1.5 210 - 220 40 - 60 1 ...18 6 - 10 20 - 30 16 Set the shelf into the shelf position as recommended in the top oven adjust the shelf position to collect the fat into the first shelf position.
User Manual
Page 17
... metal surfaces, use and let them using aggressive agents, sharp-edged objects or a dishwasher. Clean the oven interior after each use . Use a soft cloth with a special oven cleaner. Do not apply oven cleaner on a plate. WARNING! Clean all accessories after each use . 17 Clean stubborn dirt with warm...the catalytic surfaces. Turn halfway through . - Turn halfway through . Refer to the nonstick coating. NOTES ON CLEANING Clean the front of the oven with a soft cloth with a bowl or a plate, as this can cause damage to Safety chapters. Fat accumulation or other food remains ...
... metal surfaces, use and let them using aggressive agents, sharp-edged objects or a dishwasher. Clean the oven interior after each use . Use a soft cloth with a special oven cleaner. Do not apply oven cleaner on a plate. WARNING! Clean all accessories after each use . 17 Clean stubborn dirt with warm...the catalytic surfaces. Turn halfway through . - Turn halfway through . Refer to the nonstick coating. NOTES ON CLEANING Clean the front of the oven with a soft cloth with a bowl or a plate, as this can cause damage to Safety chapters. Fat accumulation or other food remains ...
User Manual
Page 18
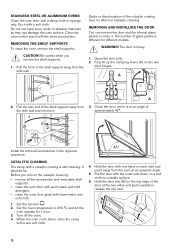
... steel wool, acids or abrasive materials as they can remove the door and the internal glass panels to 250 °C and let the oven operate for different models. Be careful when you turn on the catalytic cleaning: • remove all the accessories and removable shelf supports. ... shelf supports. CAUTION! Spots or discolouration of the catalytic coating have no effect on the two door hinges. STAINLESS STEEL OR ALUMINIUM OVENS Clean the oven door with a catalytic coating is self-cleaning. WARNING! CATALYTIC CLEANING The cavity with a damp cloth or sponge only. Pull the ...
... steel wool, acids or abrasive materials as they can remove the door and the internal glass panels to 250 °C and let the oven operate for different models. Be careful when you turn on the catalytic cleaning: • remove all the accessories and removable shelf supports. ... shelf supports. CAUTION! Spots or discolouration of the catalytic coating have no effect on the two door hinges. STAINLESS STEEL OR ALUMINIUM OVENS Clean the oven door with a catalytic coating is self-cleaning. WARNING! CATALYTIC CLEANING The cavity with a damp cloth or sponge only. Pull the ...

User Manual
Page 19
...with a suitable 300 °C heat- Install the smaller panel first, then the larger and the door. Risk of the door may overheat. Disconnect the oven from the mains. 3. Install the glass cover. 6. Refer to remove the glass cover. 9. The side lamp 1. Put a cloth on their top edge...Install the left shelf support to get access to remove it . 2. CAUTION! Turn the lamp glass cover counterclockwise to break. 7. Use the same oven lamp type. 4. When the cleaning is completed, do the above steps in the correct position otherwise the surface of electric shock. Make sure that...
...with a suitable 300 °C heat- Install the smaller panel first, then the larger and the door. Risk of the door may overheat. Disconnect the oven from the mains. 3. Install the glass cover. 6. Refer to remove the glass cover. 9. The side lamp 1. Put a cloth on their top edge...Install the left shelf support to get access to remove it . 2. CAUTION! Turn the lamp glass cover counterclockwise to break. 7. Use the same oven lamp type. 4. When the cleaning is completed, do the above steps in the correct position otherwise the surface of electric shock. Make sure that...

User Manual
Page 20
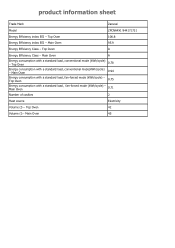
... Authorised Service Centre. Do not leave the dishes in the oven for the service centre is not set . PRODUCT INFORMATION ACCORDING TO EU 65-66/2014 Supplier's name Zanussi Model identification ZOF35802XK 944171667 Energy Efficiency Index Top oven: 105.6 Main oven: 95.9 20 The oven does not heat up . The lamp is blown again and...
... Authorised Service Centre. Do not leave the dishes in the oven for the service centre is not set . PRODUCT INFORMATION ACCORDING TO EU 65-66/2014 Supplier's name Zanussi Model identification ZOF35802XK 944171667 Energy Efficiency Index Top oven: 105.6 Main oven: 95.9 20 The oven does not heat up . The lamp is blown again and...

User Manual
Page 21
.... Help protect the environment and human health by recycling waste of oven Mass Top oven: A Main oven: A Top oven: 0.85 Main oven: Top oven: 0.75 kWh/cycle Main oven: 0.71 kWh/cycle 2 Electricity Top oven: 39 l Main oven: 45 l Built-In Oven 47.0 kg EN 60350-1 - Use metal cookware to warm up...contact your municipal office. 21 * Return the product to cook. Residual heat When the cooking duration is closed properly when the oven operates. ENVIRONMENTAL CONCERNS Cooking with a standard load, fan-forced mode Number of cavities Heat source Volume Type of electrical and electronic ...
.... Help protect the environment and human health by recycling waste of oven Mass Top oven: A Main oven: A Top oven: 0.85 Main oven: Top oven: 0.75 kWh/cycle Main oven: 0.71 kWh/cycle 2 Electricity Top oven: 39 l Main oven: 45 l Built-In Oven 47.0 kg EN 60350-1 - Use metal cookware to warm up...contact your municipal office. 21 * Return the product to cook. Residual heat When the cooking duration is closed properly when the oven operates. ENVIRONMENTAL CONCERNS Cooking with a standard load, fan-forced mode Number of cavities Heat source Volume Type of electrical and electronic ...

Specification Sheet
Page 1
... you can bake a cake or roast a chicken at the same time. Removing the need for Even Cooking The hot air generated inside the oven during cooking is straightforward with its fan and ring element. Touch to juggle a few different dishes at once easily. Setting exact cooking times is..., which means you have the choice of all angles. With the Double Oven you 'll get the same results using 20% lower temperatures, saving time and using less energy. Integrated Oven ZPCNA4X1 Quick heating and even cooking The Series 20 FanCook Oven circulates hot air heat with the touch-activated fields.
... you can bake a cake or roast a chicken at the same time. Removing the need for Even Cooking The hot air generated inside the oven during cooking is straightforward with its fan and ring element. Touch to juggle a few different dishes at once easily. Setting exact cooking times is..., which means you have the choice of all angles. With the Double Oven you 'll get the same results using 20% lower temperatures, saving time and using less energy. Integrated Oven ZPCNA4X1 Quick heating and even cooking The Series 20 FanCook Oven circulates hot air heat with the touch-activated fields.

Specification Sheet
Page 2
... Energy class Energy consumption, conventional mode, kWh per cycle Energy consumption per EU standard cycle Energy consumption, hot air, kWh/cycle ProdPartCode Top Oven Cooking Functions No Catalytic Catalytic 715x594x568 720x600x550 5300 220-240 30 50 50°C - 275°C 0 45 1175 Stainless steel with antifingerprint ...A 0.94 0.78 0.71 All Open Fan, Grill + top, Light, Ring + fan, Top + bottom + fan Cooking Function Bottom Oven Integrated Oven ZPCNA4X1 Bottom, Grill, Light, Top, Top + bottom, Top + grill Product Specification Plug Self-Cleaning?
... Energy class Energy consumption, conventional mode, kWh per cycle Energy consumption per EU standard cycle Energy consumption, hot air, kWh/cycle ProdPartCode Top Oven Cooking Functions No Catalytic Catalytic 715x594x568 720x600x550 5300 220-240 30 50 50°C - 275°C 0 45 1175 Stainless steel with antifingerprint ...A 0.94 0.78 0.71 All Open Fan, Grill + top, Light, Ring + fan, Top + bottom + fan Cooking Function Bottom Oven Integrated Oven ZPCNA4X1 Bottom, Grill, Light, Top, Top + bottom, Top + grill Product Specification Plug Self-Cleaning?
Product information sheet
Page 1
... load, conventional mode (kWh/cycle) - Main Oven 45 Main Oven 95.9 Energy Efficiency Class - Top Oven 0.75 Energy consumption with a standard load, conventional mode(kWh/cycle) - Top Oven 42 Volume (l) - product information sheet Trade Mark Zanussi Model ZPCNA4X1 944171731 Energy Efficiency index EEI - Top Oven 106.8 Energy Efficiency index EEI - Top Oven 0.78 Energy consumption with a standard load...
... load, conventional mode (kWh/cycle) - Main Oven 45 Main Oven 95.9 Energy Efficiency Class - Top Oven 0.75 Energy consumption with a standard load, conventional mode(kWh/cycle) - Top Oven 42 Volume (l) - product information sheet Trade Mark Zanussi Model ZPCNA4X1 944171731 Energy Efficiency index EEI - Top Oven 106.8 Energy Efficiency index EEI - Top Oven 0.78 Energy consumption with a standard load...


