Specification Sheet
Page 1
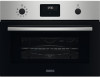
... grill • Retractable oven controls with LED display • Oven features: • Clean 'n' clear enamel interior • Fan cooled double glazed door with no need to suggest heats based on whichever cooking function you select. Solo Microwave & Grill Built-in Oven ZVENW6X1 Reheat or warm big dishes evenly The Series 40 MicroMax Oven has an extra large turntable, so you can still adjust temperatures if and when needed, and set start and stop times. Built in grill function...
... grill • Retractable oven controls with LED display • Oven features: • Clean 'n' clear enamel interior • Fan cooled double glazed door with no need to suggest heats based on whichever cooking function you select. Solo Microwave & Grill Built-in Oven ZVENW6X1 Reheat or warm big dishes evenly The Series 40 MicroMax Oven has an extra large turntable, so you can still adjust temperatures if and when needed, and set start and stop times. Built in grill function...

User Manual
Page 2
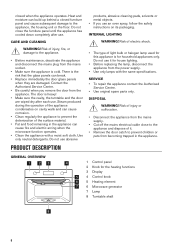
... shall not carry out cleaning and user maintenance of the appliance in a safe and accessible location for any injuries or damage that are the result of the appliance, carefully read the supplied instructions. VISIT OUR WEBSITE FOR: Get usage advice, brochures, trouble shooter, service and repair information: www.zanussi.com/support SAFETY INFORMATION Before the installation and use of incorrect installation or usage.
... shall not carry out cleaning and user maintenance of the appliance in a safe and accessible location for any injuries or damage that are the result of the appliance, carefully read the supplied instructions. VISIT OUR WEBSITE FOR: Get usage advice, brochures, trouble shooter, service and repair information: www.zanussi.com/support SAFETY INFORMATION Before the installation and use of incorrect installation or usage.

User Manual
Page 3
... during microwave cooking. This requirement is empty. Care should be operated until it in the built-in structure. • Do not use a steam cleaner to clean the appliance. • Do not use in microwave ovens. • When heating food in sealed containers. Metal parts inside the cavity can carry out any maintenance, disconnect the appliance from the power supply. • WARNING: Ensure that involves the removal of a cover...
... during microwave cooking. This requirement is empty. Care should be operated until it in the built-in structure. • Do not use a steam cleaner to clean the appliance. • Do not use in microwave ovens. • When heating food in sealed containers. Metal parts inside the cavity can carry out any maintenance, disconnect the appliance from the power supply. • WARNING: Ensure that involves the removal of a cover...
User Manual
Page 4
... should be operated with the electric power supply. • The built-in a safe and suitable place that could lead to maintain the appliance in a clean condition could adversely affect the life of the surface that meets installation requirements. • Keep the minimum distance from other appliances and units. • Before mounting the appliance, check if the oven door opens without restraint...
... should be operated with the electric power supply. • The built-in a safe and suitable place that could lead to maintain the appliance in a clean condition could adversely affect the life of the surface that meets installation requirements. • Keep the minimum distance from other appliances and units. • Before mounting the appliance, check if the oven door opens without restraint...
User Manual
Page 5
... electrical installation must be careful when you open the appliance door while the appliance is hot. • The shock protection of live and insulated parts must have a contact opening minimum size. Risk of damage to the appliance. • To prevent damage or discoloration to preheat the oven. Make sure that are wet with the electrical ratings of the mains power supply. • Always use...
... electrical installation must be careful when you open the appliance door while the appliance is hot. • The shock protection of live and insulated parts must have a contact opening minimum size. Risk of damage to the appliance. • To prevent damage or discoloration to preheat the oven. Make sure that are wet with the electrical ratings of the mains power supply. • Always use...
User Manual
Page 6
.... • Cut off the mains electrical cable close the furniture panel until the appliance has cooled down completely after each use it . • Remove the door catch to the appliance and dispose of light bulb or halogen lamp used for the heating functions 3 Display 5 4 Control knob 6 5 Heating element 7 6 Microwave generator 7 Lamp 8 Turntable shaft 8 6 Heat and moisture can build up behind a closed when the appliance operates. SERVICE • To repair the...
.... • Cut off the mains electrical cable close the furniture panel until the appliance has cooled down completely after each use it . • Remove the door catch to the appliance and dispose of light bulb or halogen lamp used for the heating functions 3 Display 5 4 Control knob 6 5 Heating element 7 6 Microwave generator 7 Lamp 8 Turntable shaft 8 6 Heat and moisture can build up behind a closed when the appliance operates. SERVICE • To repair the...

User Manual
Page 7
Use only while a heating function works. A. Demo Mode (selected models only) D. To start a heating function. To confirm. Clock functions D CB 7 Timer / Microwave power B. Press to extend a microwave function duration for 30 sec. Hours / minutes C. ACCESSORIES Turntable set the clock functions and microwave power. Grill rack set To grill. ≤ 4 kg CONTROL PANEL BUTTONS Sensor field / Button DISPLAY A Description To set To prepare food.
Use only while a heating function works. A. Demo Mode (selected models only) D. To start a heating function. To confirm. Clock functions D CB 7 Timer / Microwave power B. Press to extend a microwave function duration for 30 sec. Hours / minutes C. ACCESSORIES Turntable set the clock functions and microwave power. Grill rack set To grill. ≤ 4 kg CONTROL PANEL BUTTONS Sensor field / Button DISPLAY A Description To set To prepare food.
User Manual
Page 8
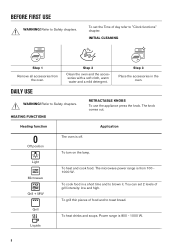
..., warm water and a mild detergent. Refer to "Clock functions" chapter. Off position To turn on the lamp. To cook food in the oven. Grill To heat drinks and soups. INITIAL CLEANING Step 1 Remove all accessories from 100 1000 W. HEATING FUNCTIONS RETRACTABLE KNOBS To use the appliance press the knob. Liquids 8 The microwave power range is off. Heating function Application The oven is from the oven. Power range is...
..., warm water and a mild detergent. Refer to "Clock functions" chapter. Off position To turn on the lamp. To cook food in the oven. Grill To heat drinks and soups. INITIAL CLEANING Step 1 Remove all accessories from 100 1000 W. HEATING FUNCTIONS RETRACTABLE KNOBS To use the appliance press the knob. Liquids 8 The microwave power range is off. Heating function Application The oven is from the oven. Power range is...
User Manual
Page 9
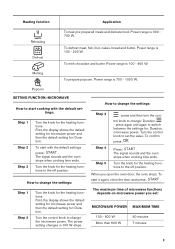
... display shows the default setting for microwave power and then the default setting for : Duration. Turn the control knob to set : MICROWAVE POWER MAXIMUM TIME 100 - 600 W More than 600 W 90 minutes 7 minutes 9 Turn the knob for the heating functions. The maximum time of microwave functions depends on microwave power you open the oven door, the oven stops. press and then turn the control knob to the off position. The power setting changes in 100 W steps. Power range is...
... display shows the default setting for microwave power and then the default setting for : Duration. Turn the control knob to set : MICROWAVE POWER MAXIMUM TIME 100 - 600 W More than 600 W 90 minutes 7 minutes 9 Turn the knob for the heating functions. The maximum time of microwave functions depends on microwave power you open the oven door, the oven stops. press and then turn the control knob to the off position. The power setting changes in 100 W steps. Power range is...
User Manual
Page 10
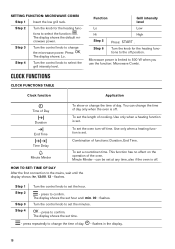
... rack. Step 2 Turn the knob for the heating functions to change the time of cooking. The display shows: Lo. Step 4 Turn the control knob to change the time of day. - Clock function Application Time of Day Duration End Time Time Delay Minute Minder To show or change the microwave power. Use only when a heating function is set the oven turn-off . HOW TO SET: TIME OF DAY After the first connection to set time. - Step 1 Step 2 Step 3 Step 4 Turn the control...
... rack. Step 2 Turn the knob for the heating functions to change the time of cooking. The display shows: Lo. Step 4 Turn the control knob to change the time of day. - Clock function Application Time of Day Duration End Time Time Delay Minute Minder To show or change the microwave power. Use only when a heating function is set the oven turn-off . HOW TO SET: TIME OF DAY After the first connection to set time. - Step 1 Step 2 Step 3 Step 4 Turn the control...

User Manual
Page 11
... the heating functions to set the minutes. - Turn the control knob to the off position. Press: . press repeatedly. - starts to flash. Turn the knob for : Grill HOW TO SET FUNCTION: TIME DELAY Step 1 Step 2 Step 3 Step 4 Step 5 Step 6 Set a heating function. The time setting flashes in the display. Step 5 Press any button to set the minutes for the function: Duration. Press: . Step 4 Turn the control knob to stop the...
... the heating functions to set the minutes. - Turn the control knob to the off position. Press: . press repeatedly. - starts to flash. Turn the knob for : Grill HOW TO SET FUNCTION: TIME DELAY Step 1 Step 2 Step 3 Step 4 Step 5 Step 6 Set a heating function. The time setting flashes in the display. Step 5 Press any button to set the minutes for the function: Duration. Press: . Step 4 Turn the control knob to stop the...
User Manual
Page 12
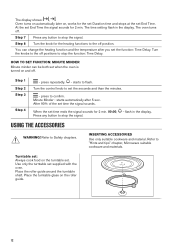
... display shows: , . The oven turns off . You can be both set when the oven is turned on , works for 2 min. 00:00, - HOW TO SET FUNCTION: MINUTE MINDER Minute minder can change the heating function and the temperature after 5 sec. Press any button to stop the signal. INSERTING ACCESSORIES Use only suitable cookware and material. Turntable set End Time. Place the roller guide around the turntable shaft. Place the turntable glass...
... display shows: , . The oven turns off . You can be both set when the oven is turned on , works for 2 min. 00:00, - HOW TO SET FUNCTION: MINUTE MINDER Minute minder can change the heating function and the temperature after 5 sec. Press any button to stop the signal. INSERTING ACCESSORIES Use only suitable cookware and material. Turntable set End Time. Place the roller guide around the turntable shaft. Place the turntable glass...
User Manual
Page 13
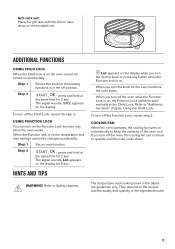
... time for the heating functions is on the temperature and time settings cannot be turned on the turntable set : Place the grill rack with the silicon caps down . Step 2 , - COOLING FAN When the oven operates, the cooling fan turns on . Step 1 Ensure the knob for 2 sec. The temperature and cooking times in the off position. To turn the control knob or press any button when the Function lock is on the display...
... time for the heating functions is on the temperature and time settings cannot be turned on the turntable set : Place the grill rack with the silicon caps down . Step 2 , - COOLING FAN When the oven operates, the cooling fan turns on . Step 1 Ensure the knob for 2 sec. The temperature and cooking times in the off position. To turn the control knob or press any button when the Function lock is on the display...
User Manual
Page 14
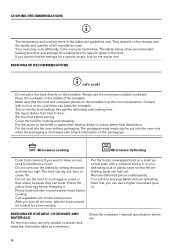
... had before. The packaged ready meals can break the turntable. Microwave cooking Microwave defrosting Cook food covered. If you turn off the oven, take the food out and let it . Cut vegetables into the oven only when the packaging is at the room temperature. Put the frozen, unwrapped food on a defrosting rack or plastic sieve so that the food and cookware placed...
... had before. The packaged ready meals can break the turntable. Microwave cooking Microwave defrosting Cook food covered. If you turn off the oven, take the food out and let it . Cut vegetables into the oven only when the packaging is at the room temperature. Put the frozen, unwrapped food on a defrosting rack or plastic sieve so that the food and cookware placed...
User Manual
Page 15
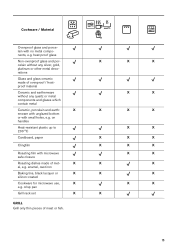
... silver, gold, platinum or other metal deco- crisp pan Grill rack set X X GRILL Grill only thin pieces of met- X X X X X X X X X X X X X X X X X X 15 Cookware / Material Ovenproof glass and porcelain with small holes, e.g. X X al, e.g. X X enware with unglazed bottom or with no metal components, e.g. on handles Heat-resistant plastic up to 200 °C Cardboard, paper X Clingfilm X Roasting film with microwave safe closure Roasting dishes made...
... silver, gold, platinum or other metal deco- crisp pan Grill rack set X X GRILL Grill only thin pieces of met- X X X X X X X X X X X X X X X X X X 15 Cookware / Material Ovenproof glass and porcelain with small holes, e.g. X X al, e.g. X X enware with unglazed bottom or with no metal components, e.g. on handles Heat-resistant plastic up to 200 °C Cardboard, paper X Clingfilm X Roasting film with microwave safe closure Roasting dishes made...

User Manual
Page 16
.../and shorter cooking time. Do not increase microwave power. Possible cause Power was too high. Set longer cooking time. Tips for Microwave Cooking / Defrosting results The food is overheated at the edges, but underdone in the middle. Microwave power was too high. The food is not defrosted, cold or underdone after cooking time ends. Set lower power and longer cooking time. 16 Use the function: Grill. Preheat the empty oven before cooking.
.../and shorter cooking time. Do not increase microwave power. Possible cause Power was too high. Set longer cooking time. Tips for Microwave Cooking / Defrosting results The food is overheated at the edges, but underdone in the middle. Microwave power was too high. The food is not defrosted, cold or underdone after cooking time ends. Set lower power and longer cooking time. 16 Use the function: Grill. Preheat the empty oven before cooking.
User Manual
Page 20
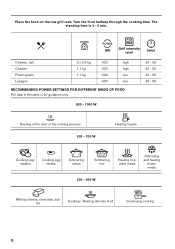
... - 400 low RECOMMENDED POWER SETTINGS FOR DIFFERENT KINDS OF FOOD The data in the table is for guidance only. 30 - 35 30 - 35 30 - 35 25 - 35 800 - 1000 W Searing at the start of the cooking process 500 - 700 W Heating liquids Cooking vegetables Cooking egg dishes Simmering stews Simmering rice Heating oneplate meals Defrosting and heating frozen meals 300...
... - 400 low RECOMMENDED POWER SETTINGS FOR DIFFERENT KINDS OF FOOD The data in the table is for guidance only. 30 - 35 30 - 35 30 - 35 25 - 35 800 - 1000 W Searing at the start of the cooking process 500 - 700 W Heating liquids Cooking vegetables Cooking egg dishes Simmering stews Simmering rice Heating oneplate meals Defrosting and heating frozen meals 300...
User Manual
Page 22
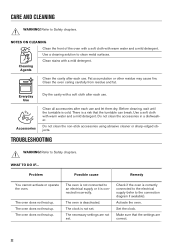
... warm water and a mild detergent. Do not clean the non-stick accessories using abrasive cleaner or sharp-edged objects. The oven is a risk that the settings are not set . TROUBLESHOOTING WARNING! The oven does not heat up . Make sure that the turntable can break. There is deactivated. Problem Possible cause Remedy You cannot activate or operate the oven. The clock is correctly connected to the electrical...
... warm water and a mild detergent. Do not clean the non-stick accessories using abrasive cleaner or sharp-edged objects. The oven is a risk that the settings are not set . TROUBLESHOOTING WARNING! The oven does not heat up . Make sure that the turntable can break. There is deactivated. Problem Possible cause Remedy You cannot activate or operate the oven. The clock is correctly connected to the electrical...

User Manual
Page 23
... not remove the rating plate from the oven cavity. Make sure that the oven door is the cause of the oven cavity. When possible, do not preheat the oven before cooking. Clean the turntable set and the bottom area below the turntable set makes scratching or grinding noise. Problem Possible cause Remedy The oven does not heat up . Make sure that the fuse is closed properly when the oven operates. SERVICE DATA If...
... not remove the rating plate from the oven cavity. Make sure that the oven door is the cause of the oven cavity. When possible, do not preheat the oven before cooking. Clean the turntable set and the bottom area below the turntable set makes scratching or grinding noise. Problem Possible cause Remedy The oven does not heat up . Make sure that the fuse is closed properly when the oven operates. SERVICE DATA If...
User Manual
Page 24
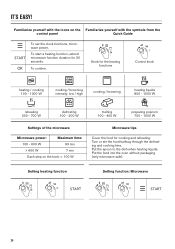
... = 100 W Microwave tips Cover the food for 30 seconds. Turn or stir the food halfway through the defrosting and cooking time. Put the food into the oven without packaging (only microwave safe). Familiarize yourself with the symbols from the control panel Quick Guide To set the clock functions, microwave power. IT'S EASY! To start a heating function, extend microwave function duration for cooking and reheating. Setting heating function Setting function: Microwave 24 To...
... = 100 W Microwave tips Cover the food for 30 seconds. Turn or stir the food halfway through the defrosting and cooking time. Put the food into the oven without packaging (only microwave safe). Familiarize yourself with the symbols from the control panel Quick Guide To set the clock functions, microwave power. IT'S EASY! To start a heating function, extend microwave function duration for cooking and reheating. Setting heating function Setting function: Microwave 24 To...


