
Operating Guide
Page 1
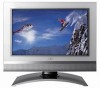
Operating Guide | Warranty Model Numbers | L17W36, L23W36 | LCD TV/Monitor © Copyright 2004, LG Electronics USA, Inc.
Operating Guide | Warranty Model Numbers | L17W36, L23W36 | LCD TV/Monitor © Copyright 2004, LG Electronics USA, Inc.

Operating Guide
Page 2
... a risk of the building, as close to modify this product. NOTE TO CABLE/TV INSTALLER: This reminder is connected. - Connect the equipment into an outlet on , the user is : Zenith Electronics Corporation 1-201-816-2000 Marked and Distributed in the literature accompanying the appliance....CATV system installer's attention to correct the interference by LG Electronics U.S.A., Inc. 1000 Sylvan Avenue, Englewood Cliffs, NJ 07632 http://www.zenith.com 2 REFER TO QUALIFIED SERVICE PERSONNEL. Warning Warning CAUTION RISK OF ELECTRIC SHOCK DO NOT OPEN WARNING: TO REDUCE THE RISK ...
... a risk of the building, as close to modify this product. NOTE TO CABLE/TV INSTALLER: This reminder is connected. - Connect the equipment into an outlet on , the user is : Zenith Electronics Corporation 1-201-816-2000 Marked and Distributed in the literature accompanying the appliance....CATV system installer's attention to correct the interference by LG Electronics U.S.A., Inc. 1000 Sylvan Avenue, Englewood Cliffs, NJ 07632 http://www.zenith.com 2 REFER TO QUALIFIED SERVICE PERSONNEL. Warning Warning CAUTION RISK OF ELECTRIC SHOCK DO NOT OPEN WARNING: TO REDUCE THE RISK ...
Operating Guide
Page 5
... Setup 21 On/Off Timer Setup 22 Sleep Timer Setup 22 Special Menu Options Closed Captions 23 Captions 24 Caption/Text 24 Key Lock 24 Auto Off 24 Lock Menu Options Lock Menu Setup...19 AVL (Auto Volume Leveler 19 Sound Selection in -Picture) Feature Watching PIP/Double Window 28 TV Program Selection for PIP 28 Using PIP Still Function 28 PIP Size 28 Moving the PIP 28 ...of-Picture: Channel Scan) . . .29 Troubleshooting Checklist 30 Maintenance 31 Product Specifications 31 Your Zenith Limited Warranty Back Cover After reading this manual, keep it handy for future reference. 5
... Setup 21 On/Off Timer Setup 22 Sleep Timer Setup 22 Special Menu Options Closed Captions 23 Captions 24 Caption/Text 24 Key Lock 24 Auto Off 24 Lock Menu Options Lock Menu Setup...19 AVL (Auto Volume Leveler 19 Sound Selection in -Picture) Feature Watching PIP/Double Window 28 TV Program Selection for PIP 28 Using PIP Still Function 28 PIP Size 28 Moving the PIP 28 ...of-Picture: Channel Scan) . . .29 Troubleshooting Checklist 30 Maintenance 31 Product Specifications 31 Your Zenith Limited Warranty Back Cover After reading this manual, keep it handy for future reference. 5

Operating Guide
Page 6
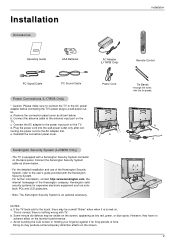
Introduction Introduction L17W36 Controls & Connection Options Menu Button Channel Button Enter Button TV/Video Button Volume Button On/Off Button on/off tv/video menu enter vol ch Headphone Jack S-Video Input Video Input Audio Input S-VIDEO IN 2 R MONO ST SAP DPM STEREO Mono ...Indicator SAP Indicator Stereo Indicator DPM Indicator Power/Standby Indicator Glows red in Standby mode, Glows green when the TV is turned on. Remote Control Sensor VIDEO L / MONO AUDIO R DC IN (15V) Y PB PR LR COMPONENT(480i/480p/720p/1080i) AUDIO ...
Introduction Introduction L17W36 Controls & Connection Options Menu Button Channel Button Enter Button TV/Video Button Volume Button On/Off Button on/off tv/video menu enter vol ch Headphone Jack S-Video Input Video Input Audio Input S-VIDEO IN 2 R MONO ST SAP DPM STEREO Mono ...Indicator SAP Indicator Stereo Indicator DPM Indicator Power/Standby Indicator Glows red in Standby mode, Glows green when the TV is turned on. Remote Control Sensor VIDEO L / MONO AUDIO R DC IN (15V) Y PB PR LR COMPONENT(480i/480p/720p/1080i) AUDIO ...

Operating Guide
Page 7
Introduction L23W36 Controls & Connection Options R MONO ST SAP DPM STEREO Mono Indicator SAP Indicator Stereo Indicator DPM Indicator Power/Standby Indicator Glows red in Standby mode, Glows green when the TV is turned on /off Channel Buttons Volume Buttons Enter Button Menu Button TV·Video Button On/Off Button * Kensington Security System Connector... / Video Input PC Input DVD/DTV Input (Component (480i/480p/720p/1080i), Audio) PC Sound Input Antenna Input 7 Remote Control Sensor ch vol enter menu tv video / I on .
Introduction L23W36 Controls & Connection Options R MONO ST SAP DPM STEREO Mono Indicator SAP Indicator Stereo Indicator DPM Indicator Power/Standby Indicator Glows red in Standby mode, Glows green when the TV is turned on /off Channel Buttons Volume Buttons Enter Button Menu Button TV·Video Button On/Off Button * Kensington Security System Connector... / Video Input PC Input DVD/DTV Input (Component (480i/480p/720p/1080i), Audio) PC Sound Input Antenna Input 7 Remote Control Sensor ch vol enter menu tv video / I on .

Operating Guide
Page 8
... D / E (Channel button) VOL F / G (Volume button) VIDEO (Refer to p.17) CC (Refer to p.24) FLASHBK Press the FLASHBK button to return to p.28 ~ 29) mute power tv/video multimedia mts fcr exit menu ch enter vol vol ch 123 456 78 audio 0 9 video arc pip cc position pip input flashbk size pip..., or RGB-PC mode. Don't mix used batteries with correct polarity. • Install two 1.5V batteries of AAA type. MUTE Switches the sound on the TV. FCR (Refer to p.16) EXIT NUMBER buttons AUDIO (Refer to p.19) ARC (Refer to p.18) PIP POSITION PIP INPUT SIZE PIP SWAP STILL SCAN CH...
... D / E (Channel button) VOL F / G (Volume button) VIDEO (Refer to p.17) CC (Refer to p.24) FLASHBK Press the FLASHBK button to return to p.28 ~ 29) mute power tv/video multimedia mts fcr exit menu ch enter vol vol ch 123 456 78 audio 0 9 video arc pip cc position pip input flashbk size pip..., or RGB-PC mode. Don't mix used batteries with correct polarity. • Install two 1.5V batteries of AAA type. MUTE Switches the sound on the TV. FCR (Refer to p.16) EXIT NUMBER buttons AUDIO (Refer to p.19) ARC (Refer to p.18) PIP POSITION PIP INPUT SIZE PIP SWAP STILL SCAN CH...
Operating Guide
Page 9
... System (L23W36 Only) - For further information, contact http://www.kensington.com, the internet homepage of the Kensington Security System, refer to the power input port on the back panel. For the detailed installation and use of the Kensington company. Note: The Kensington Security System is equipped with TV. c. e. Avoid touching the LCD screen or...
... System (L23W36 Only) - For further information, contact http://www.kensington.com, the internet homepage of the Kensington Security System, refer to the power input port on the back panel. For the detailed installation and use of the Kensington company. Note: The Kensington Security System is equipped with TV. c. e. Avoid touching the LCD screen or...

Operating Guide
Page 10
...back as necessary. c. You can be conveniently swiveled on the TV stand. Align the holes on the TV back panel with the two tabs on the Wall - Thread, then pull the wires through the hole on its stand 25° (L23W36) / 30°(L17W36) to the left or right to ...provide the optimum viewing angle. Reinstall the cover. a. Remove the cover. Installation Installation Instruction Rear A/V Cover * The connection panel is available for this TV, see your dealer.
...back as necessary. c. You can be conveniently swiveled on the TV stand. Align the holes on the TV back panel with the two tabs on the Wall - Thread, then pull the wires through the hole on its stand 25° (L23W36) / 30°(L17W36) to the left or right to ...provide the optimum viewing angle. Reinstall the cover. a. Remove the cover. Installation Installation Instruction Rear A/V Cover * The connection panel is available for this TV, see your dealer.
Operating Guide
Page 11
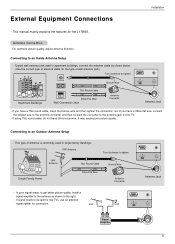
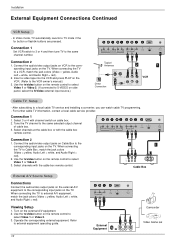
.... VHF Antenna Turn clockwise to an Inside Antenna Setup - UHF Antenna 75Ω Round Cable Bronze Wire Single Family Home 300Ω Flat Wire Antenna Converter PC INPUT ANT IN +75 Ω Antenna Jack - It may cause poor picture quality. Connecting to tighten. Typical...In poor signal areas, to get better picture quality, install a signal amplifier to the antenna jack on the TV. - Bronze Wire PC INPUT ANT IN +75 Ω Apartment Buildings 75Ω Round Cable 300Ω Flat Wire Wall Connection Jack Antenna Converter Antenna Jack - Antenna Connection -
.... VHF Antenna Turn clockwise to an Inside Antenna Setup - UHF Antenna 75Ω Round Cable Bronze Wire Single Family Home 300Ω Flat Wire Antenna Converter PC INPUT ANT IN +75 Ω Antenna Jack - It may cause poor picture quality. Connecting to tighten. Typical...In poor signal areas, to get better picture quality, install a signal amplifier to the antenna jack on the TV. - Bronze Wire PC INPUT ANT IN +75 Ω Apartment Buildings 75Ω Round Cable 300Ω Flat Wire Wall Connection Jack Antenna Converter Antenna Jack - Antenna Connection -
Operating Guide
Page 12
... the remote control to S-VIDEO on the remote control to select Video 1 or Video 2. (If connected to select Video 1 or Video 2. 3. Use the tv/video button on side panel, select the S-Video external input source.) Y PB PR LR COMPONENT(480i/480p/720p/1080i) AUDIO DVD/DTV IN VIDEO (MONO) L AUDIO R VIDEO IN...
... the remote control to S-VIDEO on the remote control to select Video 1 or Video 2. (If connected to select Video 1 or Video 2. 3. Use the tv/video button on side panel, select the S-Video external input source.) Y PB PR LR COMPONENT(480i/480p/720p/1080i) AUDIO DVD/DTV IN VIDEO (MONO) L AUDIO R VIDEO IN...
Operating Guide
Page 13
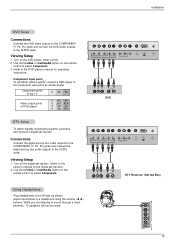
...; Component Input ports To get better picture quality, connect a DVD player to sound through a headphone(s), TV speakers will not be heard. Use the tv/video or multimedia button on the digital set -top box.) 2. Use the tv/video or multimedia button on the DVD player, insert a DVD. 2. To watch digitally broadcast programs, purchase... Connect the DVD video outputs to the COMPONENT (Y, PB, PR) jacks and connect the DVD audio outputs to the AUDIO jacks. Component ports of the TV Y PB PR Video output ports of DVD player Y Pb Pr Y B-Y R-Y Y Cb Cr Y PB PR DTV Setup -
...; Component Input ports To get better picture quality, connect a DVD player to sound through a headphone(s), TV speakers will not be heard. Use the tv/video or multimedia button on the digital set -top box.) 2. Use the tv/video or multimedia button on the DVD player, insert a DVD. 2. To watch digitally broadcast programs, purchase... Connect the DVD video outputs to the COMPONENT (Y, PB, PR) jacks and connect the DVD audio outputs to the AUDIO jacks. Component ports of the TV Y PB PR Video output ports of DVD player Y Pb Pr Y B-Y R-Y Y Cb Cr Y PB PR DTV Setup -
Operating Guide
Page 14
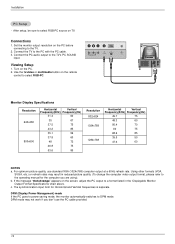
... result in the 'Displayable Monitor Output Format Specifications' chart above. Set the monitor output resolution on the screen, adjust the PC output to the TV. 2. Connect the PC audio output to the PC with the PC cable. 3. For optimum picture quality, use the PC cable provided. 14 ...Setup 1. DPM (Display Power Management) mode If the PC goes to power saving mode, the monitor automatically switches to select RGB-PC source on TV. Turn on the remote control to the operating manual for Horizontal and Vertical frequencies is separate. After setup, be sure to DPM mode. Connections 1....
... result in the 'Displayable Monitor Output Format Specifications' chart above. Set the monitor output resolution on the screen, adjust the PC output to the TV. 2. Connect the PC audio output to the PC with the PC cable. 3. For optimum picture quality, use the PC cable provided. 14 ...Setup 1. DPM (Display Power Management) mode If the PC goes to power saving mode, the monitor automatically switches to select RGB-PC source on TV. Turn on the remote control to the operating manual for Horizontal and Vertical frequencies is separate. After setup, be sure to DPM mode. Connections 1....

Operating Guide
Page 15
...shown on vacation, disconnect the power plug from the wall power outlet. First select your choice. 4. Use the F / G button to standby mode. The TV reverts to select your local broadcast area. 3. If you intend to select the Special menu. 2. Press the menu button and then use D / E button... page 16 if you want to select Language. 3. First, make all equipment connections. NOTE • If you have not auto programmed the TV to TV viewing. Special Captions Caption / Text Key lock Auto off located on -screen menus will be away on the screen in the language of your...
...shown on vacation, disconnect the power plug from the wall power outlet. First select your choice. 4. Use the F / G button to standby mode. The TV reverts to select your local broadcast area. 3. If you intend to select the Special menu. 2. Press the menu button and then use D / E button... page 16 if you want to select Language. 3. First, make all equipment connections. NOTE • If you have not auto programmed the TV to TV viewing. Special Captions Caption / Text Key lock Auto off located on -screen menus will be away on the screen in the language of your...
Operating Guide
Page 16
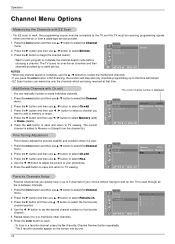
...function will remain. • EZ Scan function can manually include or erase individual channels. 1. Channel EZ Scan Ch.edit Favorite ch. Channel TV 30 Memory/Erase Memory Fine 0 DE F G Â 0-9 MENU EXIT Fine Tuning Adjustment - Press the menu button and then use ...D / E button to 5 channels of your preference. 5. Channel TV 30 Memory/Erase Memory Fine 0 DE F G Â MENU EXIT Favorite Channels Setup - Add/Delete Channels with EZ Scan - Operation Channel Menu ...
...function will remain. • EZ Scan function can manually include or erase individual channels. 1. Channel EZ Scan Ch.edit Favorite ch. Channel TV 30 Memory/Erase Memory Fine 0 DE F G Â 0-9 MENU EXIT Fine Tuning Adjustment - Press the menu button and then use ...D / E button to 5 channels of your preference. 5. Channel TV 30 Memory/Erase Memory Fine 0 DE F G Â MENU EXIT Favorite Channels Setup - Add/Delete Channels with EZ Scan - Operation Channel Menu ...
Operating Guide
Page 17
...EZ Video in the Picture menu. • Clear, Optimum and Soft are adjustable from 0 to 100. • Tint is adjustable from Red 50 to TV viewing. To initialize values (reset to select either Normal (Default), Warm (Preset), DRP Clear Blue 50 User (Manual Adjustment) or Cool (Preset). 4. ...prefer. 1. Press the exit button to save and return to select the Picture menu. 2. Press the G button and then use D / E button to TV viewing. Press the video button repeatedly to select EZ Video 3. Operation Manual Picture Control (User option) - Press the G button and then use D / ...
...EZ Video in the Picture menu. • Clear, Optimum and Soft are adjustable from 0 to 100. • Tint is adjustable from Red 50 to TV viewing. To initialize values (reset to select either Normal (Default), Warm (Preset), DRP Clear Blue 50 User (Manual Adjustment) or Cool (Preset). 4. ...prefer. 1. Press the exit button to save and return to select the Picture menu. 2. Press the G button and then use D / E button to TV viewing. Press the video button repeatedly to select EZ Video 3. Operation Manual Picture Control (User option) - Press the G button and then use D / ...

Operating Guide
Page 18
... or Blue. 4. Press the enter button and then use D / E button to select the desired picture format. Press the exit button to save and return to TV viewing. DE F G Â MENU EXIT DRP (Digital Reality picture) - Use the F / G button to select the Picture menu. 2. Press the exit button to save and ... 5. EZ Video User Red 50 2. Operation Picture Menu Options Continued Manual Color Temperature Control (User option) - Press the menu button and then use D / E button to TV viewing. Press the menu button and then use D / E button to select Clear or Soft. 4.
... or Blue. 4. Press the enter button and then use D / E button to select the desired picture format. Press the exit button to save and return to TV viewing. DE F G Â MENU EXIT DRP (Digital Reality picture) - Use the F / G button to select the Picture menu. 2. Press the exit button to save and ... 5. EZ Video User Red 50 2. Operation Picture Menu Options Continued Manual Color Temperature Control (User option) - Press the menu button and then use D / E button to TV viewing. Press the menu button and then use D / E button to select Clear or Soft. 4.

Operating Guide
Page 19
...1. Press the menu button and then use D / E button to select Balance. 3. Sound Balance 1. Press the G button and then use D / E button to TV viewing. Press the exit button to save and return to select the Sound menu. 2. AVL maintains an equal volume level automatically even if the channel...Audio Balance AVL Sound select User 0 Off RGB-PC Equalizer DE F G Â 0.1 0.5 1.0 5.0 10 kHz MENU EXIT Sound EZ Audio Balance AVL Sound select Flat 0 Off RGB-PC DE F G Â MENU EXIT AVL (Auto Volume Leveler) - Sound Menu Options Operation EZ Audio - Use the audio button to select On ...
...1. Press the menu button and then use D / E button to select Balance. 3. Sound Balance 1. Press the G button and then use D / E button to TV viewing. Press the exit button to save and return to select the Sound menu. 2. AVL maintains an equal volume level automatically even if the channel...Audio Balance AVL Sound select User 0 Off RGB-PC Equalizer DE F G Â 0.1 0.5 1.0 5.0 10 kHz MENU EXIT Sound EZ Audio Balance AVL Sound select Flat 0 Off RGB-PC DE F G Â MENU EXIT AVL (Auto Volume Leveler) - Sound Menu Options Operation EZ Audio - Use the audio button to select On ...

Operating Guide
Page 20
Use the F / G button to TV viewing. The TV can receive MTS stereo programs and any SAP (Secondary Audio Program) that accompanies the stereo program, if the broadcaster transmits an additional sound signal as ... and then use D / E button to select the Sound menu. 2. Signal mode is not clear or in PC mode - Sound EZ Audio Balance AVL Sound select Flat 0 Off RGB-PC DE F G Â MENU EXIT Stereo/SAP Broadcasts Setup - Stereo: The primary language is heard from left and right speakers. Press the menu...
Use the F / G button to TV viewing. The TV can receive MTS stereo programs and any SAP (Secondary Audio Program) that accompanies the stereo program, if the broadcaster transmits an additional sound signal as ... and then use D / E button to select the Sound menu. 2. Signal mode is not clear or in PC mode - Sound EZ Audio Balance AVL Sound select Flat 0 Off RGB-PC DE F G Â MENU EXIT Stereo/SAP Broadcasts Setup - Stereo: The primary language is heard from left and right speakers. Press the menu...
Operating Guide
Page 21
... / E button to select Clock. 3. If the time on whether or not your viewing area. Press the G button and then use D / E button to TV viewing. Press the exit button to save and return to set PBS channel. 6. Press the G button and then use D / E button to...clock is set the minutes. 6. The time is incorrect, reset the clock manually. 1. Press the G button and then use D / E button to select Manual. 4. TV 1 D.S.T. Press the G button and then use D / E button to select the time zone for the correct time and daylight saving time. 1. Auto 5. Time Menu ...
... / E button to select Clock. 3. If the time on whether or not your viewing area. Press the G button and then use D / E button to TV viewing. Press the exit button to save and return to set PBS channel. 6. Press the G button and then use D / E button to...clock is set the minutes. 6. The time is incorrect, reset the clock manually. 1. Press the G button and then use D / E button to select Manual. 4. TV 1 D.S.T. Press the G button and then use D / E button to select the time zone for the correct time and daylight saving time. 1. Auto 5. Time Menu ...

Operating Guide
Page 22
... E button to select Run or Hold. • Hold: Off timer/On timer will automatically revert to standby mode. 1. To check the remaining minutes before the TV turns off at turn -on . Then, press the G button and then use D / E button to select the number of minutes selected. 3. Press the... exit button to save and return to the same time. - The Sleep Timer turns the TV off , press the sleep button once. 4. Press the sleep button repeatedly to set the turn -on sound level. 6. First the z-z-- option appears on...
... E button to select Run or Hold. • Hold: Off timer/On timer will automatically revert to standby mode. 1. To check the remaining minutes before the TV turns off at turn -on . Then, press the G button and then use D / E button to select the number of minutes selected. 3. Press the... exit button to save and return to the same time. - The Sleep Timer turns the TV off , press the sleep button once. 4. Press the sleep button repeatedly to set the turn -on sound level. 6. First the z-z-- option appears on...


