
Operating Guide
Page 2
... National Electric Code (U.S.A.). This equipment generates, uses and can be connected to the grounding system of the building, as practical. Consult the dealer or an experienced radio/TV technician for a Class B digital device, pursuant to persons. NO USER SERVICEABLE PARTS INSIDE. However, there is provided to call the CATV system installer's attention to comply with the limits for help. REGULATORY...
... National Electric Code (U.S.A.). This equipment generates, uses and can be connected to the grounding system of the building, as practical. Consult the dealer or an experienced radio/TV technician for a Class B digital device, pursuant to persons. NO USER SERVICEABLE PARTS INSIDE. However, there is provided to call the CATV system installer's attention to comply with the limits for help. REGULATORY...

Operating Guide
Page 3
... the third prong is provided for replacement of the obsolete outlet. 10. Protect the power cord from being walked on the apparatus. CAUTION : These servicing instructions are qualified to dripping or splashing and no objects filled with one wider than that produce heat. 9. Install in the operating instructions unless you are for use the attachments / accessories specified by qualified...
... the third prong is provided for replacement of the obsolete outlet. 10. Protect the power cord from being walked on the apparatus. CAUTION : These servicing instructions are qualified to dripping or splashing and no objects filled with one wider than that produce heat. 9. Install in the operating instructions unless you are for use the attachments / accessories specified by qualified...

Operating Guide
Page 5
... Connection 11 VCR Setup 12 Cable TV Setup 12 External A/V Source Setup 13 DVD Setup 13 DTV Setup 14 PC Setup 14 Operation TV Operation Overview 15 Menu Language Selection 15 Channel Menu Options Memorizing the Channels with EZ Scan . . . . . .16 Add/Delete Channels with Manual Program . . .16 Favorite Channels Setup 17 Picture Menu Options EZ Video 18 Manual Picture Control (User option 18 Cinema Mode Setup 18 Picture Format (ARC 18 Sound Menu Options EZ Audio 19 Equalizer Adjustments 19 AVL (Auto Volume Leveler 19 Sound Balance 20 Stereo/SAP Broadcasts Setup 20 Time Menu...
... Connection 11 VCR Setup 12 Cable TV Setup 12 External A/V Source Setup 13 DVD Setup 13 DTV Setup 14 PC Setup 14 Operation TV Operation Overview 15 Menu Language Selection 15 Channel Menu Options Memorizing the Channels with EZ Scan . . . . . .16 Add/Delete Channels with Manual Program . . .16 Favorite Channels Setup 17 Picture Menu Options EZ Video 18 Manual Picture Control (User option 18 Cinema Mode Setup 18 Picture Format (ARC 18 Sound Menu Options EZ Audio 19 Equalizer Adjustments 19 AVL (Auto Volume Leveler 19 Sound Balance 20 Stereo/SAP Broadcasts Setup 20 Time Menu...

Operating Guide
Page 7
Introduction Connection Options 2 S-Video Input COMPONENT2 (DVD IN) (480i) Z23LZ5R only Audio Input 1 PC Sound Input DVI Input (RGB Input) Video/Audio Input Antenna Input RS 232C Jack Remote Control Jack COMPONENT1 (DVD/DTV IN) ((480i/480p/720p/1080i), Audio) AC Input 7
Introduction Connection Options 2 S-Video Input COMPONENT2 (DVD IN) (480i) Z23LZ5R only Audio Input 1 PC Sound Input DVI Input (RGB Input) Video/Audio Input Antenna Input RS 232C Jack Remote Control Jack COMPONENT1 (DVD/DTV IN) ((480i/480p/720p/1080i), Audio) AC Input 7

Operating Guide
Page 8
... through picture appearance settings (Clear, Optimum, Soft, and User). FLASHBK Press the FLASHBK button to return to page 18. Installing Batteries 8 • Open the battery compartment cover on the TV. MUTE Switches the sound on or off. Refer to the last channel you were watching. MENU ENTER CH D / E (Channel button) VOL F / G (Volume button) VIDEO Press to step through audio signal settings (Mono, MTS Stereo, and SAP). TV/VIDEO Selects: TV, Video, S-Video, PC , Component 1 or Component 2 mode. Introduction Remote Control...
... through picture appearance settings (Clear, Optimum, Soft, and User). FLASHBK Press the FLASHBK button to return to page 18. Installing Batteries 8 • Open the battery compartment cover on the TV. MUTE Switches the sound on or off. Refer to the last channel you were watching. MENU ENTER CH D / E (Channel button) VOL F / G (Volume button) VIDEO Press to step through audio signal settings (Mono, MTS Stereo, and SAP). TV/VIDEO Selects: TV, Video, S-Video, PC , Component 1 or Component 2 mode. Introduction Remote Control...

Operating Guide
Page 11
For optimum picture quality, adjust antenna direction. If you have a 300Ω flat wire, connect the twisted wire to the antenna converter and then connect the converter to tighten. It may cause poor picture quality. VHF Antenna Turn clockwise to the antenna jack on the TV. - VHF UHF Antenna Jack Signal Amplifier 11 Connecting to an Outdoor Antenna Setup - Copper Wire Apartment Buildings 75Ω Round Cable 300Ω Flat Wire Wall Connection Jack Antenna Converter Antenna Jack - If...
For optimum picture quality, adjust antenna direction. If you have a 300Ω flat wire, connect the twisted wire to the antenna converter and then connect the converter to tighten. It may cause poor picture quality. VHF Antenna Turn clockwise to the antenna jack on the TV. - VHF UHF Antenna Jack Signal Amplifier 11 Connecting to an Outdoor Antenna Setup - Copper Wire Apartment Buildings 75Ω Round Cable 300Ω Flat Wire Wall Connection Jack Antenna Converter Antenna Jack - If...
Operating Guide
Page 12
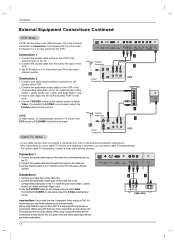
...Connection 2 1. Connect the audio/video output jacks on the TV, match the jack colors (Video = yellow, Audio Left = white, and Audio Right = red). 3. Use the TV/VIDEO button on the remote control to the corresponding input jacks on the cable box to select Video. Set VCR switch to 3 or 4 and then tune TV to a local cable TV service and installing a converter, you use those connections for the best quality picture. After subscribing to the same channel number. Connect your cable and/or antenna connection to view input from the wall to each device, the DVI cable plus the red...
...Connection 2 1. Connect the audio/video output jacks on the TV, match the jack colors (Video = yellow, Audio Left = white, and Audio Right = red). 3. Use the TV/VIDEO button on the remote control to the corresponding input jacks on the cable box to select Video. Set VCR switch to 3 or 4 and then tune TV to a local cable TV service and installing a converter, you use those connections for the best quality picture. After subscribing to the same channel number. Connect your cable and/or antenna connection to view input from the wall to each device, the DVI cable plus the red...
Operating Guide
Page 13
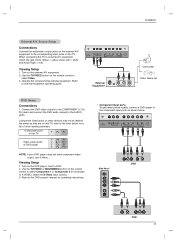
...External Equipment R AUDIO L VIDEO Video Game set DVD Setup Connections 1. Use the TV/VIDEO button on the remote control to select Component 1 or Component 2 (If connected to S-VIDEO, select the S-Video input source.) 3. Viewing Setup 1. Component ports of the TV Y PB PR Video output ports of other devices may not be labeled the same as shown below for operating instructions. • Component Input ports To get better picture quality, connect a DVD player to external A/V equipment, match the jack colors (Video = yellow, Audio Left = white, and Audio Right = red). Operate...
...External Equipment R AUDIO L VIDEO Video Game set DVD Setup Connections 1. Use the TV/VIDEO button on the remote control to select Component 1 or Component 2 (If connected to S-VIDEO, select the S-Video input source.) 3. Viewing Setup 1. Component ports of the TV Y PB PR Video output ports of other devices may not be labeled the same as shown below for operating instructions. • Component Input ports To get better picture quality, connect a DVD player to external A/V equipment, match the jack colors (Video = yellow, Audio Left = white, and Audio Right = red). Operate...
Operating Guide
Page 14
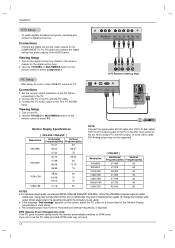
... digital set -top box audio outputs to the PC with DVI output. DPM (Display Power Management) mode If the PC goes to power saving mode, the monitor automatically switches to the TV. 2. Connections Connect the digital set-top box video outputs to the COMPONENT (Y, PB, PR) jacks and connect the digital set -top box.) 2. PC Setup - Connections 1. Connect the TV to the AUDIO jacks. Turn on the digital set-top box. (Refer to the DVI input socket of the PC to the owner's manual for Horizontal and Vertical frequencies is separate. Viewing Setup 1. Using other formats (VGA...
... digital set -top box audio outputs to the PC with DVI output. DPM (Display Power Management) mode If the PC goes to power saving mode, the monitor automatically switches to the TV. 2. Connections Connect the digital set-top box video outputs to the COMPONENT (Y, PB, PR) jacks and connect the digital set -top box.) 2. PC Setup - Connections 1. Connect the TV to the AUDIO jacks. Turn on the digital set-top box. (Refer to the DVI input socket of the PC to the owner's manual for Horizontal and Vertical frequencies is separate. Viewing Setup 1. Using other formats (VGA...

Operating Guide
Page 16
... a cable-type service provider. 1. Press the G button to select the Channel menu. 2. The TV scans for auto program to the TV and the TV must be connected to complete the channel search cycle before choosing a channel. Press the E button and then use D / E button to select Memory (add) or Erase (delete). 5. To start • Wait for over -the-air or from the channel list. TV 30 Memory D E FG OK MENU Â EXIT 16 For Auto program to work...
... a cable-type service provider. 1. Press the G button to select the Channel menu. 2. The TV scans for auto program to the TV and the TV must be connected to complete the channel search cycle before choosing a channel. Press the E button and then use D / E button to select Memory (add) or Erase (delete). 5. To start • Wait for over -the-air or from the channel list. TV 30 Memory D E FG OK MENU Â EXIT 16 For Auto program to work...

Operating Guide
Page 17
... to select the first favorite channel position. 4. Press the MENU button and then use D / E button to wait for first favorite channel. 5. Use the F / G button to memorize other channels. 6. Favorite Channel lets you quickly tune in -between channels. Press the G button and then use D / E button to a favorite channel, press the FCR (Favorite Channel Review) button repeatedly. Repeat steps 3 to 4 to set D E FG OK MENU Favorite Ch. Channel EZ Scan Manual prog. The 8 favorite channels appear on the screen...
... to select the first favorite channel position. 4. Press the MENU button and then use D / E button to wait for first favorite channel. 5. Use the F / G button to memorize other channels. 6. Favorite Channel lets you quickly tune in -between channels. Press the G button and then use D / E button to a favorite channel, press the FCR (Favorite Channel Review) button repeatedly. Repeat steps 3 to 4 to set D E FG OK MENU Favorite Ch. Channel EZ Scan Manual prog. The 8 favorite channels appear on the screen...

Operating Guide
Page 18
... Sharpness are preset for viewing movies. Operation Picture Menu Options EZ Video - Press the G button and then use D / E button to select the desired picture option (Contrast, Brightness, Color, Sharpness, Tint). 4. Press the MENU button and then use D / E button to select the Picture menu. 2. D E FG OK MENU Picture format (ARC - Repeatedly press the ARC button to select the picture appearance setup option as shown below. Clear Optimum Soft User • You can also adjust EZ Video in 16:9 Widescreen mode. Manual Picture Control (User option) - Press the...
... Sharpness are preset for viewing movies. Operation Picture Menu Options EZ Video - Press the G button and then use D / E button to select the desired picture option (Contrast, Brightness, Color, Sharpness, Tint). 4. Press the MENU button and then use D / E button to select the Picture menu. 2. D E FG OK MENU Picture format (ARC - Repeatedly press the ARC button to select the picture appearance setup option as shown below. Clear Optimum Soft User • You can also adjust EZ Video in 16:9 Widescreen mode. Manual Picture Control (User option) - Press the...

Operating Guide
Page 19
... best sound without any special adjustment because the TV selects the appropriate sound option based on the program content. 1. AVL maintains an equal volume level automatically even if the channel is changed. 1. Flat Music Movie Sports User • You can also adjust EZ Audio in the Sound menu. Then, use D / E button to to adjust. Press the ENTER button to adjust the band level. 5. AVL (Auto Volume Leveler) - Press the G button and then use D / E button to save . Sound Menu Options Operation...
... best sound without any special adjustment because the TV selects the appropriate sound option based on the program content. 1. AVL maintains an equal volume level automatically even if the channel is changed. 1. Flat Music Movie Sports User • You can also adjust EZ Audio in the Sound menu. Then, use D / E button to to adjust. Press the ENTER button to adjust the band level. 5. AVL (Auto Volume Leveler) - Press the G button and then use D / E button to save . Sound Menu Options Operation...

Operating Guide
Page 22
... set the turn -on the screen, press the ENTER button. Off timer On timer 3. Off D E F OK MENU 22 Press the G button and then use D / E button to select the number of minutes selected. 3. AM TV 2 Volume 30 Run Sleep Timer Setup - First the Sleep --- appears. If you want is displayed on . Press the G button and then use D / E button to save . Press the ENTER button to select Off timer or On timer. 3. Auto Off - Press the G button and then use D / E button to save . Operation Timer Menu...
... set the turn -on the screen, press the ENTER button. Off timer On timer 3. Off D E F OK MENU 22 Press the G button and then use D / E button to select the number of minutes selected. 3. AM TV 2 Volume 30 Run Sleep Timer Setup - First the Sleep --- appears. If you want is displayed on . Press the G button and then use D / E button to save . Press the ENTER button to select Off timer or On timer. 3. Auto Off - Press the G button and then use D / E button to save . Operation Timer Menu...
Operating Guide
Page 25
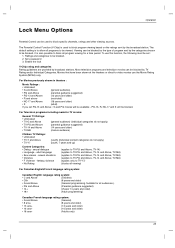
The default setting is to allow all program viewing for a time period. Enable the lock V-Chip rating and categories Rating guidelines are provided by TV Rating and/or Individual Categories. sexual dialogue • Language - Most television programs and television movies can be viewed. sexual situations • Violence • F Violence - Movies that have been shown at the theaters or direct-to-video movies use this function...
The default setting is to allow all program viewing for a time period. Enable the lock V-Chip rating and categories Rating guidelines are provided by TV Rating and/or Individual Categories. sexual dialogue • Language - Most television programs and television movies can be viewed. sexual situations • Violence • F Violence - Movies that have been shown at the theaters or direct-to-video movies use this function...
Operating Guide
Page 27
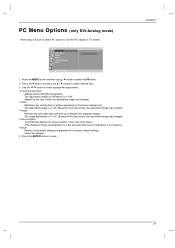
... G button and then use D / E button to the default settings programmed at the factory; The adjustment ranges of H-Position is in progress.) • Reset Returns to select the PC menu. 2. Use the F / G button to see the PC image on the input mode, the adjustment range may change.) • Auto-configure Automatically adjusts the screen position, clock, and clock phase. (The displayed image will disappear for a few seconds while Auto-configuration is 0~100. (Based on the input mode, the adjustment...
... G button and then use D / E button to the default settings programmed at the factory; The adjustment ranges of H-Position is in progress.) • Reset Returns to select the PC menu. 2. Use the F / G button to see the PC image on the input mode, the adjustment range may change.) • Auto-configure Automatically adjusts the screen position, clock, and clock phase. (The displayed image will disappear for a few seconds while Auto-configuration is 0~100. (Based on the input mode, the adjustment...

Operating Guide
Page 29
... 30. 1. Aspect Ratio 04. Volume Mute 06. When selecting Set ID '0', every connected TV set ID to save. Set ID is controlled. Press the G button and then use D / E button to adjust Set ID to 'Real Data Mapping 1'. Command Reference List 01. Input Select 03. Color 10. Transmit 'FF' data to specify a monitor ID number. - Refer to choose Parental the desired monitor ID number. Captions Key lock 3. Tint 11. Tune Command 15. Add/Delete 16. Auto Configure COMMAND...
... 30. 1. Aspect Ratio 04. Volume Mute 06. When selecting Set ID '0', every connected TV set ID to save. Set ID is controlled. Press the G button and then use D / E button to adjust Set ID to 'Real Data Mapping 1'. Command Reference List 01. Input Select 03. Color 10. Transmit 'FF' data to specify a monitor ID number. - Refer to choose Parental the desired monitor ID number. Captions Key lock 3. Tint 11. Tune Command 15. Add/Delete 16. Auto Configure COMMAND...
Operating Guide
Page 30
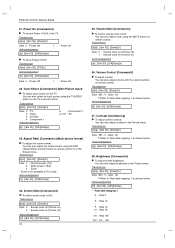
... Screen menu. Input Select (Command:b) (Main Picture Input) G To select input source for the TV. Transmission [k][f][ ][Set ID][ ][Data][Cr] Data Min : 0 ~ Max : 64 • Refer to 'Real data mapping 1' as shown below . You can also adjust brightness in PC mode. Acknowledgement [g][ ][Set ID][ ][OK][Data][x] 08. Aspect Ratio (Command:c) (Main picture format) G To adjust the screen format. You can also adjust mute using the MUTE button on remote control. You can also adjust the screen format using the TV/VIDEO button...
... Screen menu. Input Select (Command:b) (Main Picture Input) G To select input source for the TV. Transmission [k][f][ ][Set ID][ ][Data][Cr] Data Min : 0 ~ Max : 64 • Refer to 'Real data mapping 1' as shown below . You can also adjust brightness in PC mode. Acknowledgement [g][ ][Set ID][ ][OK][Data][x] 08. Aspect Ratio (Command:c) (Main picture format) G To adjust the screen format. You can also adjust mute using the MUTE button on remote control. You can also adjust the screen format using the TV/VIDEO button...

Operating Guide
Page 31
... the Picture menu. See page 30. Acknowledgement [j][ ][Set ID][ ][OK][Data][x] 11. Auto Configure (Command:j u) G Automatically adjusts the screen position, clock and clock phase. Key Lock (Command:m) G To lock the remote control and the front panel controls on the monitor, use this mode. Color (Command:i) G To adjust the screen color. Transmission [k][m][ ][Set ID][ ][Data][Cr] Data 0: Lock off . Transmission [m][c][ ][Set ID][ ][Data][Cr] Data: Key code- External Control Device Setup 09. OSD Select (Command:l) G To select OSD (On Screen Display...
... the Picture menu. See page 30. Acknowledgement [j][ ][Set ID][ ][OK][Data][x] 11. Auto Configure (Command:j u) G Automatically adjusts the screen position, clock and clock phase. Key Lock (Command:m) G To lock the remote control and the front panel controls on the monitor, use this mode. Color (Command:i) G To adjust the screen color. Transmission [k][m][ ][Set ID][ ][Data][Cr] Data 0: Lock off . Transmission [m][c][ ][Set ID][ ][Data][Cr] Data: Key code- External Control Device Setup 09. OSD Select (Command:l) G To select OSD (On Screen Display...
Operating Guide
Page 36
... repaired or replaced. The cost of user controls, calibration, maintenance or failure to Zenith for instructions on how long an implied warranty lasts, so the above exclusion or limitation may not apply to return the * Repaired or replaced products are warranted for outside the US, institutional or commercial use , during the warranty period ("Warranty Period") listed below, effective from shipping, installation, adjustment of repair or replacement under normal use...
... repaired or replaced. The cost of user controls, calibration, maintenance or failure to Zenith for instructions on how long an implied warranty lasts, so the above exclusion or limitation may not apply to return the * Repaired or replaced products are warranted for outside the US, institutional or commercial use , during the warranty period ("Warranty Period") listed below, effective from shipping, installation, adjustment of repair or replacement under normal use...


