Operating Guide
Page 5
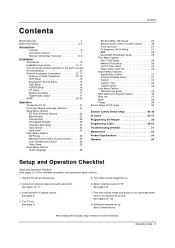
... Antenna or Cable Connection 12~13 VCR Setup 13 External A/V Source Setup 14 DVD Setup 14 HDSTB Setup 15 PC Setup 16 Monitor Out Setup 17 Digital Audio Output 17 HDMI 18~20 Operation Turning the TV On 21 On-screen Menus Language Selection 21 Setup Menu Options EZ Scan (Channel Search 22 Manual Scan 22 Channel Edit 23 DTV Signal Strength 23 Channel Label Setup 24 Input Source 24 Input Label 24 Video Menu Options EZ Picture 25 Manual Picture Control (Custom Option 25 Color Temperature Control 25 Video Reset 25 Audio Menu Options Audio...
... Antenna or Cable Connection 12~13 VCR Setup 13 External A/V Source Setup 14 DVD Setup 14 HDSTB Setup 15 PC Setup 16 Monitor Out Setup 17 Digital Audio Output 17 HDMI 18~20 Operation Turning the TV On 21 On-screen Menus Language Selection 21 Setup Menu Options EZ Scan (Channel Search 22 Manual Scan 22 Channel Edit 23 DTV Signal Strength 23 Channel Label Setup 24 Input Source 24 Input Label 24 Video Menu Options EZ Picture 25 Manual Picture Control (Custom Option 25 Color Temperature Control 25 Video Reset 25 Audio Menu Options Audio...

Operating Guide
Page 7
... Options Introduction Back Connection Panel S-VIDEO Input A connection available to this jack. output from a video device. HDMI/DVI RS-232C INPUT (VIDEO)INPUT (CONTROL/SER connect a VICE) PORT DVI(Video) sig- Antenna Input Connect over-theair signals to provide better picture quality than the video input. VIDEO Input Connects the video signal from an Note: In standby mode, these external device to the SVIDEO input. DVD/DTV Input (Component 1-2) Connect a component video/audio device to this port supplies Analog audio. CABLE Input Connect cable signals to these...
... Options Introduction Back Connection Panel S-VIDEO Input A connection available to this jack. output from a video device. HDMI/DVI RS-232C INPUT (VIDEO)INPUT (CONTROL/SER connect a VICE) PORT DVI(Video) sig- Antenna Input Connect over-theair signals to provide better picture quality than the video input. VIDEO Input Connects the video signal from an Note: In standby mode, these external device to the SVIDEO input. DVD/DTV Input (Component 1-2) Connect a component video/audio device to this port supplies Analog audio. CABLE Input Connect cable signals to these...
Operating Guide
Page 8
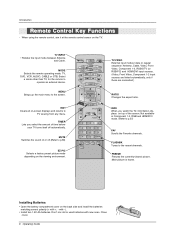
...-viewed picture. Don't mix old or used batteries with +, - TV INPUT • Rotates the input mode between Antenna and Cable. MODE Selects the remote operating mode: TV, DVD, VCR, AUDIO, CABLE or STB. When using the remote control, aim it at the remote control sensor on -screen displays and returns to the screen. GUIDE DAY + EXIT TIMER CC TV/VIDEO External input modes rotate in Component 1-2, RGB and HDMI/DVI mode. (Refer to the recent channels. Select a mode other than TV, for the remote to p.38) EZ PIC Selects a factory preset picture mode...
...-viewed picture. Don't mix old or used batteries with +, - TV INPUT • Rotates the input mode between Antenna and Cable. MODE Selects the remote operating mode: TV, DVD, VCR, AUDIO, CABLE or STB. When using the remote control, aim it at the remote control sensor on -screen displays and returns to the screen. GUIDE DAY + EXIT TIMER CC TV/VIDEO External input modes rotate in Component 1-2, RGB and HDMI/DVI mode. (Refer to the recent channels. Select a mode other than TV, for the remote to p.38) EZ PIC Selects a factory preset picture mode...
Operating Guide
Page 10
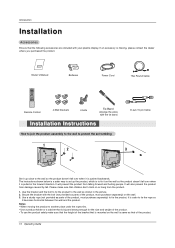
GUIDE DAY + EXIT TIMER CC FLASHBK Remote Control 4-Wall brackets 2-bolts Tie Band Arrange the wires with your plasma display. Installation Instructions How to join the product assembly to the wall to protect the set up close to fix it is pulled in the picture. 2. The instructions shown below is a safer way to set tumbling D-sub 15 pin Cable 1 2 3 Set it up the product, which is to the wall so the...
GUIDE DAY + EXIT TIMER CC FLASHBK Remote Control 4-Wall brackets 2-bolts Tie Band Arrange the wires with your plasma display. Installation Instructions How to join the product assembly to the wall to protect the set up close to fix it is pulled in the picture. 2. The instructions shown below is a safer way to set tumbling D-sub 15 pin Cable 1 2 3 Set it up the product, which is to the wall so the...
Operating Guide
Page 13
...) Installation Cable TV Wall Jack Turn clockwise to both Video and S-Video at the same time. 1 2 ANT OUT ANT IN S-VIDEO OUT OUTPUT (R) AUDIO (L) SWITCH 3 4 IN VIDEO VCR Rear Operating Guide 13 If you connect an S-VIDEO output from the VCR's output jacks to the TV input jacks, as shown in a poor signal area, please purchase a signal amplifier and install properly. • If the antenna needs to the same channel number. Insert a video tape into the VCR and press PLAY on the remote control. It is not installed...
...) Installation Cable TV Wall Jack Turn clockwise to both Video and S-Video at the same time. 1 2 ANT OUT ANT IN S-VIDEO OUT OUTPUT (R) AUDIO (L) SWITCH 3 4 IN VIDEO VCR Rear Operating Guide 13 If you connect an S-VIDEO output from the VCR's output jacks to the TV input jacks, as shown in a poor signal area, please purchase a signal amplifier and install properly. • If the antenna needs to the same channel number. Insert a video tape into the VCR and press PLAY on the remote control. It is not installed...

Operating Guide
Page 14
...How to use 1. DVD Setup R AUDIO L VIDEO Camcorder Video Game Device or DVD S-VIDEO (R) AUDIO (L) DIGITAL AUDIO OPTICAL (R) AUDIO (L) B R How to external equipment, match the jack colors (Video = yellow, Audio Left = white, and Audio Right = red). If your DVD player does not have component video output, use S-Video. Note: If your DVD only has an S-Video output jack, connect this TV finds the connected input sources automatically for operating instructions. • Component Input ports To get better picture quality, connect a DVD player to the component input ports as shown...
...How to use 1. DVD Setup R AUDIO L VIDEO Camcorder Video Game Device or DVD S-VIDEO (R) AUDIO (L) DIGITAL AUDIO OPTICAL (R) AUDIO (L) B R How to external equipment, match the jack colors (Video = yellow, Audio Left = white, and Audio Right = red). If your DVD player does not have component video output, use S-Video. Note: If your DVD only has an S-Video output jack, connect this TV finds the connected input sources automatically for operating instructions. • Component Input ports To get better picture quality, connect a DVD player to the component input ports as shown...
Operating Guide
Page 15
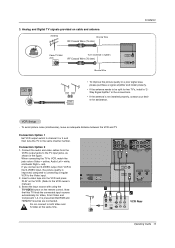
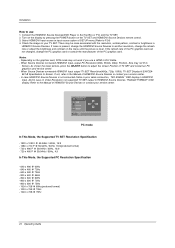
... owner's manual for video connections, depending on the remote control to connect Use the TV's COMPONENT (Y, PB, PR) INPUT, RGB or HDMI/DVI jack for the digital set -top box connector. Then, make the corresponding audio connections. Signal 480i 480p 720p 1080i Component 1/2 Yes Yes Yes Yes RGB-DTV , HDMI/DVI No Yes Yes Yes Operating Guide 15 This TV supports HDCP (High-bandwidth Digital Contents Protection) protocol for Digital Contents (480p,720p,1080i). (R) AUDIO (L) DIGITAL AUDIO OPTICAL DVI-DTV OUTPUT HDMI-DTV OUTPUT or DIGITAL AUDIO OPTICAL (R) AUDIO (L) Digital Set...
... owner's manual for video connections, depending on the remote control to connect Use the TV's COMPONENT (Y, PB, PR) INPUT, RGB or HDMI/DVI jack for the digital set -top box connector. Then, make the corresponding audio connections. Signal 480i 480p 720p 1080i Component 1/2 Yes Yes Yes Yes RGB-DTV , HDMI/DVI No Yes Yes Yes Operating Guide 15 This TV supports HDCP (High-bandwidth Digital Contents Protection) protocol for Digital Contents (480p,720p,1080i). (R) AUDIO (L) DIGITAL AUDIO OPTICAL DVI-DTV OUTPUT HDMI-DTV OUTPUT or DIGITAL AUDIO OPTICAL (R) AUDIO (L) Digital Set...
Operating Guide
Page 17
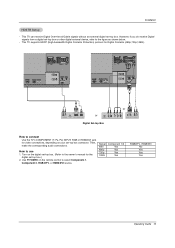
... optical cable to the TV's MONITOR OUTPUT. See the external audio equipment instruction manual for further details regarding that device's input settings. See the Operating Manual of an optical cable to external audio equipment (stereo system) via the Digital Audio Output (Optical) port. ers or speakers, please turn the TV speakers off.(Refer to use the video and audio output jacks for Monitor out. • When connecting with external audio equipments, such as amplif- How to hook up a second TV or monitor. Note: When connecting with external audio...
... optical cable to the TV's MONITOR OUTPUT. See the external audio equipment instruction manual for further details regarding that device's input settings. See the Operating Manual of an optical cable to external audio equipment (stereo system) via the Digital Audio Output (Optical) port. ers or speakers, please turn the TV speakers off.(Refer to use the video and audio output jacks for Monitor out. • When connecting with external audio equipments, such as amplif- How to hook up a second TV or monitor. Note: When connecting with external audio...
Operating Guide
Page 18
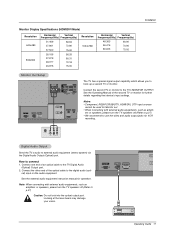
... the best picture quality, adjust the DVD Player or Set Top Box's output resolution to 1280x720p, and the PC graphics card's output resolution to 1280x720p. - This TV can receive the High-Definition Multimedia Interface(HDMI) or the Digital Visual Interface(DVI). - If the source device has an analog audio output connector, connect the PC's audio output to RGB/DVI AUDIO INPUT port located on the upper side of SETUP menu.(Refer to 1280x720p. - Select HDMI/DVI input source in input source...
... the best picture quality, adjust the DVD Player or Set Top Box's output resolution to 1280x720p, and the PC graphics card's output resolution to 1280x720p. - This TV can receive the High-Definition Multimedia Interface(HDMI) or the Digital Visual Interface(DVI). - If the source device has an analog audio output connector, connect the PC's audio output to RGB/DVI AUDIO INPUT port located on the upper side of SETUP menu.(Refer to 1280x720p. - Select HDMI/DVI input source in input source...
Operating Guide
Page 20
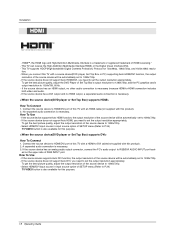
... Manual of SETUP menu.(Refer to P.24) 4. Turn on the display by pressing the POWER button on your service center. - When Source Devices connected HDMI/DVI Input, output PC Resolution(VGA, SVGA, XGA), Position, Size may be noise associated with the resolution, vertical pattern, contrast or brightness in HDMI/DVI Input. As shown the lower picture, press the ADJUST button to adjust the screen Position of HDMI/DVI Source Devices or contact your TV SET. Installation How to use a HDMI to DVI Cable...
... Manual of SETUP menu.(Refer to P.24) 4. Turn on the display by pressing the POWER button on your service center. - When Source Devices connected HDMI/DVI Input, output PC Resolution(VGA, SVGA, XGA), Position, Size may be noise associated with the resolution, vertical pattern, contrast or brightness in HDMI/DVI Input. As shown the lower picture, press the ADJUST button to adjust the screen Position of HDMI/DVI Source Devices or contact your TV SET. Installation How to use a HDMI to DVI Cable...
Operating Guide
Page 21
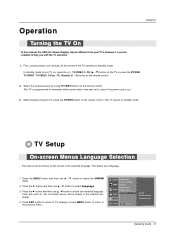
... using TV/VIDEO button on the remote control. Press EXIT button to return to TV viewing or press MENU button to return to standby mode. The menus can be shown on the screen in the selected language. 4. SETUP VIDEO AUDIO TIME Aspect Ratio Cinema 3:2 Mode Caption Caption/Text Caption Option Language G OPTION LOCK MENU Previous English Español(Spanish) Français(French) Operating Guide 21 Select the viewing source by using the TV, press the POWER button on the remote control. First select...
... using TV/VIDEO button on the remote control. Press EXIT button to return to TV viewing or press MENU button to return to standby mode. The menus can be shown on the screen in the selected language. 4. SETUP VIDEO AUDIO TIME Aspect Ratio Cinema 3:2 Mode Caption Caption/Text Caption Option Language G OPTION LOCK MENU Previous English Español(Spanish) Français(French) Operating Guide 21 Select the viewing source by using the TV, press the POWER button on the remote control. First select...
Operating Guide
Page 22
...Press the G button and then use D / E button to the EZ scan screen LOCK SETUP VIDEO AUDIO TIME OPTION EZ Scan Manual Scan Channel Edit DTV Signal Channel Label Input Source Input Label Set ID LOCK 1. ANTENNA CABLE Selection ( G or ) leads you to select EZ Scan. 3. SETUP VIDEO AUDIO TIME OPTION EZ Scan Manual Scan Channel Edit DTV Signal Channel Label Input Source Input Label SetID Select channel type and RF-channel number. G TV 2 LOCK MENU Previous Notes: • This channel number is a physical channel number, which is turned on the channel list. - Automatically finds...
...Press the G button and then use D / E button to the EZ scan screen LOCK SETUP VIDEO AUDIO TIME OPTION EZ Scan Manual Scan Channel Edit DTV Signal Channel Label Input Source Input Label Set ID LOCK 1. ANTENNA CABLE Selection ( G or ) leads you to select EZ Scan. 3. SETUP VIDEO AUDIO TIME OPTION EZ Scan Manual Scan Channel Edit DTV Signal Channel Label Input Source Input Label SetID Select channel type and RF-channel number. G TV 2 LOCK MENU Previous Notes: • This channel number is a physical channel number, which is turned on the channel list. - Automatically finds...
Operating Guide
Page 23
... or delete the channel by toggling each channel on the SETUP menu. - SETUP VIDEO AUDIO TIME OPTION EZ Scan Manual Scan Channel Edit DTV Signal Channel Label Input Source Input Label Set ID G Selection ( G or ) leads you are displayed in order to /from the Custom List are to experience picture degradation. - Press EXIT button to return to TV viewing or press MENU button to return to the channel edit screen LOCK MENU Previous 1. The higher the signal strength, the less...
... or delete the channel by toggling each channel on the SETUP menu. - SETUP VIDEO AUDIO TIME OPTION EZ Scan Manual Scan Channel Edit DTV Signal Channel Label Input Source Input Label Set ID G Selection ( G or ) leads you are displayed in order to /from the Custom List are to experience picture degradation. - Press EXIT button to return to TV viewing or press MENU button to return to the channel edit screen LOCK MENU Previous 1. The higher the signal strength, the less...
Operating Guide
Page 24
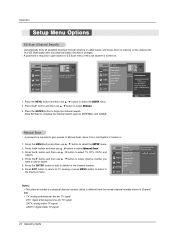
... screen. 4. Note: • To toggle RGB-DTV and RGB-PC, select RGB-DTV(or RGB-PC) and press G button. SETUP VIDEO AUDIO TIME OPTION EZ Scan Manual Scan Channel Edit DTV Signal Channel Label Input Source Input Label Set ID LOCK MENU Previous Antenna Cable Video Front Video G Component1 Component2 RGB-PC HDMI/DVI SETUP EZ Scan Manual Scan VIDEO Channel Edit AUDIO TIME OPTION DTV Signal Channel Label Input Source Input Label Set ID Video VCR Front Video VCR/DVD Component1 Set Top Box G Component2 Satellite RGB Cable Box HDMI/DVI Game LOCK MENU Previous 24 Operating...
... screen. 4. Note: • To toggle RGB-DTV and RGB-PC, select RGB-DTV(or RGB-PC) and press G button. SETUP VIDEO AUDIO TIME OPTION EZ Scan Manual Scan Channel Edit DTV Signal Channel Label Input Source Input Label Set ID LOCK MENU Previous Antenna Cable Video Front Video G Component1 Component2 RGB-PC HDMI/DVI SETUP EZ Scan Manual Scan VIDEO Channel Edit AUDIO TIME OPTION DTV Signal Channel Label Input Source Input Label Set ID Video VCR Front Video VCR/DVD Component1 Set Top Box G Component2 Satellite RGB Cable Box HDMI/DVI Game LOCK MENU Previous 24 Operating...
Operating Guide
Page 25
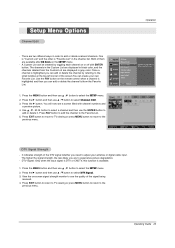
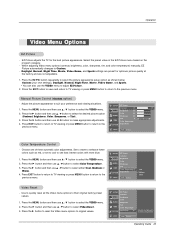
... factory preset values. 1. Operation Video Menu Options EZ Picture - Select the preset value in the EZ Picture menu based on the program category. - Press the G button and then use F / G button to suit your own settings), Daylight, Normal, Night Time, Movie, Video Game, and Sports. • You can also use D / E button to the previous menu. OPTION Video Reset LOCK MENU Previous Color Temperature Control - SETUP VIDEO AUDIO TIME OPTION EZ Picture Contrast Brightness Color Sharpness Tint Color Temperature G Video Reset LOCK MENU Previous Cool Medium Warm Video Reset - Adjust...
... factory preset values. 1. Operation Video Menu Options EZ Picture - Select the preset value in the EZ Picture menu based on the program category. - Press the G button and then use F / G button to suit your own settings), Daylight, Normal, Night Time, Movie, Video Game, and Sports. • You can also use D / E button to the previous menu. OPTION Video Reset LOCK MENU Previous Color Temperature Control - SETUP VIDEO AUDIO TIME OPTION EZ Picture Contrast Brightness Color Sharpness Tint Color Temperature G Video Reset LOCK MENU Previous Cool Medium Warm Video Reset - Adjust...

Operating Guide
Page 31
... Zoom 1 when you want to adjust the picture in Component 480i, S-Video, Video mode. Cinema 3:2 Mode Setup - Press the G button and then use D / E button to the previous menu. SETUP Aspect Ratio Cinema 3:2 Mode G Off VIDEO Caption On AUDIO Caption/Text Caption Option TIME Language OPTION LOCK MENU Previous Operating Guide 31 When you receive an analog picture with a 4:3 aspect ratio on your 16:9 TV, you need to specify how the picture is displayed on the screen for a long time, the image may become imprinted on your...
... Zoom 1 when you want to adjust the picture in Component 480i, S-Video, Video mode. Cinema 3:2 Mode Setup - Press the G button and then use D / E button to the previous menu. SETUP Aspect Ratio Cinema 3:2 Mode G Off VIDEO Caption On AUDIO Caption/Text Caption Option TIME Language OPTION LOCK MENU Previous Operating Guide 31 When you receive an analog picture with a 4:3 aspect ratio on your 16:9 TV, you need to specify how the picture is displayed on the screen for a long time, the image may become imprinted on your...

Operating Guide
Page 32
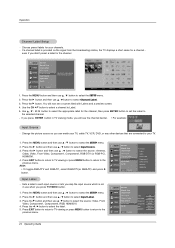
... the program is programmed to memorize the caption/text mode which was last set to, when you want the DTV/CADTV Captions to select Caption/Text. 3. SETUP VIDEO AUDIO TIME Aspect Ratio Cinema 3:2 Mode Caption Caption / Text G Caption Option Language English Spanish French OPTION LOCK MENU Previous 32 Operating Guide Select a caption mode for a data service. - Use the CC button repeatedly to select the OPTION menu. 2. Press the G button and then use D / E button to the previous menu. Press the MENU button and then use D / E button to the previous menu. This...
... the program is programmed to memorize the caption/text mode which was last set to, when you want the DTV/CADTV Captions to select Caption/Text. 3. SETUP VIDEO AUDIO TIME Aspect Ratio Cinema 3:2 Mode Caption Caption / Text G Caption Option Language English Spanish French OPTION LOCK MENU Previous 32 Operating Guide Select a caption mode for a data service. - Use the CC button repeatedly to select the OPTION menu. 2. Press the G button and then use D / E button to the previous menu. Press the MENU button and then use D / E button to the previous menu. This...
Operating Guide
Page 34
... shown at the theaters or direct-to-video movies use this function, the following must be blocked by TV Rating and/or Individual Categories. sexual dialogue • Language - adult language • Sex - The default setting is used to block specific channels, ratings and other viewing sources. Ratings for a time period. Operation Lock Menu Options Parental Control can be used to block program viewing based on the ratings sent by...
... shown at the theaters or direct-to-video movies use this function, the following must be blocked by TV Rating and/or Individual Categories. sexual dialogue • Language - adult language • Sex - The default setting is used to block specific channels, ratings and other viewing sources. Ratings for a time period. Operation Lock Menu Options Parental Control can be used to block program viewing based on the ratings sent by...

Operating Guide
Page 35
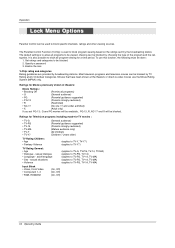
... block from the following Lock Menu options. SETUP Lock System G Off Set Password On VIDEO Block Channel AUDIO Movie Rating TV Rating-Children TIME TV Rating-General Input Block OPTION LOCK MENU Previous Note: • If you do not want to view. • Input Block: Enables you to select a source to movies shown on the remote control. sub menu, your children can set up previously. • Set Password: Change the password by blocking out...
... block from the following Lock Menu options. SETUP Lock System G Off Set Password On VIDEO Block Channel AUDIO Movie Rating TV Rating-Children TIME TV Rating-General Input Block OPTION LOCK MENU Previous Note: • If you do not want to view. • Input Block: Enables you to select a source to movies shown on the remote control. sub menu, your children can set up previously. • Set Password: Change the password by blocking out...
Operating Guide
Page 51
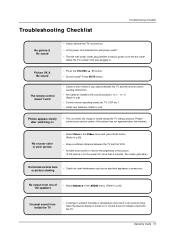
... speakers • Adjust Balance in the AUDIO menu. (Refer to p.26) Unusual sound from one of the picture. (If still picture is on • This is normal, the image is muted during the TV startup process. No or poor color or poor picture • Select Color in . Picture OK & No sound The remote control doesn't work • Press the VOLUME (D / E) button. • Sound muted? to -)? (Refer to p.8) • Correct remote operating mode set: TV, VCR...
... speakers • Adjust Balance in the AUDIO menu. (Refer to p.26) Unusual sound from one of the picture. (If still picture is on • This is normal, the image is muted during the TV startup process. No or poor color or poor picture • Select Color in . Picture OK & No sound The remote control doesn't work • Press the VOLUME (D / E) button. • Sound muted? to -)? (Refer to p.8) • Correct remote operating mode set: TV, VCR...


