

Operation Manual
Page 2
... presence of the National Electric Code (U.S.A.). Reorient or relocate the receiving antenna. - Consult the dealer or an experienced radio/TV technician for compliance could void the user's authority to Article 820-40 of important operating and maintenance (servicing) instructions in a particular installation. NOTE TO CABLE/TV INSTALLER: This reminder is intended to alert the user to the presence of uninsulated...
... presence of the National Electric Code (U.S.A.). Reorient or relocate the receiving antenna. - Consult the dealer or an experienced radio/TV technician for compliance could void the user's authority to Article 820-40 of important operating and maintenance (servicing) instructions in a particular installation. NOTE TO CABLE/TV INSTALLER: This reminder is intended to alert the user to the presence of uninsulated...

Operation Manual
Page 5
...~12 Installation External Equipment Connections 13~18 Antenna Connection 13 VCR Setup 14 External A/V Source Setup 15 DVD Setup 15 HDSTB Setup 16 AV Out Setup 16 Digital Audio Output 17 PC Setup 18~20 Operation Turning the TV On 21 TV Setup On-screen Menus Language Selection 22 Channel Selection 22 Volume Adjustment 22 Setup Menu Options EZ Scan (Channel Search 23 Manual Scan 23 Channel Edit 24 DTV Signal 24 Input Source Selection 25 Input Label 25 Video Menu Options Auto Picture Control (EZ Picture 26 Adaptive Picture Mode (APM 26 Color Temperature Control 27...
...~12 Installation External Equipment Connections 13~18 Antenna Connection 13 VCR Setup 14 External A/V Source Setup 15 DVD Setup 15 HDSTB Setup 16 AV Out Setup 16 Digital Audio Output 17 PC Setup 18~20 Operation Turning the TV On 21 TV Setup On-screen Menus Language Selection 22 Channel Selection 22 Volume Adjustment 22 Setup Menu Options EZ Scan (Channel Search 23 Manual Scan 23 Channel Edit 24 DTV Signal 24 Input Source Selection 25 Input Label 25 Video Menu Options Auto Picture Control (EZ Picture 26 Adaptive Picture Mode (APM 26 Color Temperature Control 27...
Operation Manual
Page 7
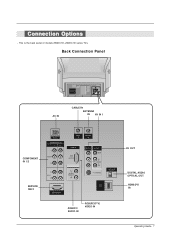
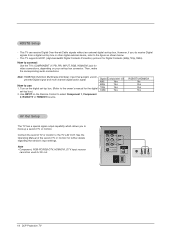
... OUT VIDEO MONO (L) AUDIO (R) S-VIDEO DIGITAL AUDIO OPTICAL OUTPUT HDMI /DVI IN AC IN CABLE IN ANTENNA IN AV IN 1 COMPONENT IN 1/2 SERVICE ONLY AC IN COMPONENT IN 1 2 Y VIDEO PB PR (L) AUDIO (R) SERVICE ONLY CABLE IN ANTENNA IN RGB IN RGB (PC/DTV) (L) AUDIO RGB/DVI (R) AV IN 1 AV OUT VIDEO MONO (L) AUDIO (R) S-VIDEO DIGITAL AUDIO OPTICAL OUT HDMI /DVI IN RGB/DVI AUDIO IN RGB(PC/DTV) VIDEO IN AV OUT DIGITAL AUDIO OPTICAL OUT HDMI/DVI IN Operating Guide 7 This is the back panel of models Z56DC1D, Z62DC1D series TVs. Connection...
... OUT VIDEO MONO (L) AUDIO (R) S-VIDEO DIGITAL AUDIO OPTICAL OUTPUT HDMI /DVI IN AC IN CABLE IN ANTENNA IN AV IN 1 COMPONENT IN 1/2 SERVICE ONLY AC IN COMPONENT IN 1 2 Y VIDEO PB PR (L) AUDIO (R) SERVICE ONLY CABLE IN ANTENNA IN RGB IN RGB (PC/DTV) (L) AUDIO RGB/DVI (R) AV IN 1 AV OUT VIDEO MONO (L) AUDIO (R) S-VIDEO DIGITAL AUDIO OPTICAL OUT HDMI /DVI IN RGB/DVI AUDIO IN RGB(PC/DTV) VIDEO IN AV OUT DIGITAL AUDIO OPTICAL OUT HDMI/DVI IN Operating Guide 7 This is the back panel of models Z56DC1D, Z62DC1D series TVs. Connection...

Operation Manual
Page 9
Back Connection Panel AC IN CABLE IN ANTENNA IN AV IN 1 COMPONENT IN 1/2 SERVICE ONLY AC IN COMPONENT IN 1 2 Y VIDEO PB PR (L) AUDIO (R) SERVICE ONLY CABLE IN ANTENNA IN RGB IN RGB (PC/DTV) (L) AUDIO RGB/DVI (R) AV IN 1 AV OUT VIDEO MONO (L) AUDIO (R) S-VIDEO DIGITAL AUDIO OPTICAL OUT HDMI /DVI IN RGB/DVI AUDIO IN RGB(PC/DTV) VIDEO IN AV OUT DIGITAL AUDIO OPTICAL OUT HDMI/DVI IN Owner's Manual 9 This is the back panel of models Z52DC2D series TVs. Connection Options -
Back Connection Panel AC IN CABLE IN ANTENNA IN AV IN 1 COMPONENT IN 1/2 SERVICE ONLY AC IN COMPONENT IN 1 2 Y VIDEO PB PR (L) AUDIO (R) SERVICE ONLY CABLE IN ANTENNA IN RGB IN RGB (PC/DTV) (L) AUDIO RGB/DVI (R) AV IN 1 AV OUT VIDEO MONO (L) AUDIO (R) S-VIDEO DIGITAL AUDIO OPTICAL OUT HDMI /DVI IN RGB/DVI AUDIO IN RGB(PC/DTV) VIDEO IN AV OUT DIGITAL AUDIO OPTICAL OUT HDMI/DVI IN Owner's Manual 9 This is the back panel of models Z52DC2D series TVs. Connection Options -

Operation Manual
Page 10
... picture quality than video input. A/V DEVICE Any device that connects to change the picture settings with the EZ Picture option in the Main Input menu. There are four jacks on the left side on page 25. This means that most equipment that produces video or sound (VCR, DVD, cable box, or television). 10 DLP Projection TV AV IN 2 LEFT/RIGHT AUDIO Used for stereo playback of equipment. Three cable connector-Right audio (red), Left audio...
... picture quality than video input. A/V DEVICE Any device that connects to change the picture settings with the EZ Picture option in the Main Input menu. There are four jacks on the left side on page 25. This means that most equipment that produces video or sound (VCR, DVD, cable box, or television). 10 DLP Projection TV AV IN 2 LEFT/RIGHT AUDIO Used for stereo playback of equipment. Three cable connector-Right audio (red), Left audio...

Operation Manual
Page 11
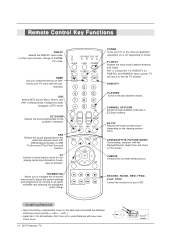
... remote control sensor on -screen displays and returns to control external devices. TV VCR CABLE DVD SAT MODE LIGHT POWER INPUT TV INPUT INFO RGB-PC TIMER HDMI/DVI 123 456 789 MUTE 0 FLASHBK FAV + SAP ADJUST VOL - INFO When you watch the TV, information displays on -screen displays, selects highlighted options. ENTER MENU EXIT ENTER When in RGB-DTV/PC or HDMI-PC mode. MUTE Switches the sound on or off.(Refer to the screen. Owner's Manual 11 RATIO Changes the screen format or aspect ratio...
... remote control sensor on -screen displays and returns to control external devices. TV VCR CABLE DVD SAT MODE LIGHT POWER INPUT TV INPUT INFO RGB-PC TIMER HDMI/DVI 123 456 789 MUTE 0 FLASHBK FAV + SAP ADJUST VOL - INFO When you watch the TV, information displays on -screen displays, selects highlighted options. ENTER MENU EXIT ENTER When in RGB-DTV/PC or HDMI-PC mode. MUTE Switches the sound on or off.(Refer to the screen. Owner's Manual 11 RATIO Changes the screen format or aspect ratio...
Operation Manual
Page 12
... screen. RATIO CC FREEZE GUIDE ENTER MENU EXIT POWER Turns your VCR. CH EZ SOUND SRS APM EZ PIC SRS Selects the sound appropriate for the select the desired sound (Off, 3DEchoSound System or SRS TruSurround XT)in Analog mode. FREEZE Freezes the currently-viewed picture. PC mode. RECORD, PAUSE, REW, FFWD, PLAY, STOP Control the functions on your TV or any other input sources, change to an option withF D E G and selecting...
... screen. RATIO CC FREEZE GUIDE ENTER MENU EXIT POWER Turns your VCR. CH EZ SOUND SRS APM EZ PIC SRS Selects the sound appropriate for the select the desired sound (Off, 3DEchoSound System or SRS TruSurround XT)in Analog mode. FREEZE Freezes the currently-viewed picture. PC mode. RECORD, PAUSE, REW, FFWD, PLAY, STOP Control the functions on your TV or any other input sources, change to an option withF D E G and selecting...
Operation Manual
Page 14
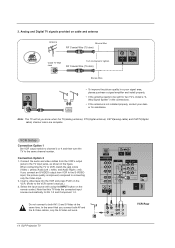
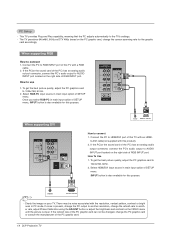
... OUT VIDEO MONO (L) AUDIO (R) S-VIDEO DIGITAL AUDIO OPTICAL OUT HDMI /DVI IN 2 ANT OUT ANT IN S-VIDEO OUT OUTPUT VIDEO (R) AUDIO (L) SWITCH 3 4 IN VCR Rear Select the input source with using the INPUT button on the remote control. VCR Setup Connection Option 1 Set VCR output switch to channel 3 or 4 and then tune the TV to the TV input jacks, as shown in the connections. • If the antenna is improved; Note that you connect an S-VIDEO output from the VCR's output jacks to the same channel number. Connect the audio and video cables from VCR to tighten...
... OUT VIDEO MONO (L) AUDIO (R) S-VIDEO DIGITAL AUDIO OPTICAL OUT HDMI /DVI IN 2 ANT OUT ANT IN S-VIDEO OUT OUTPUT VIDEO (R) AUDIO (L) SWITCH 3 4 IN VCR Rear Select the input source with using the INPUT button on the remote control. VCR Setup Connection Option 1 Set VCR output switch to channel 3 or 4 and then tune the TV to the TV input jacks, as shown in the connections. • If the antenna is improved; Note that you connect an S-VIDEO output from the VCR's output jacks to the same channel number. Connect the audio and video cables from VCR to tighten...
Operation Manual
Page 15
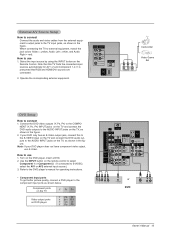
... AUDIO OUT VIDEO (L) (MONO) AUDIO (R) HDMI IN 2 (L) AUDIO (R) (L) AUDIO (R) B R (R) AUDIO (L) DIGITAL AUDIO OPTICAL or DVD S-VIDEO (R) AUDIO (L) Owner's Manual 15 Operate the corresponding external equipment. How to the AUDIO INPUT jacks on the remote control to select Component 1 or Component 2. (If connected to connect 1. Note: If your DVD only has an S-Video output jack, connect this TV finds the connected input sources automatically for operating instructions. • Component Input ports To get better picture quality, connect a DVD player to the component input...
... AUDIO OUT VIDEO (L) (MONO) AUDIO (R) HDMI IN 2 (L) AUDIO (R) (L) AUDIO (R) B R (R) AUDIO (L) DIGITAL AUDIO OPTICAL or DVD S-VIDEO (R) AUDIO (L) Owner's Manual 15 Operate the corresponding external equipment. How to the AUDIO INPUT jacks on the remote control to select Component 1 or Component 2. (If connected to connect 1. Note: If your DVD only has an S-Video output jack, connect this TV finds the connected input sources automatically for operating instructions. • Component Input ports To get better picture quality, connect a DVD player to the component input...
Operation Manual
Page 16
...'s COMPONENT (Y, PB, PR) INPUT, RGB, HDMI/DVI jack for video connections, depending on your set -top box.) 2. See the Operating Manual of the second TV or monitor for the digital set -top box connector. Note: HDMI(High Definition Multimedia Interface): Input that device's input settings. This TV supports HDCP (High-bandwidth Digital Contents Protection) protocol for AV out. Then, make the corresponding audio connections. Connect the second TV or monitor to use 1. Turn on the Remote Control to the owner's manual...
...'s COMPONENT (Y, PB, PR) INPUT, RGB, HDMI/DVI jack for video connections, depending on your set -top box.) 2. See the Operating Manual of the second TV or monitor for the digital set -top box connector. Note: HDMI(High Definition Multimedia Interface): Input that device's input settings. This TV supports HDCP (High-bandwidth Digital Contents Protection) protocol for AV out. Then, make the corresponding audio connections. Connect the second TV or monitor to use 1. Turn on the Remote Control to the owner's manual...
Operation Manual
Page 18
... cable. 2. AUDIO DVI-PC OUTPUT - Connect the PC to -DVI cable(not supplied with this TV with the resolution, vertical pattern, contrast or bright ness in main input option of SETUP menu. How to the TV's settings. - to HDMI/DVI port of SETUP menu, INPUT button is also available for this purpose. Select HDMI/DVI input source in PC mode. If the refresh rate of this purpose. If noise is clear. This TV provides Plug and Play...
... cable. 2. AUDIO DVI-PC OUTPUT - Connect the PC to -DVI cable(not supplied with this TV with the resolution, vertical pattern, contrast or bright ness in main input option of SETUP menu. How to the TV's settings. - to HDMI/DVI port of SETUP menu, INPUT button is also available for this purpose. Select HDMI/DVI input source in PC mode. If the refresh rate of this purpose. If noise is clear. This TV provides Plug and Play...
Operation Manual
Page 19
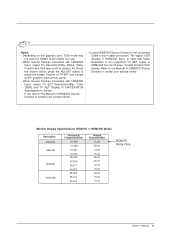
When Source Devices connected with HDMI/DVI Input, output PC Resolution(VGA, SVGA, XGA), Position and Size may not work if a HDMI1 to Screen. Refer to the Manual of HDMI/DVI Source Devices or contact your service center. - In case HDMI/DVI Source Devices is not supported TV SET output in HDMI/DVI Source Devices, "Invalid Format" OSD display. Monitor Display Specifications (RGB-PC or HDMI/DVI Mode) Resolution 640x350 640x480 800x600 1024x768 Horizontal Frequency(KHz) 31.468 31.469 37...
When Source Devices connected with HDMI/DVI Input, output PC Resolution(VGA, SVGA, XGA), Position and Size may not work if a HDMI1 to Screen. Refer to the Manual of HDMI/DVI Source Devices or contact your service center. - In case HDMI/DVI Source Devices is not supported TV SET output in HDMI/DVI Source Devices, "Invalid Format" OSD display. Monitor Display Specifications (RGB-PC or HDMI/DVI Mode) Resolution 640x350 640x480 800x600 1024x768 Horizontal Frequency(KHz) 31.468 31.469 37...

Operation Manual
Page 23
... Signal Input Input Label G Selection ( G or ) leads you want to Manual Scan menu if the Lock System is turned on the channel list. - Press the G button or ENTER button to stop the current scan and start DIGITAL ANTENNA channel scan. Next MENU Previous 1. ANTENNA Ch.20 0 channel(s) found Press to begin the channel search. A password is required to gain access to add or delete. 5. Run EZ Scan again after any Antenna/Cable connection changes. Press the MENU button and then use D / E button to select channel number...
... Signal Input Input Label G Selection ( G or ) leads you want to Manual Scan menu if the Lock System is turned on the channel list. - Press the G button or ENTER button to stop the current scan and start DIGITAL ANTENNA channel scan. Next MENU Previous 1. ANTENNA Ch.20 0 channel(s) found Press to begin the channel search. A password is required to gain access to add or delete. 5. Run EZ Scan again after any Antenna/Cable connection changes. Press the MENU button and then use D / E button to select channel number...
Operation Manual
Page 25
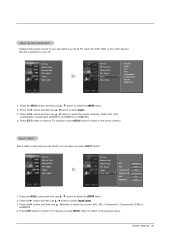
... button to return to TV viewing or press MENU button to return to the previous menu. EZ Scan Manual Scan Channel Edit DTV Signal Input Input Label EZ Scan Manual Scan Channel Edit DTV Signal Input Input Label AV1 Cable Box AV2 VCR Component1 DVD G Component2 Set Top Box RGB PC HDMI/DVI Game 1. Press the G button and then use D / E button to each input source which is in use D / E button to select the SETUP menu. 2. Owner's Manual 25 EZ Scan Manual Scan Channel Edit DTV Signal Input Input Label EZ Scan Manual Scan Channel Edit DTV Signal Input Input Label Antenna Cable...
... button to return to TV viewing or press MENU button to return to the previous menu. EZ Scan Manual Scan Channel Edit DTV Signal Input Input Label EZ Scan Manual Scan Channel Edit DTV Signal Input Input Label AV1 Cable Box AV2 VCR Component1 DVD G Component2 Set Top Box RGB PC HDMI/DVI Game 1. Press the G button and then use D / E button to each input source which is in use D / E button to select the SETUP menu. 2. Owner's Manual 25 EZ Scan Manual Scan Channel Edit DTV Signal Input Input Label EZ Scan Manual Scan Channel Edit DTV Signal Input Input Label Antenna Cable...
Operation Manual
Page 26
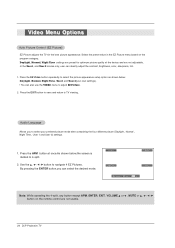
... Time , User 1 and User 2) settings. 1. Press the APM button at the factory and are not adjustable. Select the preset value in the EZ Picture menu based on the remote control are preset for the best picture appearance. Daylight, Normal, Night Time settings are not usable. 26 DLP Projection TV Press the EZ Video button repeatedly to select the picture appearance setup option as shown below ,the screen is divided to adjust EZ Picture. 2. Use the D / E / F / G button to TV viewing...
... Time , User 1 and User 2) settings. 1. Press the APM button at the factory and are not adjustable. Select the preset value in the EZ Picture menu based on the remote control are preset for the best picture appearance. Daylight, Normal, Night Time settings are not usable. 26 DLP Projection TV Press the EZ Video button repeatedly to select the picture appearance setup option as shown below ,the screen is divided to adjust EZ Picture. 2. Use the D / E / F / G button to TV viewing...

Operation Manual
Page 34
... adjustments. 4. Press the G button and then use F / G button to select TV Speaker. 3. Press EXIT button to return to TV viewing or press MENU button to return to the previous menu. Press EXIT button to return to TV viewing or press MENU button to return to the previous menu. 34 DLP Projection TV Audio Language EZ SoundRite EZ Sound Balance TV Speaker Audio Language EZ SoundRite EZ Sound Balance 0 L R TV Speaker 1. Feature turns the TV Speakers...
... adjustments. 4. Press the G button and then use F / G button to select TV Speaker. 3. Press EXIT button to return to TV viewing or press MENU button to return to the previous menu. Press EXIT button to return to TV viewing or press MENU button to return to the previous menu. 34 DLP Projection TV Audio Language EZ SoundRite EZ Sound Balance TV Speaker Audio Language EZ SoundRite EZ Sound Balance 0 L R TV Speaker 1. Feature turns the TV Speakers...
Operation Manual
Page 41
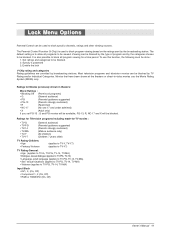
...; Component 1, 2 (On, Off) • RGB or HDMI/DVI (On, Off) Owner's Manual 41 Lock Menu Options Parental Control can be used to block program viewing based on the ratings sent by broadcasting stations. It is also possible to block all program viewing for Movies previously shown in theaters: Movie Ratings : • Blocking Off (Permits all programs to be blocked. Specify a password 3. The default setting is used to be viewed. To use the...
...; Component 1, 2 (On, Off) • RGB or HDMI/DVI (On, Off) Owner's Manual 41 Lock Menu Options Parental Control can be used to block program viewing based on the ratings sent by broadcasting stations. It is also possible to block all program viewing for Movies previously shown in theaters: Movie Ratings : • Blocking Off (Permits all programs to be blocked. Specify a password 3. The default setting is used to be viewed. To use the...

Operation Manual
Page 42
... previous menu. Use the D / E button to choose from the external source devices you wish to block. • Movie Rating (MPPA): Blocks movies according to this menu. You can view those programs. • TV Rating-General: Based on the ratings, blocks certain TV programs that you have hooked up previously. • Set Password: Change the password by blocking out all the movies with the initial password "0-0-0-0". 2. Parental Lock Setup Set...
... previous menu. Use the D / E button to choose from the external source devices you wish to block. • Movie Rating (MPPA): Blocks movies according to this menu. You can view those programs. • TV Rating-General: Based on the ratings, blocks certain TV programs that you have hooked up previously. • Set Password: Change the password by blocking out all the movies with the initial password "0-0-0-0". 2. Parental Lock Setup Set...

Operation Manual
Page 49
... power cord connected to the TV set : TV, VCR etc.? • Install new batteries. (Refer to p.12) Picture appears slowly after five minutes. Picture OK & No sound • Press the VOLUME (D / E) button. • Sound muted? Please contact your service center, if the picture has not appeared after switching on . • Is the power cord inserted into the outlet where the TV's power cord was plugged in the Picture menu and press the G button...
... power cord connected to the TV set : TV, VCR etc.? • Install new batteries. (Refer to p.12) Picture appears slowly after five minutes. Picture OK & No sound • Press the VOLUME (D / E) button. • Sound muted? Please contact your service center, if the picture has not appeared after switching on . • Is the power cord inserted into the outlet where the TV's power cord was plugged in the Picture menu and press the G button...
Operation Manual
Page 52
... result from the Date of the original warranty period. Parts: One Year from normal wear and tear, misuse, abuse, operation outside environmental specifications or contrary to you may be borne by inadequate home antenna or faulty antenna connections, computer software, institutional or commercial use , during the warranty period ("Warranty Period") listed below, effective from state to buy, Product Assistance, or Customer Assistance LG Customer...
... result from the Date of the original warranty period. Parts: One Year from normal wear and tear, misuse, abuse, operation outside environmental specifications or contrary to you may be borne by inadequate home antenna or faulty antenna connections, computer software, institutional or commercial use , during the warranty period ("Warranty Period") listed below, effective from state to buy, Product Assistance, or Customer Assistance LG Customer...


