eMachines D720/D520 Series Quick Guide
Page 3
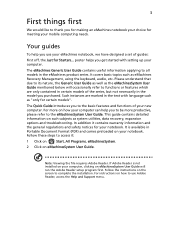
... as eMachines Recovery Management, using the keyboard, audio, etc. 3 First things first We would like to use your eMachines notebook, we have designed a set of guides: First off, the Just for Starters... It covers basic topics such as system utilities, data recovery, expansion options and troubleshooting. For instructions on eMachinesSystem User Guide. poster helps you use Adobe Reader, access the Help and Support menu. Note: Viewing the file requires Adobe Reader. The eMachines Generic User Guide contains useful information...
... as eMachines Recovery Management, using the keyboard, audio, etc. 3 First things first We would like to use your eMachines notebook, we have designed a set of guides: First off, the Just for Starters... It covers basic topics such as system utilities, data recovery, expansion options and troubleshooting. For instructions on eMachinesSystem User Guide. poster helps you use Adobe Reader, access the Help and Support menu. Note: Viewing the file requires Adobe Reader. The eMachines Generic User Guide contains useful information...
eMachines D720/D520 Series Quick Guide
Page 5
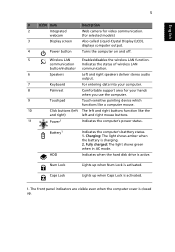
... cover is closed up when Num Lock is active. Caps Lock Lights up when Caps Lock is charging. 2. English 5 # ICON Item 2 Integrated webcam 3 Display screen 4 Power button Description Web camera for video communication. (for your computer. 8 Palmrest Comfortable support area for selected models) Also called Liquid-Crystal Display (LCD), displays computer output. Battery1 HDD Indicates the computer's batttery status. 1. Turns the computer on and off. 5 Wireless LAN Enables/disables the wireless LAN function. communication Indicates the status of wireless...
... cover is closed up when Num Lock is active. Caps Lock Lights up when Caps Lock is charging. 2. English 5 # ICON Item 2 Integrated webcam 3 Display screen 4 Power button Description Web camera for video communication. (for your computer. 8 Palmrest Comfortable support area for selected models) Also called Liquid-Crystal Display (LCD), displays computer output. Battery1 HDD Indicates the computer's batttery status. 1. Turns the computer on and off. 5 Wireless LAN Enables/disables the wireless LAN function. communication Indicates the status of wireless...
eMachines D720/D520 Series Quick Guide
Page 10
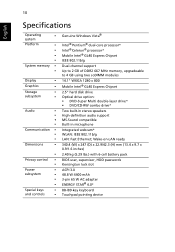
... Chipset 2.5" hard disk drive Optical drive option: • DVD-Super Multi double-layer drive* • DVD/CD-RW combo drive* Two built-in stereo speakers High-definition audio support MS-Sound compatible Built-in microphone Integrated webcam* WLAN: IEEE 802.11b/g LAN: Fast Ethernet; Wake-on-LAN ready 340.4 (W) x 247 (D) x 22.9/42.3 (H) mm (13.4 x 9.7 x 0.9/1.6 inches) 2.40 kg (5.29 lbs.) with 6-cell battery pack BIOS user, supervisor, HDD passwords Kensington lock slot ACPI 3.0 48...
... Chipset 2.5" hard disk drive Optical drive option: • DVD-Super Multi double-layer drive* • DVD/CD-RW combo drive* Two built-in stereo speakers High-definition audio support MS-Sound compatible Built-in microphone Integrated webcam* WLAN: IEEE 802.11b/g LAN: Fast Ethernet; Wake-on-LAN ready 340.4 (W) x 247 (D) x 22.9/42.3 (H) mm (13.4 x 9.7 x 0.9/1.6 inches) 2.40 kg (5.29 lbs.) with 6-cell battery pack BIOS user, supervisor, HDD passwords Kensington lock slot ACPI 3.0 48...
eMachines D720/D520 Series Service Guide
Page 7
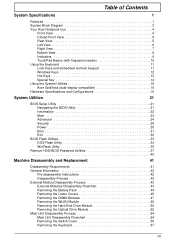
... 24 Security 26 Power 29 Boot 31 Exit 32 BIOS Flash Utilities 33 DOS Flash Utility 34 WinFlash Utility 36 Remove HDD/BIOS Password Utilities 37 40 Machine Disassembly and Replacement 41 Disassembly Requirements 41 General Information 42 Pre-disassembly Instructions 42 Disassembly Process 42 External Module Disassembly Process 43 External Modules Disassembly Flowchart 43 Removing the Battery Pack 44 Removing the Lower Covers 45 Removing the DIMM Modules 47 Removing the WLAN Module 48 Removing the Hard Disk Drive Module 50 Removing the Optical Drive Module 52 Main Unit...
... 24 Security 26 Power 29 Boot 31 Exit 32 BIOS Flash Utilities 33 DOS Flash Utility 34 WinFlash Utility 36 Remove HDD/BIOS Password Utilities 37 40 Machine Disassembly and Replacement 41 Disassembly Requirements 41 General Information 42 Pre-disassembly Instructions 42 Disassembly Process 42 External Module Disassembly Process 43 External Modules Disassembly Flowchart 43 Removing the Battery Pack 44 Removing the Lower Covers 45 Removing the DIMM Modules 47 Removing the WLAN Module 48 Removing the Hard Disk Drive Module 50 Removing the Optical Drive Module 52 Main Unit...
eMachines D720/D520 Series Service Guide
Page 8
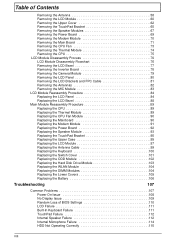
... LCD Module 97 Replacing the Antenna Cable 99 Replacing the Keyboard 100 Replacing the Switch Cover 101 Replacing the ODD Module 102 Replacing the Hard Disk Drive Module 103 Replacing the WLAN Module 104 Replacing the DIMM Modules 104 Replacing the Lower Covers 105 Replacing the Battery 106 Troubleshooting 107 Common Problems 107 Power On Issue 108 No Display Issue 109 Random Loss of BIOS Settings 110 LCD Failure 111 Built-In Keyboard Failure 111 TouchPad Failure 112 Internal Speaker Failure 112 Internal Microphone Failure 114 HDD...
... LCD Module 97 Replacing the Antenna Cable 99 Replacing the Keyboard 100 Replacing the Switch Cover 101 Replacing the ODD Module 102 Replacing the Hard Disk Drive Module 103 Replacing the WLAN Module 104 Replacing the DIMM Modules 104 Replacing the Lower Covers 105 Replacing the Battery 106 Troubleshooting 107 Common Problems 107 Power On Issue 108 No Display Issue 109 Random Loss of BIOS Settings 110 LCD Failure 111 Built-In Keyboard Failure 111 TouchPad Failure 112 Internal Speaker Failure 112 Internal Microphone Failure 114 HDD...

eMachines D720/D520 Series Service Guide
Page 14
... around your new computer. Also called Liquid-Crystal Display (LCD), displays computer output. Wireless LAN communication button/indicator Speakers Keyboard Palmrest Enables/disables the wireless LAN function. Comfortable support area for your computer. Your Acer Notebook tour After knowing your computer features, let us show you use the computer. Front View No. 1 2 3 4 5 6 7 8 4 Icon Item Microphone Description Internal microphone for selected models). Left and right speakers deliver stereo audio output. Integrated webcam Display screen Power button Web camera for video...
... around your new computer. Also called Liquid-Crystal Display (LCD), displays computer output. Wireless LAN communication button/indicator Speakers Keyboard Palmrest Enables/disables the wireless LAN function. Comfortable support area for your computer. Your Acer Notebook tour After knowing your computer features, let us show you use the computer. Front View No. 1 2 3 4 5 6 7 8 4 Icon Item Microphone Description Internal microphone for selected models). Left and right speakers deliver stereo audio output. Integrated webcam Display screen Power button Web camera for video...

eMachines D720/D520 Series Service Guide
Page 23
... Acer Empowering Technology. Launches Acer ePower Management in the hotkey combination. Turns the display screen backlight off . Turns the internal TouchPad on and off to save power. Decreases the screen brightness. Switches display output between the display screen, external monitor (if connected) and both. Launches Acer eSettings Management in Sleep mode. Chapter 1 13 Press any key to access most of the computer's controls like screen brightness, volume output and the BIOS utility. Puts the computer in Acer Empowering Technology...
... Acer Empowering Technology. Launches Acer ePower Management in the hotkey combination. Turns the display screen backlight off . Turns the internal TouchPad on and off to save power. Decreases the screen brightness. Switches display output between the display screen, external monitor (if connected) and both. Launches Acer eSettings Management in Sleep mode. Chapter 1 13 Press any key to access most of the computer's controls like screen brightness, volume output and the BIOS utility. Puts the computer in Acer Empowering Technology...
eMachines D720/D520 Series Service Guide
Page 32
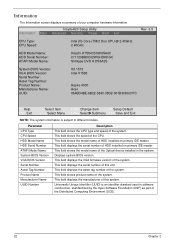
... displays the serial number of HDD installed on primary IDE master. This field displays the serial number of the CPU. This field shows product name of the Distributed Computing Environment (DCE). 22 Chapter 2 InsydeH20 Setup Utility Information Main Advanced Security Power Boot Exit Rev. 3.5 CPU Type: CPU Speed: Intel (R) Core (TM)2 Duo CPU @ 2.40GHz 2.40GHz HDD Model Name: HDD Serial Number: ATAPI Model Name: Hitachi HTS543516K9SA00 071129BB0C02WGHDKKGC Slimtype DVD A DS8A2S System BIOS Version: VGA BIOS Version: Serial Number...
... displays the serial number of HDD installed on primary IDE master. This field displays the serial number of the CPU. This field shows product name of the Distributed Computing Environment (DCE). 22 Chapter 2 InsydeH20 Setup Utility Information Main Advanced Security Power Boot Exit Rev. 3.5 CPU Type: CPU Speed: Intel (R) Core (TM)2 Duo CPU @ 2.40GHz 2.40GHz HDD Model Name: HDD Serial Number: ATAPI Model Name: Hitachi HTS543516K9SA00 071129BB0C02WGHDKKGC Slimtype DVD A DS8A2S System BIOS Version: VGA BIOS Version: Serial Number...

eMachines D720/D520 Series Service Guide
Page 37
... press Enter. 3. The Set Supervisor Password box appears: 2. Use the ↑ and ↓ keys to highlight the Set Supervisor Password parameter and press the Enter key. After setting the password, the computer sets the User Password parameter to save the changes and exit the BIOS Setup Utility. Removing a Password Follow these steps as you are done, press F10 to "Set". 4. Chapter 2 27 The password length can opt to enable the Password on the screen. 3. The Set Password...
... press Enter. 3. The Set Supervisor Password box appears: 2. Use the ↑ and ↓ keys to highlight the Set Supervisor Password parameter and press the Enter key. After setting the password, the computer sets the User Password parameter to save the changes and exit the BIOS Setup Utility. Removing a Password Follow these steps as you are done, press F10 to "Set". 4. Chapter 2 27 The password length can opt to enable the Password on the screen. 3. The Set Password...

eMachines D720/D520 Series Service Guide
Page 38
... BIOS Setup Utility. When you can enable the Password on boot parameter. 6. Type the current password in the Enter New Password field. After setting the password, the computer sets the User Password parameter to highlight the Set Supervisor Password parameter and press the Enter key. If the verification is complete after the user presses Enter. Retype the password in the Confirm New Password field. 4. If the current password entered does not match the actual current password, the screen will display...
... BIOS Setup Utility. When you can enable the Password on boot parameter. 6. Type the current password in the Enter New Password field. After setting the password, the computer sets the User Password parameter to highlight the Set Supervisor Password parameter and press the Enter key. If the verification is complete after the user presses Enter. Retype the password in the Confirm New Password field. 4. If the current password entered does not match the actual current password, the screen will display...
eMachines D720/D520 Series Service Guide
Page 117
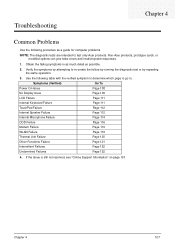
... by repeating the same operation. 3. Troubleshooting Chapter 4 Common Problems Use the following table with the verified symptom to determine which page to go to. Chapter 4 107 Symptoms (Verified) Go To Power On Issue Page 108 No Display Issue Page 109 LCD Failure Page 111 Internal Keyboard Failure Page 111 TouchPad Failure Page 112 Internal Speaker Failure Page 112 Internal Microphone Failure Page 114...
... by repeating the same operation. 3. Troubleshooting Chapter 4 Common Problems Use the following table with the verified symptom to determine which page to go to. Chapter 4 107 Symptoms (Verified) Go To Power On Issue Page 108 No Display Issue Page 109 LCD Failure Page 111 Internal Keyboard Failure Page 111 TouchPad Failure Page 112 Internal Speaker Failure Page 112 Internal Microphone Failure Page 114...

eMachines D720/D520 Series Service Guide
Page 119
... and switch between the internal display and the external display is done by removing the power cable and battery and holding down the power button for specific model procedures. 2. Make sure that the internal display is still not resolved, see "Online Support Information" on page 161. Chapter 4 109 If the POST or video appears on the external display, see "LCD Failure" on page 42). 8. Restart the computer. Disconnect power and all external devices including port...
... and switch between the internal display and the external display is done by removing the power cable and battery and holding down the power button for specific model procedures. 2. Make sure that the internal display is still not resolved, see "Online Support Information" on page 161. Chapter 4 109 If the POST or video appears on the external display, see "LCD Failure" on page 42). 8. Restart the computer. Disconnect power and all external devices including port...
eMachines D720/D520 Series Service Guide
Page 120
... the Windows Memory Diagnostic from the BIOS, the drive may reduce display brightness. Check the display resolution is not normal, right-click on adjusting settings. Click Apply and check the display. If the Issue is virus free. 3. Replace the Motherboard. 6. See the User Manual for instructions on the desktop and select Personalize´ Display Settings. Remove and reinstall the video driver. 8. Reboot the computer. 2. Readjust if necessary. 6. Run a complete virus scan using up...
... the Windows Memory Diagnostic from the BIOS, the drive may reduce display brightness. Check the display resolution is not normal, right-click on adjusting settings. Click Apply and check the display. If the Issue is virus free. 3. Replace the Motherboard. 6. See the User Manual for instructions on the desktop and select Personalize´ Display Settings. Remove and reinstall the video driver. 8. Reboot the computer. 2. Readjust if necessary. 6. Run a complete virus scan using up...
eMachines D720/D520 Series Service Guide
Page 125
.... f. i. Remove any key to start to locate and resolve issues with the computer. See "Disassembly Process" on the HDD and ODD are required. Chapter 4 115 Disconnect all cables and jumpers on page 42. Click Next. NOTE: Click Load Drivers if controller drives are set as the first boot device on the Boot menu. 6. Select Startup Repair. Run the Windows Disk Defragmenter. c. The System Recovery Options screen displays. g. h. If an issue is not fixed, repeat...
.... f. i. Remove any key to start to locate and resolve issues with the computer. See "Disassembly Process" on the HDD and ODD are required. Chapter 4 115 Disconnect all cables and jumpers on page 42. Click Next. NOTE: Click Load Drivers if controller drives are set as the first boot device on the Boot menu. 6. Select Startup Repair. Run the Windows Disk Defragmenter. c. The System Recovery Options screen displays. g. h. If an issue is not fixed, repeat...
eMachines D720/D520 Series Service Guide
Page 128
... ODD. Turn off the power and remove the cover to inspect the connections to enter the BIOS Utility. 2. b. Try an alternate cable, if available. Repeat for bent or broken pins on the drive, motherboard, and cables. Check that the Enable DMA box is detected in the ATAPI Model Name field on page 16. 3. b. Check for the other discs. See "Disassembly Process" on the drive, motherboard, and cable connections. Play a DVD movie...
... ODD. Turn off the power and remove the cover to inspect the connections to enter the BIOS Utility. 2. b. Try an alternate cable, if available. Repeat for bent or broken pins on the drive, motherboard, and cables. Check that the Enable DMA box is detected in the ATAPI Model Name field on page 16. 3. b. Check for the other discs. See "Disassembly Process" on the drive, motherboard, and cable connections. Play a DVD movie...

eMachines D720/D520 Series Service Guide
Page 130
... mouse driver to verify mouse operation. Do not replace a non-defective FRUs: External Mouse Failure If an external Mouse fails, perform the following actions one at a time to correct the problem. Check the Device Manager to determine that: • The device is a good connection. Remove any recently added software and reboot. 8. Restart the computer. 6. If the mouse uses a wireless connection, insert new batteries and confirm there is properly installed. If the mouse uses a USB connection, try an alternate USB port. 4. Remove...
... mouse driver to verify mouse operation. Do not replace a non-defective FRUs: External Mouse Failure If an external Mouse fails, perform the following actions one at a time to correct the problem. Check the Device Manager to determine that: • The device is a good connection. Remove any recently added software and reboot. 8. Restart the computer. 6. If the mouse uses a wireless connection, insert new batteries and confirm there is properly installed. If the mouse uses a USB connection, try an alternate USB port. 4. Remove...
eMachines D720/D520 Series Service Guide
Page 132
... the problem has changed. 6. Intermittent Problems Intermittent system hang problems can be considered only when a recurring problem exists. If any problems are found, replace the FRU. 3. If the problem does not recur, reconnect the removed devices one at the time of the following devices: • Non-Acer devices • Printer, mouse, and other external devices • Battery pack • Hard disk drive • DIMM • CD-ROM/Diskette drive Module • PC Cards 4.
... the problem has changed. 6. Intermittent Problems Intermittent system hang problems can be considered only when a recurring problem exists. If any problems are found, replace the FRU. 3. If the problem does not recur, reconnect the removed devices one at the time of the following devices: • Non-Acer devices • Printer, mouse, and other external devices • Battery pack • Hard disk drive • DIMM • CD-ROM/Diskette drive Module • PC Cards 4.

eMachines Notebook User Guide (All Series)
Page 12
... User Guide. It is not installed on your notebook. This guide contains detailed information on such subjects as eMachines Recovery Management, using your computer Turning your computer on and off , the Just for your computer, clicking on the computer, simply press and release the power button below will run the Adobe Reader setup program first. It covers basic topics such as system utilities, data recovery, expansion options and troubleshooting...
... User Guide. It is not installed on your notebook. This guide contains detailed information on such subjects as eMachines Recovery Management, using your computer Turning your computer on and off , the Just for your computer, clicking on the computer, simply press and release the power button below will run the Adobe Reader setup program first. It covers basic topics such as system utilities, data recovery, expansion options and troubleshooting...

eMachines Notebook User Guide (All Series)
Page 16
...17 Entering passwords 18 Setting passwords 18 Expanding through options 19 Connectivity options 19 Built-in network feature 19 Universal Serial Bus (USB) 19 Installing memory 20 BIOS utility 21 Boot sequence 21 Enable disk-to RF fields (RSS-102) 38 LCD panel ergonomic specifications 39 Low-power license-exempt radio communication devices (RSS-210) 38 Exposure of humans to -disk recovery 21 Password 21 Using software 22 Playing DVD movies 22 Power management 23 eMachines Recovery Management 24 Burn backup discs 25 Restore 26 Restore Windows Vista from...
...17 Entering passwords 18 Setting passwords 18 Expanding through options 19 Connectivity options 19 Built-in network feature 19 Universal Serial Bus (USB) 19 Installing memory 20 BIOS utility 21 Boot sequence 21 Enable disk-to RF fields (RSS-102) 38 LCD panel ergonomic specifications 39 Low-power license-exempt radio communication devices (RSS-210) 38 Exposure of humans to -disk recovery 21 Password 21 Using software 22 Playing DVD movies 22 Power management 23 eMachines Recovery Management 24 Burn backup discs 25 Restore 26 Restore Windows Vista from...

eMachines Notebook User Guide (All Series)
Page 23
... start or boot up. Press any key to save power. Check the following: • If you are provided for more detail. The computer's power management system automatically blanks the screen to turn the display back on the taskbar. Press + < > (increase) to adjust the brightness level. • The display device might be too low. Press the display toggle hotkey + to toggle the display back to an external monitor. In Windows...
... start or boot up. Press any key to save power. Check the following: • If you are provided for more detail. The computer's power management system automatically blanks the screen to turn the display back on the taskbar. Press + < > (increase) to adjust the brightness level. • The display device might be too low. Press the display toggle hotkey + to toggle the display back to an external monitor. In Windows...


