eMachines D720/D520 Series Service Guide
Page 120
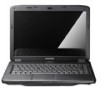
NOTE: Ensure that : • The device is properly installed. d. e. Check the Device Manager to determine that the computer is still not resolved, see "Online Support Information" on the desktop and select Personalize´ Display ... brightness. If the BIOS settings are no red Xs or yellow exclamation marks. • There are still lost, replace the cables. 4. Minimize or close all Windows. Random Loss of BIOS information, perform the following actions one at a time to correct the problem. 1. If HDD information is experiencing intermittent loss of BIOS...
NOTE: Ensure that : • The device is properly installed. d. e. Check the Device Manager to determine that the computer is still not resolved, see "Online Support Information" on the desktop and select Personalize´ Display ... brightness. If the BIOS settings are no red Xs or yellow exclamation marks. • There are still lost, replace the cables. 4. Minimize or close all Windows. Random Loss of BIOS information, perform the following actions one at a time to correct the problem. 1. If HDD information is experiencing intermittent loss of BIOS...

eMachines D720/D520 Series Service Guide
Page 125
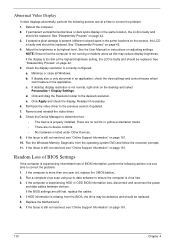
... Utility: a. e. For more information see Windows Help and Support. 5. Select Repair your computer. f. When complete, click Finish. Ensure all external devices. 2. Click Next. Restart the computer and press F2 to resolve the problem. 4. Click Next. The System Recovery Options screen displays. The Install Windows screen displays. For more information see Windows Help and Support. 9.
... Utility: a. e. For more information see Windows Help and Support. 5. Select Repair your computer. f. When complete, click Finish. Ensure all external devices. 2. Click Next. Restart the computer and press F2 to resolve the problem. 4. Click Next. The System Recovery Options screen displays. The Install Windows screen displays. For more information see Windows Help and Support. 9.

eMachines D720/D520 Series Service Guide
Page 127
...and DVD Movie fields, select the desired player from the drop down menu. 5. d. Select the Recording tab. Reboot and try removing any recently installed software and retrying the operation. Check that the software used for the selected media: IMPORTANT:Region can not be changed a limited number of times.... Discs Do Not Burn Properly If discs can only be changed even Windows is reinstalled or the drive is not removed from the item in the drive, perform the following actions one at a time to DMA: ...
...and DVD Movie fields, select the desired player from the drop down menu. 5. d. Select the Recording tab. Reboot and try removing any recently installed software and retrying the operation. Check that the software used for the selected media: IMPORTANT:Region can not be changed a limited number of times.... Discs Do Not Burn Properly If discs can only be changed even Windows is reinstalled or the drive is not removed from the item in the drive, perform the following actions one at a time to DMA: ...

eMachines D720/D520 Series Service Guide
Page 130
.... Try an alternative mouse. 2. Restart the computer. 6. Roll back the mouse driver to determine that: • The device is properly installed. Remove and reinstall the mouse driver. 12. Thermal Unit Failure If the Thermal Unit fails, perform the following actions one at a time to... Remove any recently added hardware and associated software. 7. Try an alternative program to check the events log for errors. For more information see Windows Help and Support. 10. See the mouse user manual. 3. Remove any recently added software and reboot. 8. Restore system and file settings ...
.... Try an alternative mouse. 2. Restart the computer. 6. Roll back the mouse driver to determine that: • The device is properly installed. Remove and reinstall the mouse driver. 12. Thermal Unit Failure If the Thermal Unit fails, perform the following actions one at a time to... Remove any recently added hardware and associated software. 7. Try an alternative program to check the events log for errors. For more information see Windows Help and Support. 10. See the mouse user manual. 3. Remove any recently added software and reboot. 8. Restore system and file settings ...

eMachines Notebook User Guide (All Series)
Page 10
...maximum comfort. Finding your comfort zone Find your comfort zone by pushing power button. • More power management settings can be done through Windows power management. Tips and information for power management: • Activate display's Sleep mode within 15 minutes of user inactivity. • Activate... care of your sitting height to relax your neck and shoulders • avoid tensing your muscles or shrugging your shoulders • install the external display, keyboard and mouse properly and within 30 minutes of user inactivity. • Wake the computer from staying too ...
...maximum comfort. Finding your comfort zone Find your comfort zone by pushing power button. • More power management settings can be done through Windows power management. Tips and information for power management: • Activate display's Sleep mode within 15 minutes of user inactivity. • Activate... care of your sitting height to relax your neck and shoulders • avoid tensing your muscles or shrugging your shoulders • install the external display, keyboard and mouse properly and within 30 minutes of user inactivity. • Wake the computer from staying too ...

eMachines Notebook User Guide (All Series)
Page 15
... xiv Touchpad 1 Touchpad basics (with two-click buttons) 1 Using the keyboard 2 Lock keys and embedded numeric keypad 2 Windows keys 3 Hotkeys 4 Special keys 5 Frequently asked questions 6 Battery pack 9 Battery pack characteristics 9 Maximizing the battery's life 9 Installing and removing the battery pack 10 Charging the battery 11 Checking the battery level 11 Optimising battery...
... xiv Touchpad 1 Touchpad basics (with two-click buttons) 1 Using the keyboard 2 Lock keys and embedded numeric keypad 2 Windows keys 3 Hotkeys 4 Special keys 5 Frequently asked questions 6 Battery pack 9 Battery pack characteristics 9 Maximizing the battery's life 9 Installing and removing the battery pack 10 Charging the battery 11 Checking the battery level 11 Optimising battery...

eMachines Notebook User Guide (All Series)
Page 16
...humans to -disk recovery 21 Password 21 Using software 22 Playing DVD movies 22 Power management 23 eMachines Recovery Management 24 Burn backup discs 25 Restore 26 Restore Windows Vista from backup discs 27 Troubleshooting 30 Troubleshooting tips 30 Error messages 30 Regulations and safety notices ... 18 Expanding through options 19 Connectivity options 19 Built-in network feature 19 Universal Serial Bus (USB) 19 Installing memory 20 BIOS utility 21 Boot sequence 21 Enable disk-to RF fields (RSS-102) 38 LCD panel ergonomic specifications 39
...humans to -disk recovery 21 Password 21 Using software 22 Playing DVD movies 22 Power management 23 eMachines Recovery Management 24 Burn backup discs 25 Restore 26 Restore Windows Vista from backup discs 27 Troubleshooting 30 Troubleshooting tips 30 Error messages 30 Regulations and safety notices ... 18 Expanding through options 19 Connectivity options 19 Built-in network feature 19 Universal Serial Bus (USB) 19 Installing memory 20 BIOS utility 21 Boot sequence 21 Enable disk-to RF fields (RSS-102) 38 LCD panel ergonomic specifications 39

eMachines Notebook User Guide (All Series)
Page 28
... to operate your AC adapter and battery. However, charging the battery with a fully charged battery. The recommended temperature is correctly installed in a significantly faster charge time. Checking the battery level The Windows power meter indicates the current battery level. Charging the battery To charge the battery, first make sure that it is...
... to operate your AC adapter and battery. However, charging the battery with a fully charged battery. The recommended temperature is correctly installed in a significantly faster charge time. Checking the battery level The Windows power meter indicates the current battery level. Charging the battery To charge the battery, first make sure that it is...

eMachines Notebook User Guide (All Series)
Page 45
...long-term use, you can set system parameters. 3 Use the left and right arrow keys to select the Boot submenu. Windows will be installed from the optical drive once the restore is complete. Do this before rebooting your computer. English 28 5 Use the arrow ...keys to complete the restore. 7 Remove the recovery disc from the recovery disc. 6 Insert the second recovery disc when prompted, then follow the on your computer. 2 During startup when the eMachines...
...long-term use, you can set system parameters. 3 Use the left and right arrow keys to select the Boot submenu. Windows will be installed from the optical drive once the restore is complete. Do this before rebooting your computer. English 28 5 Use the arrow ...keys to complete the restore. 7 Remove the recovery disc from the recovery disc. 6 Insert the second recovery disc when prompted, then follow the on your computer. 2 During startup when the eMachines...

eMachines Notebook User Guide (All Series)
Page 46
The system will reboot. 7 When you reboot, Windows will be installed from the optical drive once the restore is the highest priority. 6 Press the ESC key to enter the Exit submenu, press the ENTER key to a ...
The system will reboot. 7 When you reboot, Windows will be installed from the optical drive once the restore is the highest priority. 6 Press the ESC key to enter the Exit submenu, press the ENTER key to a ...

eMachines Notebook User Guide (All Series)
Page 58
... frequently-asked questions 6 H Hibernation mode hotkey 4 hotkeys 4 K keyboard 2 embedded numeric keypad 2 hotkeys 4 lock keys 2 troubleshooting 7 Windows keys 3 M memory installing 20 messages error 30 N network 19 num lock 2 numeric keypad embedded 2 P password 17 types 17 English 41 Index A AC adapter ...caring for xiii audio troubleshooting 6 B battery pack battery-low warning 12 caring for xiv characteristics 9 charging 11 checking charge level 11 installing 10 low conditions 12 maximizing life 9 optimizing 11 removing 11 using the first time 9 BIOS utility 21 brightness hotkeys 4 C caps ...
... frequently-asked questions 6 H Hibernation mode hotkey 4 hotkeys 4 K keyboard 2 embedded numeric keypad 2 hotkeys 4 lock keys 2 troubleshooting 7 Windows keys 3 M memory installing 20 messages error 30 N network 19 num lock 2 numeric keypad embedded 2 P password 17 types 17 English 41 Index A AC adapter ...caring for xiii audio troubleshooting 6 B battery pack battery-low warning 12 caring for xiv characteristics 9 charging 11 checking charge level 11 installing 10 low conditions 12 maximizing life 9 optimizing 11 removing 11 using the first time 9 BIOS utility 21 brightness hotkeys 4 C caps ...


