

User Manual
Page 3
... Flat-Panel Monitor 1 Unpacking the monitor 2 Setting up the monitor 2 Attaching the base 2 Connecting cables 3 Connecting a security cable 4 Turning on the monitor 4 Adjusting monitor settings 5 Monitor buttons 5 On-screen display options 6 Changing Windows screen settings 8 Power management 9 ENERGY STAR 9 Energy declaration 9 Maintaining 10 Troubleshooting 10 No power 10 No picture 10 Display colors are wrong 11 Picture has shadows or "ghosts 11 Color is not uniform 11 Image is not sized or centered correctly 11 The monitor has pixels that are always dark or too bright...
... Flat-Panel Monitor 1 Unpacking the monitor 2 Setting up the monitor 2 Attaching the base 2 Connecting cables 3 Connecting a security cable 4 Turning on the monitor 4 Adjusting monitor settings 5 Monitor buttons 5 On-screen display options 6 Changing Windows screen settings 8 Power management 9 ENERGY STAR 9 Energy declaration 9 Maintaining 10 Troubleshooting 10 No power 10 No picture 10 Display colors are wrong 11 Picture has shadows or "ghosts 11 Color is not uniform 11 Image is not sized or centered correctly 11 The monitor has pixels that are always dark or too bright...

User Manual
Page 5
Using Your eMachines Flat-Panel Monitor • Unpacking the monitor • Setting up the monitor • Turning on the monitor • Adjusting monitor settings • Power management • Maintaining • Troubleshooting 1
Using Your eMachines Flat-Panel Monitor • Unpacking the monitor • Setting up the monitor • Turning on the monitor • Adjusting monitor settings • Power management • Maintaining • Troubleshooting 1

User Manual
Page 6
... press the base's release button while you are missing any items, call Customer Care. Setting up the monitor To set up the monitor, first attach the base, then connect cables. Using Your eMachines Flat-Panel Monitor Unpacking the monitor Your monitor box should contain the following items: • Monitor (with neck attached) • Base (to connect to the neck) • This User Guide • VGA cable • Audio cable (Option)€ • Power cord If you slide...
... press the base's release button while you are missing any items, call Customer Care. Setting up the monitor To set up the monitor, first attach the base, then connect cables. Using Your eMachines Flat-Panel Monitor Unpacking the monitor Your monitor box should contain the following items: • Monitor (with neck attached) • Base (to connect to the neck) • This User Guide • VGA cable • Audio cable (Option)€ • Power cord If you slide...

User Manual
Page 7
www.emachines.com Connecting cables To connect video and power cables: 1 Position your computer and the monitor so you can reach the back of each, then connect the blue VGA video cable to the blue VGA video connector under the back of the monitor. 2 * Option for Dual Model Position your computer and the monitor so you can reach the back of each, then connect the white DVI video cable to the white DVI video connector under the back of the monitor. 3 Make sure that...
www.emachines.com Connecting cables To connect video and power cables: 1 Position your computer and the monitor so you can reach the back of each, then connect the blue VGA video cable to the blue VGA video connector under the back of the monitor. 2 * Option for Dual Model Position your computer and the monitor so you can reach the back of each, then connect the white DVI video cable to the white DVI video connector under the back of the monitor. 3 Make sure that...

User Manual
Page 8
... to your monitor's AUDIO jack. (Option) Audio jack 6 Plug the power cord into a correctly grounded (three-prong) AC power outlet. We recommend using a surge protector to the lock slot on the back of your monitor. To connect a cable lock, follow the cable lock's instructions to connect it to protect your monitor from that shown.) Power button Important Turn on your monitor before turning on the front of your monitor (cable lock not included). Using Your eMachines Flat-Panel Monitor 5 If you...
... to your monitor's AUDIO jack. (Option) Audio jack 6 Plug the power cord into a correctly grounded (three-prong) AC power outlet. We recommend using a surge protector to the lock slot on the back of your monitor. To connect a cable lock, follow the cable lock's instructions to connect it to protect your monitor from that shown.) Power button Important Turn on your monitor before turning on the front of your monitor (cable lock not included). Using Your eMachines Flat-Panel Monitor 5 If you...

User Manual
Page 9
... through Windows) to adjust the display image. While the OSD is running, the power LED on page 5. For more information about computer controls, see "Adjusting monitor settings" on the monitor's power button should be blue. The monitor saves changes you make to adjust other settings for the current screen resolution. 4 After you do not see a display image, check the connections. Monitor buttons This monitor features an on -screen display (OSD) to the settings, even if you adjust contrast, brightness, and other monitor settings. Allow several seconds for the best viewing angle...
... through Windows) to adjust the display image. While the OSD is running, the power LED on page 5. For more information about computer controls, see "Adjusting monitor settings" on the monitor's power button should be blue. The monitor saves changes you make to adjust other settings for the current screen resolution. 4 After you do not see a display image, check the connections. Monitor buttons This monitor features an on -screen display (OSD) to the settings, even if you adjust contrast, brightness, and other monitor settings. Allow several seconds for the best viewing angle...

User Manual
Page 10
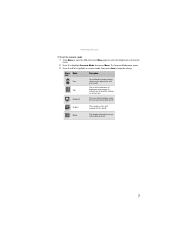
... menus: Menu Name icon Brightness and Contrast Focus and Clock Description Adjusts the brightness and contrast (by selecting User) or selects a color mode (by selecting Scenario Mode). OSD Settings Adjusts the horizontal and vertical position of the OSD and sets the timeout. Adjusts focus and clock settings. Position Adjusts horizontal and vertical screen image position. Input Source Wide Mode DDC/CI Settings Select input signal from D-Sub or DVI-D or HDMI Select Wide mode setting for the OSD. The OSD opens. 3 Press < and > to highlight a setting, then press Menu to defaults.
... menus: Menu Name icon Brightness and Contrast Focus and Clock Description Adjusts the brightness and contrast (by selecting User) or selects a color mode (by selecting Scenario Mode). OSD Settings Adjusts the horizontal and vertical position of the OSD and sets the timeout. Adjusts focus and clock settings. Position Adjusts horizontal and vertical screen image position. Input Source Wide Mode DDC/CI Settings Select input signal from D-Sub or DVI-D or HDMI Select Wide mode setting for the OSD. The OSD opens. 3 Press < and > to highlight a setting, then press Menu to defaults.
User Manual
Page 11
... User-defined (custom) settings, User which can be adjusted to highlight Scenario Mode, then press Menu. This is the best general-purpose mode. Graphic This enhances color and emphasizes fine detail. Standard This uses default settings, and is the best balance of Text brightness and contrast to keep the setting. Movie This displays full-motion scenes in the clearest detail. 7 www.emachines.com To set the scenario mode: 1 Press Menu to open the OSD...
... User-defined (custom) settings, User which can be adjusted to highlight Scenario Mode, then press Menu. This is the best general-purpose mode. Graphic This enhances color and emphasizes fine detail. Standard This uses default settings, and is the best balance of Text brightness and contrast to keep the setting. Movie This displays full-motion scenes in the clearest detail. 7 www.emachines.com To set the scenario mode: 1 Press Menu to open the OSD...

User Manual
Page 12
... Control Panel is in Windows XP: 1 Click Start, then click Control Panel. If the new settings make the screen illegible and you have played a game or run a video-intensive program, check the color depth setting and return it to display images on the monitor. Color depth is the number of pixels (individual colored dots) your monitor. Using Your eMachines Flat-Panel Monitor Changing Windows screen settings Color depth and screen resolution are two of the most basic monitor settings you prefer, then click OK. 8 The Control Panel opens...
... Control Panel is in Windows XP: 1 Click Start, then click Control Panel. If the new settings make the screen illegible and you have played a game or run a video-intensive program, check the color depth setting and return it to display images on the monitor. Color depth is the number of pixels (individual colored dots) your monitor. Using Your eMachines Flat-Panel Monitor Changing Windows screen settings Color depth and screen resolution are two of the most basic monitor settings you prefer, then click OK. 8 The Control Panel opens...

User Manual
Page 13
...: VESA state LED indicator Power consumption On Green < 30 W (E182H&/E192HQ) < 48 W (E202H) Active Off Amber Acer is ENERGY STAR? Products that supports the VESA Display Power Management Signaling (DPMS) protocol, the monitor can be reduced to offer our customers products with the ENERGY STAR mark. In the Active Off mode the power LED turns amber. marks Energy declaration When connected to offer products and services worldwide...
...: VESA state LED indicator Power consumption On Green < 30 W (E182H&/E192HQ) < 48 W (E202H) Active Off Amber Acer is ENERGY STAR? Products that supports the VESA Display Power Management Signaling (DPMS) protocol, the monitor can be reduced to offer our customers products with the ENERGY STAR mark. In the Active Off mode the power LED turns amber. marks Energy declaration When connected to offer products and services worldwide...

User Manual
Page 14
... the power cord is connected securely to both your notebook's display and this monitor as your primary monitor and not use this monitor in this troubleshooting section may help you toggle between your notebook's user guide for about the picture quality. Notebook computers typically have problems with water only. No picture • Make sure that the video cable is connected correctly to reach maximum brightness. Wipe the cabinet, screen, and controls. See...
... the power cord is connected securely to both your notebook's display and this monitor as your primary monitor and not use this monitor in this troubleshooting section may help you toggle between your notebook's user guide for about the picture quality. Notebook computers typically have problems with water only. No picture • Make sure that the video cable is connected correctly to reach maximum brightness. Wipe the cabinet, screen, and controls. See...

User Manual
Page 15
... or pushed in. Picture has shadows or "ghosts" • Press Auto to automatically adjust the display image to the ideal settings. • Remove any extension cables or switchboxes. • Make sure that the video cable is connected securely to the back of the monitor and your computer. www.emachines.com • If the power LED is amber: • Make sure that your computer is turned on. • Move...
... or pushed in. Picture has shadows or "ghosts" • Press Auto to automatically adjust the display image to the ideal settings. • Remove any extension cables or switchboxes. • Make sure that the video cable is connected securely to the back of the monitor and your computer. www.emachines.com • If the power LED is amber: • Make sure that your computer is turned on. • Move...

User Manual
Page 16
... can display at your monitor's native resolution. • This may require you to make changes to the Windows System Registry. eMachines' inspection standards keep these pixels are always dark or too bright • This condition is justified based on your computer. Using Your eMachines Flat-Panel Monitor • If the image looks stretched or fuzzy, you need, see "Changing Windows screen settings" on page 8. • If you feel these to identify whether a repair or replacement...
... can display at your monitor's native resolution. • This may require you to make changes to the Windows System Registry. eMachines' inspection standards keep these pixels are always dark or too bright • This condition is justified based on your computer. Using Your eMachines Flat-Panel Monitor • If the image looks stretched or fuzzy, you need, see "Changing Windows screen settings" on page 8. • If you feel these to identify whether a repair or replacement...

User Manual
Page 19
... switch, make sure that the switch is damaged. ■ The system performance changes. Safety, Regulatory, and Legal Notices Important safety information Warning Always follow all instructions marked on the product and in the monitor case are unable to insert the plug into the extension cord does not exceed the extension cord ampere rating. No user serviceable parts inside. Your eMachines product is a safety feature. Make...
... switch, make sure that the switch is damaged. ■ The system performance changes. Safety, Regulatory, and Legal Notices Important safety information Warning Always follow all instructions marked on the product and in the monitor case are unable to insert the plug into the extension cord does not exceed the extension cord ampere rating. No user serviceable parts inside. Your eMachines product is a safety feature. Make...

User Manual
Page 20
...laws. For additional recycling information specific to your "end of life" product may contact us at the Customer Care number listed in the municipal waste ...longer useful to you can do your part for the environment by ensuring that potentially hazardous substances are disposed of new eMachines equipment. www.emachines.com...user guide and we will be "traded in your "end of life" product, you with your "end of life" product. Finally, we can reduce the amount of natural resources needed to produce electrical and electronic equipment, minimize the use of our natural resources, eMachines...
...laws. For additional recycling information specific to your "end of life" product may contact us at the Customer Care number listed in the municipal waste ...longer useful to you can do your part for the environment by ensuring that potentially hazardous substances are disposed of new eMachines equipment. www.emachines.com...user guide and we will be "traded in your "end of life" product, you with your "end of life" product. Finally, we can reduce the amount of natural resources needed to produce electrical and electronic equipment, minimize the use of our natural resources, eMachines...

User Manual
Page 21
...digital apparatus as set out in the radio interference regulations of Responsible Party: 333 West San Carlos St. Contact Person: Acer Representative Phone No.: 254-298-4000 Fax No.: 254-298-4147 Canada Industry Canada (IC) Unintentional emitter per ICES-003 This digital... apparatus does not exceed the Class B limits for this device must accept any interference received, including interference that may cause undesired operation. E192HQ xxx; A. E192HQ; www.emachines... this declaration: Product: 18.5 &20" LCD Monitor Model Number: E182H; S. A. San Jose, CA ...
...digital apparatus as set out in the radio interference regulations of Responsible Party: 333 West San Carlos St. Contact Person: Acer Representative Phone No.: 254-298-4000 Fax No.: 254-298-4147 Canada Industry Canada (IC) Unintentional emitter per ICES-003 This digital... apparatus does not exceed the Class B limits for this device must accept any interference received, including interference that may cause undesired operation. E192HQ xxx; A. E192HQ; www.emachines... this declaration: Product: 18.5 &20" LCD Monitor Model Number: E182H; S. A. San Jose, CA ...

User Manual
Page 22
... have been taken and are in Electrical and Electronic Equipment Year to assure that : Product: Trade Name: Model Number: SKU Number: or Blank) 18.5 &20" LCD Monitor emachines E182H;E192HQ;E202H E182H xxx; Easy Lai /Manager Regulation, Acer Inc. EN55022:2006, AS/NZS CISPR22:2006, Class B -. ...www.emachines.com European Union Acer Incorporated 8F, 88, Sec. 1, Hsin Tai Wu Rd., Hsichih Taipei Hsien 221, Taiwan ...
... have been taken and are in Electrical and Electronic Equipment Year to assure that : Product: Trade Name: Model Number: SKU Number: or Blank) 18.5 &20" LCD Monitor emachines E182H;E192HQ;E202H E182H xxx; Easy Lai /Manager Regulation, Acer Inc. EN55022:2006, AS/NZS CISPR22:2006, Class B -. ...www.emachines.com European Union Acer Incorporated 8F, 88, Sec. 1, Hsin Tai Wu Rd., Hsichih Taipei Hsien 221, Taiwan ...


