

Service Guide
Page 7
Table of Contents System Specifications 1 Features 1 System Block Diagram 4 Your Acer Notebook tour 5 Front View 5 Closed Front View 6 Rear View 7 Left View 7 Right View 8 Bottom View 8 Indicators 10 TouchPad Basics 11 Using the Keyboard 12 Lock ...Utilities 16 Acer GridVista (dual-display compatible 16 Hardware Specifications and Configurations 17 System Utilities 25 BIOS Setup Utility 25 Navigating the BIOS Utility 25 eMachines E627 BIOS 26 Information 26 Main 27 Security 28 Boot 31 Exit 32 BIOS Flash Utilities 33 DOS Flash Utility 34 WinFlash Utility 35 Remove...
Table of Contents System Specifications 1 Features 1 System Block Diagram 4 Your Acer Notebook tour 5 Front View 5 Closed Front View 6 Rear View 7 Left View 7 Right View 8 Bottom View 8 Indicators 10 TouchPad Basics 11 Using the Keyboard 12 Lock ...Utilities 16 Acer GridVista (dual-display compatible 16 Hardware Specifications and Configurations 17 System Utilities 25 BIOS Setup Utility 25 Navigating the BIOS Utility 25 eMachines E627 BIOS 26 Information 26 Main 27 Security 28 Boot 31 Exit 32 BIOS Flash Utilities 33 DOS Flash Utility 34 WinFlash Utility 35 Remove...

Service Guide
Page 15
Your Acer Notebook tour After knowing your computer features, let us show you around your computer. Indicates the status of wireless LAN communication. Touch-sensitive pointing device which ...
Your Acer Notebook tour After knowing your computer features, let us show you around your computer. Indicates the status of wireless LAN communication. Touch-sensitive pointing device which ...
Service Guide
Page 26
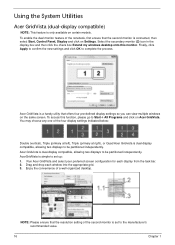
... GridVista. Drag and drop each display from the task bar. 2. To enable the dual monitor feature of a well-organized desktop. Enjoy the convenience of the notebook, first ensure that the second monitor is connected, then select Start, Control Panel, Display and click on certain models. Using the System Utilities Acer GridVista...
... GridVista. Drag and drop each display from the task bar. 2. To enable the dual monitor feature of a well-organized desktop. Enjoy the convenience of the notebook, first ensure that the second monitor is connected, then select Start, Control Panel, Display and click on certain models. Using the System Utilities Acer GridVista...

Service Guide
Page 38
... Enabled NOTE: When you have three tries before the system halts. The user can enter Setup menu only and does not have to return your notebook computer to your password, you forget your dealer to enter setup. Information M a i n PhoenixBIOS Setup Utility Security Boot Exit Supervisor Password Is: User Password Is: HDD0...
... Enabled NOTE: When you have three tries before the system halts. The user can enter Setup menu only and does not have to return your notebook computer to your password, you forget your dealer to enter setup. Information M a i n PhoenixBIOS Setup Utility Security Boot Exit Supervisor Password Is: User Password Is: HDD0...

Service Guide
Page 51
... procedures on how to avoid mismatch when putting back the components. During the disassembly process, group the screws with the corresponding components to disassemble the notebook computer for the different components vary in size. Chapter 3 41 Disassembly Requirements To disassemble the computer, you need the following tools: • Wrist grounding strap...
... procedures on how to avoid mismatch when putting back the components. During the disassembly process, group the screws with the corresponding components to disassemble the notebook computer for the different components vary in size. Chapter 3 41 Disassembly Requirements To disassemble the computer, you need the following tools: • Wrist grounding strap...

Service Guide
Page 133
... "Disassembly Process" on page 177. Chapter 4 123 Reference Product pages for 10 seconds. Make sure the computer has power by pressing Fn+F5 (on this notebook model, switching between the internal display and the external display is by checking at least one at a time to the computer and switch between the...
... "Disassembly Process" on page 177. Chapter 4 123 Reference Product pages for 10 seconds. Make sure the computer has power by pressing Fn+F5 (on this notebook model, switching between the internal display and the external display is by checking at least one at a time to the computer and switch between the...

Service Guide
Page 148
.... It repeats this sequence continuously. 138 Chapter 4 Code C5h C6h C7h C8h C9h D2h Beeps POST Routine Description PnPnd dual CMOS (optional) Initialize notebook docking (optional) Initialize notebook docking late Force check (optional) Extended checksum (optional) Unknown interrupt Code E0h Beeps For Boot Block in Flash ROM Initialize the chipset E1h Initialize...
.... It repeats this sequence continuously. 138 Chapter 4 Code C5h C6h C7h C8h C9h D2h Beeps POST Routine Description PnPnd dual CMOS (optional) Initialize notebook docking (optional) Initialize notebook docking late Force check (optional) Extended checksum (optional) Unknown interrupt Code E0h Beeps For Boot Block in Flash ROM Initialize the chipset E1h Initialize...
Service Guide
Page 187
... our services, so if you have any suggestions or comments, please do not hesitate to communicate these purposes, we offer, accompanied by a list of Acer's Notebook, Desktop and Server models including: • Service guides for all models • User's manuals • Training materials • Bios updates • Software utilities • Spare...
... our services, so if you have any suggestions or comments, please do not hesitate to communicate these purposes, we offer, accompanied by a list of Acer's Notebook, Desktop and Server models including: • Service guides for all models • User's manuals • Training materials • Bios updates • Software utilities • Spare...

Service Guide
Page 190
... 72 Replacing 99 media access on indicator 6, 10 Memory Removing 49 Replacing 116 Memory Check 122 Model Definition 160 N No Display Issue 123 Notebook Manager hotkey 14 num lock on indicator 6, 10 O 180 ODD Failure 129 Online Support Information 177 Optical Disk Drive Replacing 117 Optical Drive... Module Removing 47 P Panel 5 Bottom 8 PC Card 10 Power Board Removing 65 Replacing 104 Power On Failure 122 R Right Speaker Module Removing 68 Replacing 102 RTC Battery Removing 73 S SD ...
... 72 Replacing 99 media access on indicator 6, 10 Memory Removing 49 Replacing 116 Memory Check 122 Model Definition 160 N No Display Issue 123 Notebook Manager hotkey 14 num lock on indicator 6, 10 O 180 ODD Failure 129 Online Support Information 177 Optical Disk Drive Replacing 117 Optical Drive... Module Removing 47 P Panel 5 Bottom 8 PC Card 10 Power Board Removing 65 Replacing 104 Power On Failure 122 R Right Speaker Module Removing 68 Replacing 102 RTC Battery Removing 73 S SD ...


