
Product Manual
Page 3
... entire team, thank you for purchasing an iRobot Roomba vacuum cleaning robot. Register your business, feedback and loyalty. we appreciate your robot right now at www.irobot.com/register. Here's to get the best performance from you can also tell us about new robots, exclusive discounts and special promotions. Register your robot. Please take a few moments to read...
... entire team, thank you for purchasing an iRobot Roomba vacuum cleaning robot. Register your business, feedback and loyalty. we appreciate your robot right now at www.irobot.com/register. Here's to get the best performance from you can also tell us about new robots, exclusive discounts and special promotions. Register your robot. Please take a few moments to read...

Service Manual
Page 2
... Data Report to iRobot ...9 Roomba 500 Series Vacuuming Robot 10 Roomba Terminology...10 Roomba Features and Compatibility...13 Roomba Cleaning Behavior and Technology 15 Service Procedure (based on Built-in-Test Failures 17 Charging Accessories...21 Roomba Battery...22 Roomba Power Supply...23 Roomba Home Base...25 Roomba Accessories...27 Roomba Virtual Wall ...28 Roomba Virtual Wall Light House ...30 Roomba Wireless Command Center...
... Data Report to iRobot ...9 Roomba 500 Series Vacuuming Robot 10 Roomba Terminology...10 Roomba Features and Compatibility...13 Roomba Cleaning Behavior and Technology 15 Service Procedure (based on Built-in-Test Failures 17 Charging Accessories...21 Roomba Battery...22 Roomba Power Supply...23 Roomba Home Base...25 Roomba Accessories...27 Roomba Virtual Wall ...28 Roomba Virtual Wall Light House ...30 Roomba Wireless Command Center...
Service Manual
Page 3
... CONSTANTS ...46 BUILT-IN-TEST CHART ...47 ROOMBA BLACK BOX ...50 Appendix B : Roomba 500 Series Mobility Test Procedure 53 MOBILITY TEST PROCEDURE ...54 MOBILITY TABLE 3 CONSTRUCTION SPECIFICATIONS (IN MM 55 ROBOT RCON TEST ...56 VIRTUAL WALL TEST ...57 ...cleaning 62 VACUUM BIN Module inspection and cleaning 63 Appendix D: Roomba Spare Parts Replacement Instructions 64 Roomba Spare Parts Replacement (Battery, Side Brush, Cleaning Head and Wheel Modules 65 Roomba Faceplate Replacement ...69 Roomba Filter Replacement ...70 Roomba Front Wheel Replacement ...71 Appendix E: Roomba Software ...
... CONSTANTS ...46 BUILT-IN-TEST CHART ...47 ROOMBA BLACK BOX ...50 Appendix B : Roomba 500 Series Mobility Test Procedure 53 MOBILITY TEST PROCEDURE ...54 MOBILITY TABLE 3 CONSTRUCTION SPECIFICATIONS (IN MM 55 ROBOT RCON TEST ...56 VIRTUAL WALL TEST ...57 ...cleaning 62 VACUUM BIN Module inspection and cleaning 63 Appendix D: Roomba Spare Parts Replacement Instructions 64 Roomba Spare Parts Replacement (Battery, Side Brush, Cleaning Head and Wheel Modules 65 Roomba Faceplate Replacement ...69 Roomba Filter Replacement ...70 Roomba Front Wheel Replacement ...71 Appendix E: Roomba Software ...

Service Manual
Page 5
... fail to resolve the issue should reset Roomba's charging system by guiding a user through a troubleshooting process. At a minimum, iRobot recommends that the customer be done when the robot is complete. Clean out the vacuum bin and vacuum filter.5 2 1 4 3 5 B) If necessary, customer should a customer send the Roomba to resolve the Roomba issue. When ON the CLEAN button will...
... fail to resolve the issue should reset Roomba's charging system by guiding a user through a troubleshooting process. At a minimum, iRobot recommends that the customer be done when the robot is complete. Clean out the vacuum bin and vacuum filter.5 2 1 4 3 5 B) If necessary, customer should a customer send the Roomba to resolve the Roomba issue. When ON the CLEAN button will...

Service Manual
Page 6
... flexible brush counter rotate? See 'Pause Errors'; 'Behavioral Issues' and 'Charging Error' chapters below 04: Roomba Cleaning Remove and empty the vacuum bin and vacuum filter. Clean the cliff sensors with alcohol. 6 This can be done when the robot is low, charge the battery first. Look for a few minutes. If the battery is ON...
... flexible brush counter rotate? See 'Pause Errors'; 'Behavioral Issues' and 'Charging Error' chapters below 04: Roomba Cleaning Remove and empty the vacuum bin and vacuum filter. Clean the cliff sensors with alcohol. 6 This can be done when the robot is low, charge the battery first. Look for a few minutes. If the battery is ON...
Service Manual
Page 10
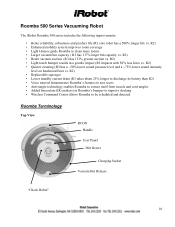
Roomba 500 Series Vacuuming Robot The iRobot Roomba 500 series includes the following improvements: • Better reliability, robustness and product life (R3 core robot has a 500% longer life vs. R2) • Light touch bumper results in Roomba's bumper to improve docking • Wireless Command Center allows Roomba to clean more rooms • Larger vacuum... mobility system improves room coverage • Light Houses guide Roomba to be scheduled and directed Roomba Terminology Top View RCON Handle User Panel Dirt Detect Charging Socket Vacuum Bin Release "Check Robot" 10
Roomba 500 Series Vacuuming Robot The iRobot Roomba 500 series includes the following improvements: • Better reliability, robustness and product life (R3 core robot has a 500% longer life vs. R2) • Light touch bumper results in Roomba's bumper to improve docking • Wireless Command Center allows Roomba to clean more rooms • Larger vacuum... mobility system improves room coverage • Light Houses guide Roomba to be scheduled and directed Roomba Terminology Top View RCON Handle User Panel Dirt Detect Charging Socket Vacuum Bin Release "Check Robot" 10
Service Manual
Page 14
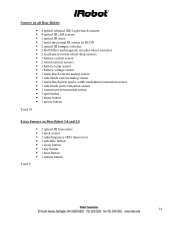
Sensors on all Base Robots ƒ 4 optical infrared (IR) Light-touch sensors ƒ 4 optical IR cliff sensors ƒ 1 optical IR stasis ƒ 1 omni directional IR sensor in RCON ƒ 2 optical ... ƒ 1 main-brush pwm (pulse width modulation) truncation sensor ƒ 1 side-brush pwm truncation sensor ƒ 1 vacuum pwm truncation sensor ƒ 1 spot button ƒ 1 home button ƒ 1 power button Total 29 Extra Sensors on Base Robot 3.4 and 3.5 ƒ 2 optical IR binoculars ƒ 1 dock sensor ƒ 1 radiofrequency (RF) transceiver ƒ 1 schedule button ƒ...
Sensors on all Base Robots ƒ 4 optical infrared (IR) Light-touch sensors ƒ 4 optical IR cliff sensors ƒ 1 optical IR stasis ƒ 1 omni directional IR sensor in RCON ƒ 2 optical ... ƒ 1 main-brush pwm (pulse width modulation) truncation sensor ƒ 1 side-brush pwm truncation sensor ƒ 1 vacuum pwm truncation sensor ƒ 1 spot button ƒ 1 home button ƒ 1 power button Total 29 Extra Sensors on Base Robot 3.4 and 3.5 ƒ 2 optical IR binoculars ƒ 1 dock sensor ƒ 1 radiofrequency (RF) transceiver ƒ 1 schedule button ƒ...

Service Manual
Page 15
... a 3-stage cleaning system 1. sweeps debris into corners 2. Vacuum - At the specified time, Roomba leaves its cleaning time appropriately. ƒ Spot Mode: Roomba will clean for a maximum of walls and into the vacuum bin 3. sucks up dust and small particles which is programmed, Roomba enters scheduled cleaning mode. The robot will clean until the battery depletes to...
... a 3-stage cleaning system 1. sweeps debris into corners 2. Vacuum - At the specified time, Roomba leaves its cleaning time appropriately. ƒ Spot Mode: Roomba will clean for a maximum of walls and into the vacuum bin 3. sucks up dust and small particles which is programmed, Roomba enters scheduled cleaning mode. The robot will clean until the battery depletes to...

Service Manual
Page 16
...detected it and slow down. The main brush and side brush will revert to specific situations o Cliff avoid - Roomba drives straight o Spiral - o Undocking - The brushes and vacuum are other behaviors that react to wall-follow - There is ON, it will switch off after a number of...not triggered) or when Roomba moves straight for the first time, Roomba goes into spiral mode (if the 'clean' button is held twice after the robot is special control of bumper activations. Roomba follows along a wall When first started, Roomba goes into wall follow - Roomba will drive straight and ...
...detected it and slow down. The main brush and side brush will revert to specific situations o Cliff avoid - Roomba drives straight o Spiral - o Undocking - The brushes and vacuum are other behaviors that react to wall-follow - There is ON, it will switch off after a number of...not triggered) or when Roomba moves straight for the first time, Roomba goes into spiral mode (if the 'clean' button is held twice after the robot is special control of bumper activations. Roomba follows along a wall When first started, Roomba goes into wall follow - Roomba will drive straight and ...

Service Manual
Page 37
...131; "Uh-Oh" followed by 2 beeps (main brush stall error) ƒ Main brushes do not spin ƒ Roomba is stuck in vacuum bin ƒ Roomba's brushes thump (approximately once per second) on hard floor surfaces or when no tassels or wires are present, try cleaning... inspection and cleaning (Appendix C). • BRUSH & FLAPPER inspection and cleaning (Appendix C). The robot may spin slowly or briefly spin backwards in the main brushes. Vacuum Bin issues Customer observations ƒ Vacuum isn't working. ƒ Debris isn't collecting on thick or high-pile carpets. Most common causes...
...131; "Uh-Oh" followed by 2 beeps (main brush stall error) ƒ Main brushes do not spin ƒ Roomba is stuck in vacuum bin ƒ Roomba's brushes thump (approximately once per second) on hard floor surfaces or when no tassels or wires are present, try cleaning... inspection and cleaning (Appendix C). • BRUSH & FLAPPER inspection and cleaning (Appendix C). The robot may spin slowly or briefly spin backwards in the main brushes. Vacuum Bin issues Customer observations ƒ Vacuum isn't working. ƒ Debris isn't collecting on thick or high-pile carpets. Most common causes...
Service Manual
Page 49
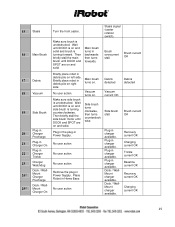
... SPOT are Side brush turns clockwise, then turns counterclock wise. Vacuum turns on left side. Plug-in charger available. Vacuum current OK. Dock / WallMount charger available. Charger On Plug-in charger available. Briefly place robot in turning forward. Plug-in 22 Charger Trickle No user action... Charging current OK Trickle current OK Baseline current OK Recovery current OK Charging current OK 49 Debris detected Debris detected 18 Vacuum No user action. 15 Stasis Turn the front caster. Wait until DOCK is turns in debris pile on and Main brush...
... SPOT are Side brush turns clockwise, then turns counterclock wise. Vacuum turns on left side. Plug-in charger available. Vacuum current OK. Dock / WallMount charger available. Charger On Plug-in charger available. Briefly place robot in turning forward. Plug-in 22 Charger Trickle No user action... Charging current OK Trickle current OK Baseline current OK Recovery current OK Charging current OK 49 Debris detected Debris detected 18 Vacuum No user action. 15 Stasis Turn the front caster. Wait until DOCK is turns in debris pile on and Main brush...

Service Manual
Page 61
CLEANING HEAD Module inspection and cleaning ƒ Check if main brushes are spinning by running the robot with the vacuum bin removed. ƒ Remove Brushes and clean them if dirty. ƒ Make sure both yellow main brush caps are installed correctly. ƒ If not, send ...; If the square end of bumper several times to shake out any debris that might be causing the bumper to avoid stairs, replace robot. 61 CLIFF SENSOR Module inspection and cleaning ƒ First determine that Roomba was not started on flat surfaces with compressed air, if available. ƒ If problem persists, replace...
CLEANING HEAD Module inspection and cleaning ƒ Check if main brushes are spinning by running the robot with the vacuum bin removed. ƒ Remove Brushes and clean them if dirty. ƒ Make sure both yellow main brush caps are installed correctly. ƒ If not, send ...; If the square end of bumper several times to shake out any debris that might be causing the bumper to avoid stairs, replace robot. 61 CLIFF SENSOR Module inspection and cleaning ƒ First determine that Roomba was not started on flat surfaces with compressed air, if available. ƒ If problem persists, replace...

Service Manual
Page 65
Side Brush Module Side brush with Screw Cleaning Head Module Bristle Brush Flapper Brush Brush end caps Brush Bearings Wire Bale Vacuum Bin Module Filter Frame Filter Removable Squeegee Bin Grill Cover (Green, White, Black) Battery Replaceable rubber dust shield Roomba Accessory Spare Parts WCC Battery Door Virtual Wall Battery Door Light House battery door Roomba Spare Parts Replacement (Battery, Side Brush, Cleaning Head and Wheel Modules) 1. Turn the robot over and remove side screw brush screw 65
Side Brush Module Side brush with Screw Cleaning Head Module Bristle Brush Flapper Brush Brush end caps Brush Bearings Wire Bale Vacuum Bin Module Filter Frame Filter Removable Squeegee Bin Grill Cover (Green, White, Black) Battery Replaceable rubber dust shield Roomba Accessory Spare Parts WCC Battery Door Virtual Wall Battery Door Light House battery door Roomba Spare Parts Replacement (Battery, Side Brush, Cleaning Head and Wheel Modules) 1. Turn the robot over and remove side screw brush screw 65

Service Manual
Page 74
Appendix I: Roomba Serial Number Robot Barcode Serial Number Format (barcode sticker on date of the month this robot was manufactured Model revision for remanufactured Model number (00000 - 09999) Year (since 2000) this robot was manufactured Month this robot was manufactured Day of manufacture Example: KYN535010707120100047 74 seen when vacuum bin is removed) MM Status: LLLLL YY mm dd RR SSSSS Manufacturer ID: 'JE' or 'KY' or 'PR' 'N' for new, 'R' for this robot Order that robot was made on inside chassis -
Appendix I: Roomba Serial Number Robot Barcode Serial Number Format (barcode sticker on date of the month this robot was manufactured Model revision for remanufactured Model number (00000 - 09999) Year (since 2000) this robot was manufactured Month this robot was manufactured Day of manufacture Example: KYN535010707120100047 74 seen when vacuum bin is removed) MM Status: LLLLL YY mm dd RR SSSSS Manufacturer ID: 'JE' or 'KY' or 'PR' 'N' for new, 'R' for this robot Order that robot was made on inside chassis -


