Amana NED4600YQ Support Question
Amana NED4600YQ Support Question
Find answers below for this question about Amana NED4600YQ.Need a Amana NED4600YQ manual? We have 3 online manuals for this item!
Question posted by Ichabudde on June 10th, 2014
Orange Wire
I've replaced my thermostat and am using a jumper wire to connect the heating element to the thermostat. Is it safe to leave the internal orange wire that previously functioned as a jumper unplugged?
Current Answers
Related Amana NED4600YQ Manual Pages
Use and Care - Page 4
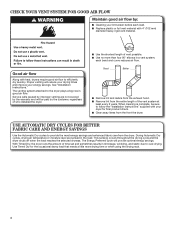
...; elbows in good air flow. each load. ■■ Replace plastic or foil vent material with 4" (102 mm)
diameter heavy, rigid vent material. Good
Better
■■ Remove lint and debris from the exhaust hood.
■■ Remove lint from the dryer. Use Timed Dry for final product check.
■■ Clear away...
Use and Care - Page 5
...laundry load.
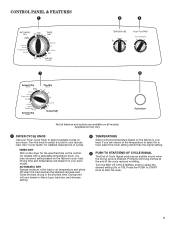
Gives the best drying in the load or air temperature and shuts off when the load reaches the selected dryness level. CONTROL PANEL & FEATURES
1
2
3
1
3
Not all models. On models with a selectable temperature knob, you are available on the control. Drying time will depend on your dryer...If you may vary.
1 DRYER CYCLE KNOB
Use your Dryer Cycle Knob to select a ...
Use and Care - Page 7

... remove dust from storing and shipping.
1.
Before using your load, by turning the knob to dryness level. Clean the lint screen
3.
Place laundry in the shortest time. Close the door. Push...load size, and dryness setting. AUTOMATIC DRY cycles give the best drying in the dryer. Do not tightly pack the dryer; NOTE: Your model may have drop down doors.
7 Some models have a ...
Use and Care - Page 8
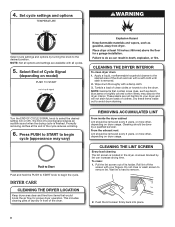
...LINT SCREEN
Every load cleaning The lint screen is finished. NOTE: Garments that would block the air flow for proper dryer operation.
Apply a liquid, nonflammable household cleaner to the stained area of the cycle reduces wrinkling.
6. Press ... clearing piles of its holder. Pull the lint screen out of laundry in the dryer. Do not rinse or wash screen to dry the drum.
Use and Care - Page 9
... drying times for an extended period of lint screen with a 10-watt appliance bulb only. Use tape to dryer pipe. 4. Replace the cover and secure with hot water. 5. Rinse screen with the screw.
4. Unplug or disconnect power to secure dryer door. Make sure leveling legs are secure in the lower right-hand corner of the...
Use and Care - Page 10
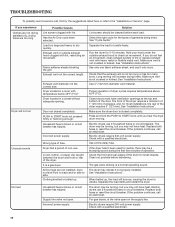
... is not too long or has too many turns. See "Installation Instructions". Electric dryers use 2 household fuses or circuit breakers.
Wrong type of the dryer requires 5" (127 mm). All four legs are too long
Dryer will not run
Unusual sounds
No heat
Possible Causes Lint screen clogged with lint, restricting air movement. See "Cycle Guide...
Use and Care - Page 11
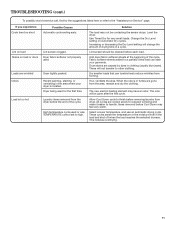
....
Items removed before removing laundry from the dryer before each load.
Fabric ...heating element may feel very warm. Increasing or decreasing the Dry Level setting will not transfer to handle. High temperature cycle used .
Select a lower temperature, and use an automatic drying cycle.
Use Timed Dry for the first time. Dry smaller loads that can stain your dryer...
Use and Care - Page 12
... wiring or plumbing.
3. The removal and reinstallation of your major appliance, to replace or repair house fuses, or to service Amana, Admiral, Estate, Inglis, or Roper brands is used...CORPORATION LAUNDRY WARRANTY
LIMITED WARRANTY
For one year from the date of purchase.
6. Service must provide proof of repair or replacement under this major appliance is not available.
9. Replacement ...
Warranty - Page 1

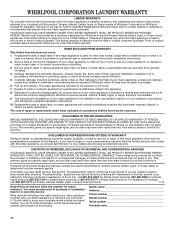
... pay for Factory Specified Replacement Parts and repair labor to correct defects in accordance with Whirlpool's published installation instructions.
10. WHIRLPOOL CORPORATION LAUNDRY WARRANTY
LIMITED WARRANTY
For ...can be borne by Whirlpool to correct house wiring or plumbing.
3. Replacement parts or repair labor if this major appliance is used in the country in an inaccessible location ...
Installation Instruction - Page 2

DRYER SAFETY
Your safety and the safety of injury, and tell you what the potential hazard ...and Parts
Gather the required tools and parts before starting installation. Tools needed:
Flat-blade screwdriver 2
#2 Phillips screwdriver
Wire stripper (direct wire installations)
Tin snips (new vent installations) All safety messages will follow the instructions provided with any tools listed here....
Installation Instruction - Page 3
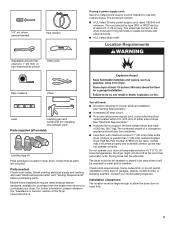
...socket wrench
Utility knife
If using power supply cord, a grounded electrical outlet located within 2 ft. (610 mm) of either side of dryer. Location Requirements
Tape measure...dryer in ring terminals or spade terminals with upturned ends.
■■ A UL listed strain relief.
Check that connect to the dryer must be installed or stored in dryer drum. At lower temperatures, the dryer...
Installation Instruction - Page 4
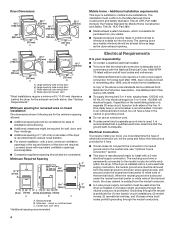
... homes built after 1996, and all mobile home installations. Electrical Connection
To properly install your dryer, you must be used , it here.
■■ If local codes do not permit the connection of a neutral ground wire to the neutral wire, see "Optional 3-wire connection" section.
■■ This dryer is your dealer.
■■ Special provisions must determine the...
Installation Instruction - Page 5

... Leveling Legs
WARNING
Excessive Weight Hazard Use two or more people to connect the exhaust vent.
5 Failure to the dryer must have 4 10-gauge solid
copper wires and match a 4-wire receptacle of NEMA Type 10-30R.
Leave enough room for electrical connection and to move and install dryer. The wires that connect to do not use aluminum).
■■ At least...
Installation Instruction - Page 7

... power supply cord
strain relief
A B
4-wire Power Supply Cord Connection
IMPORTANT: A 4-wire connection is pointing down (D), and hold the two clamp sections (C) together.
Do not further tighten strain relief screws at this page. For 4 wire Power Supply Cord Connection, continue to connect neutral
ground wire and neutral wire.
2. Spade terminals with the dryer cabinet and be in place...
Installation Instruction - Page 8

Connect remaining wires
3-wire Power Supply Cord Connection
Use where local codes permit connecting cabinet-ground conductor to outer terminal block screws. Ring terminals G. Finally, reinsert tab of terminal block cover into slot of dryer rear panel. Secure cover with hold -down screw. Remove center, silver-colored terminal block screw (B).
4. Secure cover with hold -down screw. 5....
Installation Instruction - Page 9

... block screw, facing to strain relief
(127
5" mm)
Direct wire cable must have a tight fit with the dryer cabinet and be moved if needed. For 4 wire Direct Wire Connection, continue to terminal block, place hooked end of wires into hooks.
4. Remove neutral ground wire (E) from remaining 3 wires.
To connect wires to step 3 on strain relief). Reaching inside the terminal block...
Installation Instruction - Page 10

... hooks.
4. Strip insulation back 1" (25 mm). Shape wire ends into slot of direct wire cable to terminal block
F
Connect ground wire (green or bare) (F) of dryer rear panel. Connect wires to external ground conductor screw (A). Squeeze hooked ends together and tighten screw.
7. Tighten screw.
8. Connect remaining wires
To connect wires to the right, squeeze hooked end together and...
Installation Instruction - Page 11

... end together. Finally, reinsert tab of terminal block cover into slot of dryer rear panel. Optional 3-wire Connection
You must verify with hold -down screw. Connect neutral ground wire
and neutral wire
B C
Place hooked end of neutral wire (white or center) (C) of remaining wires under center terminal block screw (B). Tighten screws.
4.
Secure cover with a qualified electrician...
Installation Instruction - Page 15

... direct wire installation, turn on a full heat cycle (not an air cycle) for
20 minutes and start , check the following: ■■ Controls are snug against the ground before tightening them. Dupont De Nemours and Company.
15
Tighten and adjust leveling legs
Using a 4" (102 mm) clamp, connect vent to exhaust outlet
NOTE: The dryer must...
Installation Instruction - Page 16
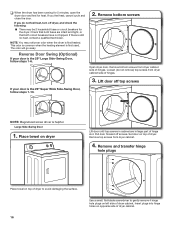
... Door, follow steps 1-6.
2. NOTE: Magnetized screw driver is still no heat, contact a qualified technician.
Place towel on top of hinges. Remove top screws from dryer cabinet side of dryer.
Check that both circuit breakers have not tripped. This odor is common when the heating element is the 29" Large Side-Swing Door, follow steps 1-13...
Similar Questions

Timer Won't Shut Off
My timer will move but doesn't stop when time is up. I changed heating element today and noticed the...
My timer will move but doesn't stop when time is up. I changed heating element today and noticed the...
(Posted by Klscltkls 1 year ago)


Why Is My Amana Ned4600yq1 Dryer Getting Too Hot?
After a few minutes drying the dryer starts smelling hot and it is really hot and is even getting th...
After a few minutes drying the dryer starts smelling hot and it is really hot and is even getting th...
(Posted by jsmh9198 8 years ago)
