
Bernina 817 Support Question
Bernina 817 Support Question
Find answers below for this question about Bernina 817.Need a Bernina 817 manual? We have 1 online manual for this item!
Question posted by Sockcranker on December 11th, 2012
Needle Adjustment To Center It Evenly…on Bernina #817
Hi, Re: Bernina #817
My needle post is too much to the left and not enough to the right.
Which screw and where is it situated so that I can make this adjustment making the needle equidistant in the widest zig zag position without touching either side of the plate. I would need mesurments in mm. if possible.
Is there a manual available or the diagram page/instructions I could follow. I am quite handy mechanically so I can do this.
Thank you.
Pauline
Current Answers
Related Bernina 817 Manual Pages
Manual - Page 2

... Monograms Needle position Needle table Normal gathering Oiling, Model 807/810 Oiling, Model 817 Overlock Patching material
Patching tricot Perforating Pintucking Plain stitching Quick seam Reverse sewing Ruffling ...Wrapping
15
Zigzag sewing
15
Zip insertion
35
Model 807, 810 Free-arm zigzag sewing machine with built-in plain and fancy stitches
Model 817 Fiat-bed sewing machine with built-in ...
Manual - Page 3

... sewing position while sewing. reverse stitch length Presser foot lift Passage space Size of stitches
approx. 1100 stitches/min. Weight of delivery:
Machine No. We have placed in )
power: 15 watts
Number of baseplate Shuttle system
4.5 mm left -center -right 4 mm 2 mm 6,5 mm 110x200 mm 355 x182 mm (807. 810) non-stick central bobbin shuttle
Bobbin capacity Needle...
Manual - Page 4
... of the machine
• rt
10 11 12
13
14
8
7
BERNINA
6
5
II
4 3 2
1
fl
a4
24 23 22
21
2
Model 807
15 16
17 18 19 20
.0"
1 Free-arm cover-plate 2 Needle-plate 3 Presser-foot 4 Needle-clamp 5... 16 Handwheel release 17 Left-center-right adjusting knob
(needle position) 18 Zigzag adjusting knob 19 Stitch length adjustment
(stitch length lever) 20 Drop-feed control 21 iiFast-Slow...
Manual - Page 5

...810
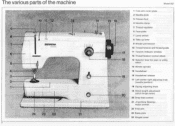
Model 817 The various parts of the machine
a
10 11 )112 im2l5im.13
14
IS 10
1 Olink•MA
5
4 3 2
L
24
22
1 Free-arm cover-plate 2 Needle-plate 3 Presser-foot 4 Needle-clamp ... Handwheel release 17 Left-center right adjusting knob
(needle position) 18 Zigzag adjusting knob 19 Stitch length adjustment
(stitch length lever) 20 Drop-feed control 21 ,,Fast-Slow Sewing.>
motor control 22...
Manual - Page 6
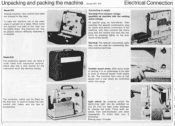
... and start the ma- Push switch to supply
Warning! Connecting to left. By pressing switch the dazzle-free light can be controlled within this range.
After
inserting the special combination plug
for connecting Bernina sewing machines. chine by pressing lightly on foot-starter.
The machine then runs at reduced speed. Press bulb upwards, turn it...
Manual - Page 7

...highest position. Light switch. Pull out light cover sideways to supply Warning!
To insert bulb, turn anti-clockwise and draw downwards.
Adjustable motor...needle -mod is an advantage with many kinds of the left hand and remove the bobbin case. II
-4101limpilsor
5 After inserting the special combination plug for connecting Bernina sewing machines. Electrical Connection Model 817...
Manual - Page 8
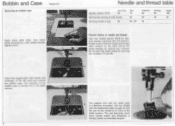
... numbers 80. 90 and 100 while those for Bernina sewing machines 807, 810 and 817. Turn hand- The usual needles for sewing are numbers 70 and 80. The insertion of the bobbin case Is carried out in the same manner.
6
The presser foot with thumb and forefinger of the left hand and remove the bobbin case.
Please...
Manual - Page 10
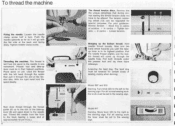
... must be altered. Loosen the needle clamp screw half a turn the hand wheel towards you until the takeup lever is
led from the front to the sewing sign. Threading the machine.
Bernina has the unique advantage that during normal sewing the thread tension does not have to the needle in its highest position.
Model 807 and 810 Darning...
Manual - Page 11

... machine: this
advantage. Only in no time. The Bernina principle: «Just clip it can be used as a thread cutter. make sure that it oft« The work . I
push lever downwards. Raise presser foot by pulling to the rear.
0 , 4 • e•
.
The sewing table Only model 807, 810
Removing work is turned to the left...
Manual - Page 12

.... Setting the zigzag spacing: knob 18. The marker line on material and
higher the number, the wider the zig- from 0 to the left. The knob may be accu- spacing to be sewn with the stitch length
The tine on the scale at CO". thread - zag stitch. rately adjusted with the Bernina Models )307, 810 or 817.
Manual - Page 20

...Seams on left.
Cut edges must be joined up and oversews simultaneously. Stitch width 3: Stitch length: 1-1'h
To finish off turnings. Hold the scissors correctly. Sew at ...
Stitch width 1: Stitch length: 1 Knitted fabrics can be on Jersey
Needle position: centre
Drop teed control: sewing
Automatic:
zigzag WNW/ (1)
except for quick seam
Quick seam
Stitch width:
3-4
Stitch ...
Manual - Page 26

Very poor position.
vvvwvomAN.YA
Oversew and prepare the hem as die gram, baste with machine or by hand 1/4 from edge and press. Fingers of left hand must lie on the folded edge so that the needle just catches the edge of the work very lightly while sewing.
25 Adjust the zigzag so that they can " feel...
Manual - Page 29

... adjusting Is the same as described. How to sew the buttonhole with right hand until cords are parallel. Sew satin stitch for the satin stitch. (Page 10)
will reinforce the buttonhole where the button will be sewn so that when the sowing foot is In the centre. Under no circumstances should the zigzag or needle position...
Manual - Page 34

... the hole (they may even lie slightly over one another .
33 Always move work sideways (left , a little above the hole. The Model 807, 810 only zigzag rows should not overlap nor lie apart from one or two stitches, and leave the needle down the wool with zigzag.
Now sew across the new wool threads...
Manual - Page 35
... its
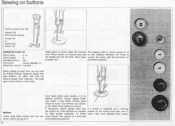
highest position. Leave zii,,ag on the button and sew over it. However• those who sew buttons on .
Adjust zigzag width
and make a trial...needle into the left
Automatic:
zigzag VvVONIN (1)
Drop feed control.
Now sew If a shank is in front allows a clear view. Dutton presser foot 152
Needle: 80 Mercerised sewing
thread: 50 Or embroidery thread• 30
Sewing...
Manual - Page 48
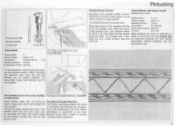
...Needle position:
0-212/ about 112/
Automatic:
straight stitch
Needle position: centre
Drop feed control: sewing
The gimp Is threaded like this: model 807, 810
(0)
To sew pintucks, 2 top threads are needed (for double needle). Drop feed control: sewing
Lower presser foot. For twin needle... When threading the machine take care that ...817 for automatic guiding. Com-
close to the needles...
Manual - Page 49
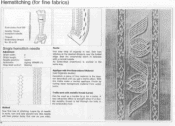
... hemstitch needle
Adjustment
Stitch width: Stitch length: Needle position: Automatic: Drop feed control:
2 1 centre zigzag VVWVWV (1) Sewing
ti
Cr)i)
c
:42 r. Sew hem ...sew second row (the needle will then pierce holes first row on one side).
48
It. Method
Sew first row of fine material in the embroidery foot. Hemstitching (for a stole). P1444 1 ;.;
With
this trellis make...
Manual - Page 52
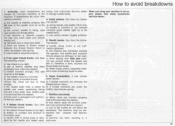
... the upper thread breaks. preferably from a Bernina dealer); Flat side ed or even containing knots is blunt or crooked;
d) the needle is used correctly (push needle right up in the
(see needle and thread table);
thread tension discs; Can have c) when sewing over thick part mate- b) bobbin is secured properly. d) machine has been standing in throat plate is...
Manual - Page 54

Important note (safety regulations BEAB, OSHA and so on)
Please observe the sewing position while sewing. The sewing machine should be disconnected from the power supply by pressing the release knob (see illustration) and can easily be removed.
The moving needle Is a source of danger (danger of injury to fingers). A
4 1,
Removing frame cover (Model 807) The frame...
Manual - Page 55

... of injury to fingers).
r
place arm cover and re-screw tightly. Machine can be put in its be making sure that the spring snaps back
turned down. The moving needle Is a source of danger (danger of left hand press latch again with the left . Cleaning and oiling Model 817
Ij
'Pt
t('' firei
I
'
ti
Cleaning and oiling the...
Similar Questions

Bobbin Screw Replacement
The Tiny screw on the side of my 817 bobbin case and I cannot find it. Where can I get a new one? Wh...
The Tiny screw on the side of my 817 bobbin case and I cannot find it. Where can I get a new one? Wh...
(Posted by Suzannef3545 2 years ago)

Bernina 817 Belts
Bernina 817 sewing machine is making noises. I think the belts are worn out. Don't know which belts ...
Bernina 817 sewing machine is making noises. I think the belts are worn out. Don't know which belts ...
(Posted by marlenemartin 7 years ago)

Bernina 1090 S Sewing Machine Manual
I Dont See The User Manual For This Machine For Free Downloading.what User Manual Are The Same As Th...
I Dont See The User Manual For This Machine For Free Downloading.what User Manual Are The Same As Th...
(Posted by cynthianel 10 years ago)
Looking For A Manual On A Berenia 640 Sewing Machine. Artista
Cannot get a manual to download from the website WWW.bernia usa
Cannot get a manual to download from the website WWW.bernia usa
(Posted by jsue 11 years ago)
