Bosch HMV9305 Support Question
Bosch HMV9305 Support Question
Find answers below for this question about Bosch HMV9305 - 1.8 cu. ft. Microwave.Need a Bosch HMV9305 manual? We have 2 online manuals for this item!
Question posted by barryclark on August 26th, 2014
Tassimo Fd 9305
red lightv comes on when swiched on stays on even whenm green light is on and machine working
Current Answers
Related Bosch HMV9305 Manual Pages
Installation Instructions - Page 2

... contact electrical wires with your drill bit. - Mounting plate is located on back side of microwave oven.
Locate and disconnect the power to install. )
Back of the oven are and where electrical wires might be affected by installing this oven. IF YOU DO NOT DISCONNECT THE POWER, YOU COULD GET AN ELECTRIC SHOCK.
•...
Installation Instructions - Page 3

... DO NOT USE A FUSE IN THE NEUTRAL OR GROUNDING CIRCUIT. DO NOT place objects between the microwave oven front face and the door. - DO NOT allow soil or cleaner residue to operate safely. -
...is equipped with a cord having a grounding wire with the door open. -
DO NOT operate the microwave oven if it . If there is properly grounded or if you do not use an extension cord.
•...
Installation Instructions - Page 4

...
MATERIAL (such as windows, doors, and strong heating vents. - YOUR SAFETY FIRST
• MAKE SURE YOU HAVE ENOUGH SPACE AND SUPPORT. - DO NOT mount the microwave oven to cooking surface or countertop (Use templates included with installation instructions)
Figure 4
CAUTION • Before you risk personal injury and/or property damage. Mount the...
Installation Instructions - Page 7

...CONNECTIONS
WARNING
AVOID ELECTRICAL SHOCK! Locate the grounded electric outlet for this oven in the cabinet above the oven, as shown in electric shock or other personal injury.
• DO... the wall and upper cabinet in Step 4. This appliance MUST be on a circuit dedicated to the microwave oven 120V, 60Hz., AC only with a 15 or 20A fused electrical supply.
Upper Cabinet
Grounded Outlet (...
Installation Instructions - Page 10

...panel side
Figure 11
Exhaust adaptor
Back of cabinet.
1. STEP 3: PREPARE THE VENTING BLOWER
Your microwave oven is shipped with a thick, protective covering to protect it from damage and dirt. At this...of cardboard or hardboard and pull it into the guides (see Figure 11).
4.
UNPLUG UNIT BEFORE WORKING ON IT.
• DO NOT PULL OR STRETCH THE BLOWER WIRING! Remove mounting plate screw(s)...
Installation Instructions - Page 11

... unit back into cabinet. See Figure 17.
7.
Reassemble the blower wire. Rotate the unit so that the exhaust ports face towards the rear of the microwave oven.
3. See Figure 18. Remove the blower plate from Back plate. blower unit
back plate
blower plate mounting screws
Parts "B"
blower unit mounting screw
Figure 13...
Installation Instructions - Page 12

...See Figure 21. See Figure 19.
2. Reattach blower plate to microwave oven.
Remove the blower plate from cabinet. Carefully lift the blower unit...
ROOM-VENTED (Recirculating) INSTALLATION:
1. Place blower unit back into microwave oven.
5. Rotate blower unit 90˚ so the exhaust ports face the front of the microwave oven.
3. Remove one blower unit mounting screw and one blower plate ...
Installation Instructions - Page 13

...
Figure 23
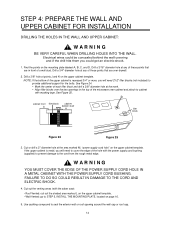
13 Using a plumb line and (metal) measuring tape, find any wall stud, consult a local building contractor. CAUTION
DO NOT ATTEMPT TO INSTALL THE MICROWAVE OVEN IF YOU CANNOT FIND A WALL STUD.
3. NOTE: Be sure the minimum width is 30 inches and the distance from the top of the upper cabinet...
Installation Instructions - Page 14
.... • Align filler blocks over drywall.
2. NOTE: If the bottom of the upper cabinet is metal, you will need to cover the edge of the microwave oven cabinet and attach to cabinet with the power supply cord bushing (supplied) to prevent damage to provide additional support for the bolts. See Figure 24...
Installation Instructions - Page 17

..., thread power supply cord through each hole in the upper cabinet bottom. See Figure 30.
2. Carefully lift microwave oven and hang it on support tabs (See Figure 26 on the next page. Rotate the microwave oven upward so the top of oven is closed.
4. Tighten the bolts until the gap between the upper cabinet and...
Installation Instructions - Page 18

...upper cabinet. power supply cord clamp
8. Plug in Figure 33, to lock. See Figure 34.
STEP 6: ATTACH THE OVEN TO THE WALL
5. See Figure 6 on the page 8. damper
Figure 32
7. Figure 34
18 See "PREPARE THE VENTING... slide slot,
duct
then push up and toward oven center to inside of your microwave oven. Read your use and care manual, then check the operation of the cabinet.
Use & Care Manual - Page 2

... 5
UNDERSTANDING YOUR MICROWAVE OVEN 6-9
Cookware Guide 6 Tips For Microwave Cooking 7 Parts And Accessories 8 Control Panel 8-9 USING YOUR MICROWAVE OVEN 10-29 Learn About Your Microwave Oven 10 Help 10 Clock 10 Kitchen Timer 10 Control Set-Up 10 Vent HI/LO/Off 11 T/Table On/Off 11 Child Lock 11 Light HI/LO/Off 11 Light Timer 11 Easy...
Use & Care Manual - Page 3

... face and the door or allow soil or cleaner residue to the
receiver. • Move the microwave oven away from the receiver. • Plug the microwave oven into a different outlet so
that the microwave oven and the receiver are designed to correct such interference.
3
It is no damage to this equipment does cause interference to radio...
Use & Care Manual - Page 4

To reduce the risk of oven is not working properly, or if it is specifically designed to heat, cook, or dry food. Do ... chemicals or vapors, such as syrup bottles.
- Do not heat the following items in the microwave oven: whole eggs in this oven for the operations described in the oven. Do not allow grease to accumulate on the cooktop.
• Suitable for industrial or laboratory use...
Use & Care Manual - Page 5

... governing codes and ordinances.
If the power supply cord is too short, have a qualified electrician or serviceman install an outlet near the microwave oven.
• For a permanently connected appliance:
The microwave oven must be connected to a grounded, metallic, permanent wiring system, or an equipment grounding conductor should be run with the provided installation instructions...
Use & Care Manual - Page 6

...sure that you use metal-trimmed or metal-banded
dinnerware, casserole dishes, etc. UNDERSTANDING YOUR MICROWAVE OVEN
COOKWARE GUIDE
Most heat-resistant, non-metallic cookware is a discharge of electric current.
lic...no metallic trim or design can cause arcing, which is safe for use in the microwave oven. China • Bowls, cups, serving plates, and platters without metallic trim. Use...
Use & Care Manual - Page 7

... as baked potatoes, cupcakes, and hors d'oeuvres in the sink. UNDERSTANDING YOUR MICROWAVE OVEN
TIPS FOR MICROWAVE COOKING
BROWNING Meat and poultry with a wet paper towel, especially after cooking inside top will brown lightly when cooked for many days. Use a lid or microwave-safe plastic wrap with a soft cloth and a mild detergent solution.
Stop the...
Use & Care Manual - Page 8

...Control
Grease Filter
Panel
Glass Turntable
Cooktop/Countertop Light
OVEN SPECIFICATIONS
Power Supply
120 VAC, 60 Hz
Input Power
1,500 W
Cooking Power 1,000 W
(IEC 60705 Standard)
Frequency
2,450 MHz
Rated Current
13 A
Outer Dimensions (WxHxD)
Cavity Volume
2915⁄16" x 167⁄16"x 155⁄8" 1.8 Cu. Ft.
Net Weight
60 lbs. CONTROL PANEL
1
3
2
4
5
7
6
8
9
10...
Use & Care Manual - Page 9

...: Touch this pad to set the light timer. Light Timer: Touch this pad to set and start a function. See page 13 for more information.
7. Popcorn: Touch this pad to add ten seconds of humidity coming from the potato. Start: Touch this pad when popping popcorn in your microwave oven. Auto Defrost: Meat, poultry, fish. See...
Use & Care Manual - Page 10

...time counting down.
• When the time is over, you need to know to operate your microwave oven as a timer.
PROCEDURE
DISPLAY
1. kg
10
Press Help, then select a key pad. PROCEDURE... minutes and 59 seconds. No.
USING YOUR MICROWAVE OVEN
LEARN ABOUT YOUR MICROWAVE OVEN
This section discusses the concepts behind microwave cooking and introduces you to the basics you ...
Similar Questions

Timer Beeper
How do you stop the timer from beeping when the time is up? I have the Bosch microwave oven model nu...
How do you stop the timer from beeping when the time is up? I have the Bosch microwave oven model nu...
(Posted by Kobe11710 9 years ago)

Bosch 80050 Trim Kit
If I have a trim kit from a previous microwave oven can I use it with the Bosch 8050, they look almo...
If I have a trim kit from a previous microwave oven can I use it with the Bosch 8050, they look almo...
(Posted by jeetee 10 years ago)

Bosch Hmv9305 Microwave Turntable Hums When Operating
(Posted by benderskyassoc 11 years ago)

Microwave Hmv9305 (2005 Yr). Everything Seems To Work But Nonething Heats
Microwave HMV9305 (2005 yr). Everything seems to work but nonething heats. Will this be exspense fix...
Microwave HMV9305 (2005 yr). Everything seems to work but nonething heats. Will this be exspense fix...
(Posted by bsowa 12 years ago)
Microwave Will Not Turn On
BOSCH Microwave HMV9305 arced while changing light bulb There is power in the socket but it will not...
BOSCH Microwave HMV9305 arced while changing light bulb There is power in the socket but it will not...
(Posted by ryarjan 12 years ago)