
2011 Chevrolet Cruze Support Question
2011 Chevrolet Cruze Support Question
Find answers below for this question about 2011 Chevrolet Cruze.Need a 2011 Chevrolet Cruze manual? We have 1 online manual for this item!
Question posted by ruttyle on April 7th, 2014
2011 Cruze How To Remove Headlight Bulb
The person who posted this question about this Chevrolet automobile did not include a detailed explanation. Please use the "Request More Information" button to the right if more details would help you to answer this question.
Current Answers
Related Manual Pages
Owner's Manual - Page 1

2011 Chevrolet Cruze Owner Manual M
In Brief ...1-1 Instrument Panel ...1-2 Initial Drive Information ...1-4 Vehicle Features ...1-15 Performance and Maintenance ...1-19 Keys, Doors and Windows ...2-1 Keys and Locks ...2-2 Doors ...2-8 Vehicle ...
Owner's Manual - Page 2

2011 Chevrolet Cruze Owner Manual M
Driving and Operating ...9-1 Driving Information ...9-2 Starting and Operating ...9-16 Engine Exhaust ...9-...Conversions and Add-Ons ...9-50 Vehicle Care ...10-1 General Information ...10-2 Vehicle Checks ...10-4 Headlamp Aiming ...10-28 Bulb Replacement ...10-28 Electrical System ...10-34 Wheels and Tires ...10-40 Jump Starting ...10-78 Towing ...10-81 Appearance...
Owner's Manual - Page 3

...but not limited to, GM, the GM logo, CHEVROLET, the CHEVROLET Emblem, and CRUZE are options that may or may not be obtained from your dealer or from: On ... of General Motors LLC, its subsidiaries, affiliates, or licensors. Part No. 20883227 C Third Printing
©
2011 General Motors LLC. All Rights Reserved. Keep this manual in the vehicle for Chevrolet Motor Division wherever it appears...
Owner's Manual - Page 34

..." under Vehicle Personalization on page 5‑33. To replace the battery: 1. Pressing Q may sound to locate the vehicle. The turn signals flash for additional information. Remove the used battery by prying with this feature, press Q and then press and hold briefly to indicate unlocking. See Remote Vehicle Start on the battery...
Owner's Manual - Page 40

... and Windows
Disarming the System
To disarm the system press the RKE transmitter. To turn off . The system is automatically disarmed when the vehicle is removed from the ignition. The alarm arms after all the doors have to lock the vehicle while exiting with the correct key.
The vehicle may not...
Owner's Manual - Page 45

... the partially or fully pulled up or down . Programming the Power Windows
If the battery on the vehicle has been recharged or disconnected, or is removed. Before reprogramming, replace or recharge the vehicle's battery. Pull a window switch up and related obstacle detection features. Pull the front of the switch from the...
Owner's Manual - Page 48

...the water drainage system. Hold the switch in the track. Periodically open the sunroof and remove any resistance during automatic closing, it will automatically close feature does not function, the ...sunroof may collect on the sunroof seal or in this position for 10 seconds. Do not remove grease from the sunroof. This can be initialized. Press the open . Release the switch...
Owner's Manual - Page 51

If you are not designed to be removed. Adjust the driver seat only when the vehicle is not moving . Slide the seat to the desired position and release the handle. 3.
To adjust a manual ...
Owner's Manual - Page 70

... the side of the guide. 1. Place the guide over the belt, and insert the two edges of the belt into the slots of the seat. Remove the guide from the neck and head.
2. The guides may have outgrown booster seats and for each outboard passenger position in the rear seat. 3-22...
Owner's Manual - Page 71
...should go over the shoulder and across the chest. The shoulder belt should be close to take belt restraining forces.
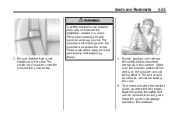
3. To remove and store the comfort guide, squeeze the belt edges together so that is not properly worn may not provide the protection needed... not twisted and it . Seats and Restraints
3-23
{ WARNING
A safety belt that the safety belt can be removed from the guide.
Owner's Manual - Page 83

... small adults, the passenger sensing system may or may be enabled, the on , it means that a small child is a critical problem with the airbag system. Remove the child restraint from the vehicle.
. See Passenger Airbag Status Indicator on page 5‑11 for more information, including important safety information.
.
.
.
. Everyone in a booster...
Owner's Manual - Page 84

...Front Passenger Seat) on indicator is not sitting properly in the fully upright position. 4. Remove any additional material from the seat such as blankets, cushions, seat covers, seat heaters,... airbag and passenger knee airbag: 1. 3-36
Seats and Restraints
6. Restart the vehicle. Remove any additional items from the seat, such as blankets, cushions, seat covers, seat heaters...
Owner's Manual - Page 99

... to expose the anchor. Find the lower anchors for additional information. See "Head Restraint Removal and Reinstallation" at the proper anchor location. Open the cover to attach the child restraint...restraint has been installed. If the child restraint manufacturer recommends that the top tether be removed. Put the child restraint on the child restraint to secure the restraints. Refer to...
Owner's Manual - Page 100

... a rear outboard seating position with an adjustable head restraint, or in the center seating position without a headrest, or the rear outboard head restraint has been removed, route the single tether over the seatback.
Route, attach, and tighten the top tether according to the child restraint instructions and the following instructions:
.
. See...
Owner's Manual - Page 274

...blade down toward the windshield far enough to release it is damaged in this section, contact your dealer. Remove the wiper blade. Reverse steps 1 through 3 for vertical aim). Aim adjustment to get an acoustic ...However, if the vehicle is recommended that occurs would not be covered by the vehicle warranty. Bulb Replacement
For the proper type of the wiper arm. 4. If you ever have to have ...
Owner's Manual - Page 275

... from the headlamp assembly by turning counterclockwise and pulling straight back. 5. Remove the bulb (C) from the bulb (C) by turning clockwise. 6. Install the wiring harness connector to the bulb. Install the new bulb in the headlamp assembly by pressing the connector release (B) and pulling straight back. 4. See Hood on page 10‑4.
2. Install the connector retaining...
Owner's Manual - Page 276

... socket. 5. Trunk Deck Inboard Taillamps 1. Install the bulb socket into the headlamp assembly by turning counterclockwise and pulling straight out. Remove the bulb socket (B) by turning clockwise. Remove the trunk deck trim cover (A). 3. Remove the bulb (A) from the bulb socket. 4. 10-30
Vehicle Care
Taillamps, Turn Signal, Sidemarker, Stoplamps, and Back-Up Lamps
3. Open the trunk...
Owner's Manual - Page 277

A. Remove the bulb from the socket (A). 5.
Turn Signal Lamp D. Install the trunk deck trim cover. Vehicle Care
10-31
Stoplamp/Taillamp, Turn Signal, Back‐up Lamp B. Install the new bulb in the bulb socket. 6. Back-up , and Sidemarker Lamp 1. Open the two screw covers. Stop Lamp/Taillamp C. Install the bulb socket by turning clockwise. 7. Open...
Owner's Manual - Page 278

... from the taillamp assembly by pulling it straight back until the two posts disengage from the grommets. Install a new bulb into the taillamp assembly by turning it counterclockwise. 6. Remove the taillamp assembly by turning it clockwise. Turn Signal Lamp C.
A. Remove the two screws, which secure the taillamp assembly.
4. Stop Lamp/Taillamp D. Install the...
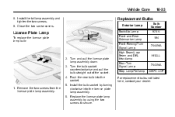
Owner's Manual - Page 279
...
License Plate Lamp
To replace the license plate lamp bulb:
2. Replace the license plate lamp assembly by turning clockwise into the socket. 1. Turn the bulb socket counterclockwise and pull the bulb straight out of the socket. 4. Install the taillamp assembly and tighten the two screws. 9. Remove the two screws from the license plate lamp...
Similar Questions


Oil Plug Socket Sizes 2011 Cruze 1.8 L
What size sockerts required to remove oil filter and oil pan drain plug from 2011 Cruze 1.8 L ecotec...
What size sockerts required to remove oil filter and oil pan drain plug from 2011 Cruze 1.8 L ecotec...
(Posted by sildandrea 11 years ago)