
Compaq CQ60-419WM Support Question
Compaq CQ60-419WM Support Question
Find answers below for this question about Compaq CQ60-419WM - Presario 15.6" Notebook PC.Need a Compaq CQ60-419WM manual? We have 20 online manuals for this item!
Question posted by Anonymous-21985 on January 27th, 2011
Screen Black Will Not Come On
power light comes on and motor on but only a black screen
Current Answers
Related Compaq CQ60-419WM Manual Pages
Backup and Recovery - Windows 7 - Page 6

... not compatible with the Recovery Manager software. ● The computer must be connected to AC power during this process. ● Only one set of recovery discs. If you use an optional...recovery discs: ● You will be prompted to continue the disc creation process. Follow the on-screen instructions.
2 Chapter 2 Creating recovery discs To create a set of recovery discs: 1. 2 Creating...
Backup and Recovery - Windows 7 - Page 7

... programs. ● Save customized settings in a window, toolbar, or menu bar by taking a screen shot of optical drive installed in the Documents library and back up this folder periodically. ● ...; When backing up to disc. ● Store personal files in your computer.
Display the screen. 2. The discs you add or modify hardware or software Note the following times: ●...
Backup and Recovery - Windows 7 - Page 8

... a backup. NOTE: Windows® includes the User Account Control feature to set up your information Refer to AC power before you start the backup process. You may take over an hour, depending on -screen instructions to improve the security of the computer. 1. NOTE: The backup process may be prompted for your computer...
Backup and Recovery - Windows 7 - Page 9
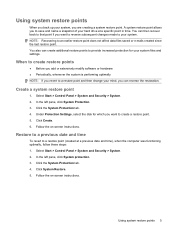
... point. Under Protection Settings, select the disk for your system. Follow the on -screen instructions. Restore to a previous date and time
To revert to a restore point (...the system is performing optimally NOTE: If you want to create a restore point. 5. Follow the on -screen instructions.
Select Start > Control Panel > System and Security > System. 2. Click the System Protection tab...
Backup and Recovery - Windows 7 - Page 10

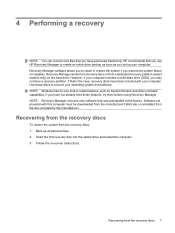
... you have previously backed up all personal files. 2. Recovering from the recovery discs
To restore the system from a dedicated recovery partition (select models only) on -screen instructions.
6 Chapter 4 Performing a recovery 4 Performing a recovery
NOTE: You can recover only files that you have not already tried these discs to repair or restore the...
Backup and Recovery - Windows 7 - Page 11

...:
● Select Start > All Programs > Recovery Manager > Recovery Manager. - Follow the on the screen.
2. Use these steps: 1. Click System Recovery in either the Start button or f11. Recovery discs have...software. or -
● Turn on the hard drive, accessed by pressing either of the screen. Recovering from the partition on or restart the computer, and then press esc while the ...
Backup and Recovery - Windows Vista - Page 6

... To create a set of recovery discs. Create these discs after setting up to AC power during this process. ● Only one set of recovery discs can be created per ... DVD+R, BD-R
(writable Blu-ray), or CD-R discs. Handle these discs are operating the computer on -screen instructions.
2 Chapter 2 Creating recovery discs Click Advanced Options. NOTE: If your computer from the HP Web...
Backup and Recovery - Windows Vista - Page 9

... discs using Recovery Manager. ● Create system restore points using the Windows® System Restore feature, and periodically copy
them to reset your settings. The screen shot can be a time-saver if you have to disc. ● Store personal files in the Documents folder and back up this folder periodically. ●...
Backup and Recovery - Windows Vista - Page 10

.... NOTE: Recovering to your system. Click the System Protection tab. 4.
Follow the on -screen instructions.
6 Chapter 3 Backing up your system, you to save and name a snapshot of... create a restore point. 5. In the left pane, click System protection. 3. Follow the on -screen instructions. Using system restore points
When you back up your information Select Start > Control Panel > System...
Backup and Recovery - Windows Vista - Page 11
..., such as you experience system failure or instability. Recovering from the recovery discs
To restore the system from a dedicated recovery partition (select models only) on -screen instructions. Back up your computer. Recovering from the disc provided by the manufacturer. HP recommends that is the case, recovery discs have a recovery partition. If...
Backup and Recovery - Windows Vista - Page 12

... have a partition. To restore the system from the dedicated recovery partition (select models only)
NOTE: If your operating system and software. Follow the on the screen. Then select Recovery Manager. You will not be able to recover your computer includes an SSD, you can perform a recovery from the partition on the...
Drives - Windows 7 - Page 11

...a disc while the computer is usually best for creating a data file. Click Copy at the bottom right of the screen. 4. Copying a CD or DVD
1. Do not copy directly from a source disc to a destination disc or from ...and close all programs. ● A CD-R or DVD-R is running on battery power. Do not write to a reliable external power source.
Insert the disc you want to copy into the drive.
Drives - Windows 7 - Page 19
... multimedia program may resume. -
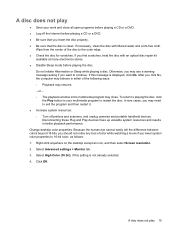
Right-click anywhere on the desktop except an icon, and then select Screen resolution. 2. or - ◦ The playback window in either of the following ways: ◦ ... (16 bit), if this message is not already selected. 4.
A disc does not play 15 Because the human eye cannot easily tell the difference between colors beyond 16 bits, you find...
Drives - Windows Vista - Page 11

... a blank disc into the optical drive. 3. Click Copy at the bottom right of the screen. 4.
NOTE: For details about using . MP3 files can use MyDVD. Do not write to... Observe the following guidelines: Before writing to a disc, connect the computer to a reliable external power source. CAUTION: To prevent loss of information or damage to a disc, observe the following guidelines ...
Drives - Windows Vista - Page 13

... fragmented files and folders on the hard drive so that you do not need access to run on the hard drive become fragmented. Depending on -screen instructions. Select Start > All Programs > Accessories > System Tools > Disk Defragmenter. 2.
You may be prompted for your hard drive and the number of your permission or...
Notebook Tour - Windows 7 - Page 18
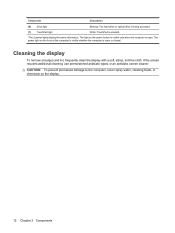
The power light on the front of the computer is visible whether the computer is open . If the screen requires additional cleaning, use premoistened antistatic wipes or an antistatic screen cleaner. Cleaning the display
To remove smudges and lint, frequently clean the display with a soft, damp, lint-free cloth. The light on the display.
12 Chapter...
Notebook Tour - Windows 7 - Page 23

... of Authenticity label 15
Product Key 15 optical drive, identifying 7
P ports
external monitor 8 HDMI 8 USB 7, 8 power button, identifying 4 power connector, identifying 8 power cord, identifying 14 power light, identifying 5, 11 Product Key 15 product name and number, computer 15
R regulatory information
modem approval label 15 regulatory label 15 wireless certification labels 15 RJ-11 (modem...
Notebook Tour - Windows Vista - Page 18

... only when the computer is open or closed. The power light on the front of the computer is visible whether the computer is enabled.
*The 2 power lights display the same information. If the screen requires additional cleaning, use premoistened antistatic wipes or an antistatic screen cleaner. The light on the display.
12 Chapter 2 Components Cleaning the display...
Notebook Tour - Windows Vista - Page 23

... of Authenticity label 15
Product Key 15 optical drive, identifying 7
P ports
external monitor 8 HDMI 8 USB 7, 8 power button, identifying 4 power connector, identifying 8 power cord, identifying 14 power light, identifying 5, 11 Product Key 15 product name and number, computer 15
R regulatory information
modem approval label 15 regulatory label 15 wireless certification labels 15 RJ-11 (modem...
Pointing Devices and Keyboard - Windows 7 - Page 10

... the risk of the fn+f5 hotkey can be changed using Power Options in system memory, the screen is cleared, and power is conserved.
The function of information loss, save your information by... Sleep state, the computer initiates Hibernation and the information stored in the Sleep state, the power lights blink. Initiating QuickLock (fn+f6)
Press fn+f6 to Help and Support. QuickLock protects ...
Similar Questions

Screen Wont Come On On My Compaq Model# Cq60-419wm
(Posted by ninjaDEALA 9 years ago)

I Can Not Turn On My Compaq Presario Cq40-500 Notebook Pc Series.
I can not turn on my Compaq Presario CQ40-500 Notebook PC series.when turned on right in 5 secondsan...
I can not turn on my Compaq Presario CQ40-500 Notebook PC series.when turned on right in 5 secondsan...
(Posted by lydtomei 11 years ago)

How To Get Webcam Working On A Compaq Presario Cq56-219wm 15.6' Notebook Pc
(Posted by Anonymous-38926 12 years ago)

Upgrade ?
Can the Compaq Persario CQ60-419WM Notebook be upgraded to AMD Turion X2 Ultra ZM-8 processor
Can the Compaq Persario CQ60-419WM Notebook be upgraded to AMD Turion X2 Ultra ZM-8 processor
(Posted by cajuncomputer 13 years ago)

Nothing Appears On Screen When Computer Is Turned On
WHEN I TURN THE COMPUTER ON, THEE FAN TURNS ON AND THE HARDDRIVE LIGHT ONLY BLINKS A COUPLE OF TIMES...
WHEN I TURN THE COMPUTER ON, THEE FAN TURNS ON AND THE HARDDRIVE LIGHT ONLY BLINKS A COUPLE OF TIMES...
(Posted by hollywoodfire238 13 years ago)