DeLonghi ESAM3300 Support Question
DeLonghi ESAM3300 Support Question
Find answers below for this question about DeLonghi ESAM3300.Need a DeLonghi ESAM3300 manual? We have 1 online manual for this item!
Question posted by sansim786 on August 4th, 2014
Esam 3300 Coffee Grounds Do Not Fall As Disks?
My ESAM 3300 works well, lately it breaks the used grounds rather than discard as diskettes into the grounds container. I have tried everything, cleaning the infuser & inside of the machine. Used lubricant to lubricate with food grade lubricant all the parts. Every time I clean, the next coffee made the grounds will be in a intact diskette. The next time I use the machine is when the grounds will scatter. I have done this again and again same results. I do not know if cleaning the infuser resets the machine? Please help it is a pain to clean after every coffee!!
Current Answers
Related DeLonghi ESAM3300 Manual Pages
Owner Manual - Page 4
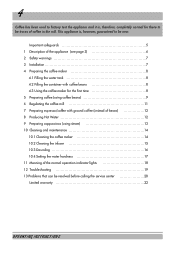
... appliance (see page 3 6 2 Safety warnings 7 3 Installation 7 4 Preparing the coffee maker 8
4.1 Filling the water tank 8 4.2 Filling the container with ground coffee (instead of beans 12 8 Producing Hot Water 12 9 Preparing cappuccinos (using steam 13 10 Cleaning and maintenance 14 10.1 Cleaning the coffee maker 14 10.2 Cleaning the infuser 15 10.3 Descaling 16 10.4 Setting the water...
Owner Manual - Page 5
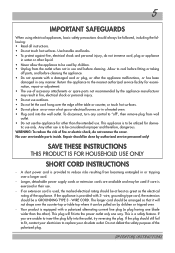
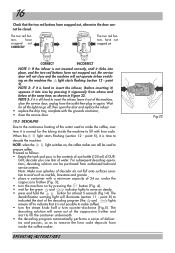
...• Plug cord into the outlet, try reversing the plug. WARNING: To reduce ...inside. A short power cord is exercised in fire, electrical shock or personal injury. • Do not use and before cleaning... the appliance. • Do not operate with 3- Longer, detachable power supply cords or extension cords are unable to replace your obsolete outlet. wire, grounding...
Owner Manual - Page 6
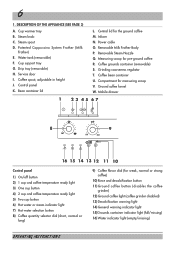
...INSTRUCTIONS Water tank (removable) F. Drip tray (removable) H. Power cable O. Ground coffee funnel W. Steam knob C. Infuser N. Grinding coarseness regulator T. Coffee spout, adjustable in height J. Central lid for pre-ground coffee R. Bean container lid
L. Service door I. Coffee grounds container (removable) S. Cup support tray G. DESCRIPTION OF THE APPLIANCE (SEE PAGE...
Owner Manual - Page 7
... grounded. Only connect the appliance to the value indicated on the appliance's rating plate. Failure to respect the above the coffee maker.
• Never install the machine ...Place the appliance on a work bench, make espresso coffee" and "hot drinks". OPERATING INSTRUCTIONS For repairs, contact a technical service center authorized by using the machine incorrectly.
• This appliance...
Owner Manual - Page 8
....
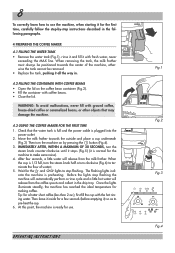
4.2 FILLING THE CONTAINER WITH COFFEE BEANS • Open the lid on by -step instructions described in the drip tray. OPERATING INSTRUCTIONS
Fig.1 Fig.2 Fig.3 Fig.4 Tip: for use the machine, when starting it for the first time, carefully follow the step-by pressing the button (Fig.4).
3.
Check that may damage the machine.
4.3 USING THE COFFEE MAKER FOR THE...
Owner Manual - Page 9
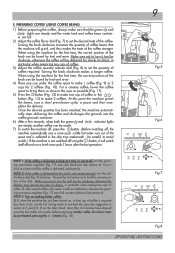
... hot rinsing water to set the quantity of the dial. When using the machine for 2 coffees (Fig. 10). cally stops delivering the coffee and discharges the grounds into the
coffee grounds container.
6) After a few seconds, when both the green and
indicator lights
are steady, another coffee the infuser must be delivered too slowly (in drips), in
particular when preparing two...
Owner Manual - Page 10
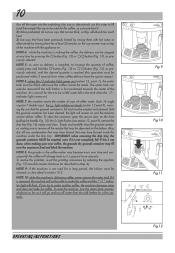
... full and must be emptied and cleaned.
If it is delivering coffee, never remove the water tank.
Empty and carefully clean the grounds container, making sure to remove all the residue that have formed that the grounds container is complete, to make another coffee, the machine becomes noisy and does not make the coffee and the " " indicator light will remain...
Owner Manual - Page 11
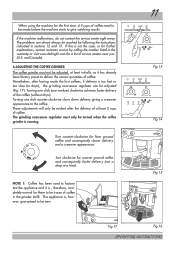
... a time). Turning one number) clockwise achieves faster delivery of the coffee (without drips). Turn clockwise for coarser ground coffee and consequently faster delivery (not a drop at least 2 cups of coffee. These adjustments will only be evident after having made before the machine starts to the coffee.
Turning one click (one click counter-clockwise slows down delivery...
Owner Manual - Page 12

...
for espresso espresso coffee makers.
NOTE 2: Never add more than 1 measure, otherwise either the machine will not make just one measuring scoop of coffee to select the ground coffee function (Fig. 18). Lift the lid in section 10.2 "Cleaning the infuser".
3. Note: You can make the coffee and the pre-ground coffee will be lost inside the machine. Do not use not use the measuring...
Owner Manual - Page 13
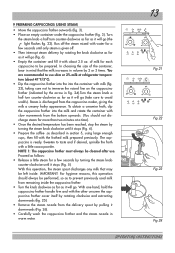
... frother into the container with milk (fig. 23), taking care not to be left inside the cappuccino frother...to prevent previously used milk from the bottom upwards. (You should always be cleaned after use skim or 2% ...maker, giving the milk a creamy frothy appearance. 9 PREPARING CAPPUCCINOS (USING STEAM)
• Move the cappuccino frother outwards (fig. 3). • Place an empty container...
Owner Manual - Page 14
...the water: it counter-clockwise.
10 CLEANING AND MAINTENANCE
• Before performing any cleaning operations, the machine must have cooled down and must be washed in the dishwasher.
10.1 CLEANING THE COFFEE MAKER
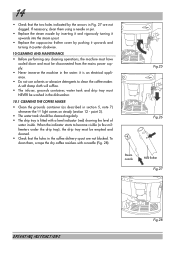
• Clean the grounds container (as described in Fig. 27 are not blocked. A soft damp cloth will suffice.
• The infuser, grounds container, water tank and drip tray must...
Owner Manual - Page 15
... and the grounds container (Fig. 16) and clean
them; • press the two red release buttons on the infuser. OPERATING INSTRUCTIONS To remove the coffee stuck
to the parts inside of the machine.
Fig.31
Bottom pipe on the infuser sideways and
towards the center (Fig. 29) and pull it out; 10.2 CLEANING THE INFUSER
The infuser must be cleaned regularly to...
Owner Manual - Page 16
... by pressing it vigorously from
inside the machine to insert the infuser, leave it is normal for all the lights to go off, then open the door and replace the infuser. • replace the drip tray, complete with the grounds container; • close and the machine will not operate (when switching on , the coffee maker can be closed. under...
Owner Manual - Page 17
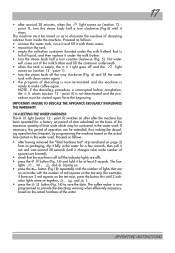
...clean water.
• reposition the tank.
• empty the collection container (located under the milk frother.
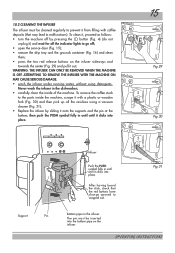
• turn the steam knob half a turn counter-clockwise (Fig. 5). ing operation less frequent, by programming the machine based on the actual
lime content in the water used... strip (enclosed on page 2)
from inside the machine.
The coffee maker is empty, the
l ight goes ...
Owner Manual - Page 18
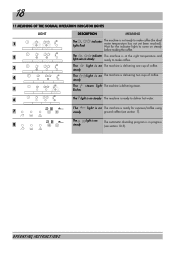
... at the right temperature and
lights are on The automatic descaling program is delivering two cups of coffee.
Wait for espresso/coffee using
7
steady
ground coffee (see section 10.3). The ,
indicator The machine is ready to make coffee.
The
steam light The machine is not ready to deliver hot water. 18
11 MEANING OF THE NORMAL OPERATION INDICATOR LIGHTS...
Owner Manual - Page 19
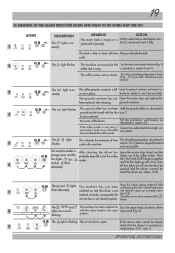
... door be opened and the infuser inserted (to be closed properly. The ,
and The machine has been switched on and
...infuser is on The coffee grounds container is not closed ,
9
check that a small stone in section 5 - The grounds container has not Open the access door and replace the
been replaced after cleaning.
The
light
This indicates the presence of the coffee maker...
Owner Manual - Page 20
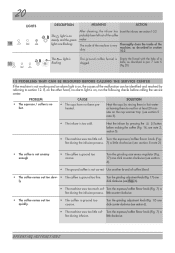
...; The machine uses too little cof- If, on the other hand, no hot.
• The cups have not been preheated. Turn the espresso/coffee flavor knob (Fig. 7) a fee during infusion. little counter-clockwise.
• The coffee comes out too quickly.
• The coffee is ground too coarse.
Heat the infuser by rinsing them to section 12.
After cleaning, the infuser has...
Owner Manual - Page 21
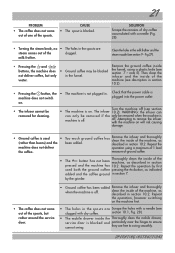
... first
used
•
(rather than beans) and the
Too much ground been added. Repeat
the operation, however switching
on .
Clean the holes in the spouts are Scrape the holes with a needle (Fig. 28).
• Turning the steam knob, no • The holes in section 7.
off . coffee
has
Remove the infuser and thoroughly clean the inside of the machine...
Owner Manual - Page 22
...is not covered by the warranty? Also, consequential and incidental damage resulting from the use of all accessories, spare parts or replacement parts, please contact our parts division at... ( 2 ) from defects in transit.
22
This warranty applies to Super Automatic Espresso Machines with the sale or use .
LIMITED WARRANTY What does the warranty cover? We warrant each appliance to the ...
Similar Questions

The Green Light For A Single Coffee Is On But Machine It Doesn't Work ?
(Posted by Petrostrapieris 1 year ago)

When I Push The Coffee Button To Brew The Water Comes Into The Drip Tray
(Posted by jkeller7396 2 years ago)

Coffee Not Coming Out Of Spouts Coming Out In Catch Tray
(Posted by Dhulslander 2 years ago)

Esam 3300 Power On Initialization Issue
Hi,When I plug power cord into receptacle the machine starts its initialization cycle properly by mo...
Hi,When I plug power cord into receptacle the machine starts its initialization cycle properly by mo...
(Posted by totasek 7 years ago)

Messy Coffee Grounds
my esam digital espresso/capucino/latte makes is throwing coffee grounds all over the inside of the ...
my esam digital espresso/capucino/latte makes is throwing coffee grounds all over the inside of the ...
(Posted by mdellinger 10 years ago)