Dell OptiPlex 7010 Support Question
Dell OptiPlex 7010 Support Question
Find answers below for this question about Dell OptiPlex 7010.Need a Dell OptiPlex 7010 manual? We have 6 online manuals for this item!
Question posted by mccarodrig on June 11th, 2014
Optiplex 7010 How To Mount Dual Hard Drives
The person who posted this question about this Dell product did not include a detailed explanation. Please use the "Request More Information" button to the right if more details would help you to answer this question.
Current Answers
Related Dell OptiPlex 7010 Manual Pages
Owner's Manual (Desktop) - Page 3

... Memory...12 Installing The Memory...12 Removing The Coin-Cell Battery...12 Installing The Coin-Cell Battery...13 Removing The Hard Drive...13 Installing The Hard Drive...15 Removing The Optical Drive...15 Installing The Optical Drive...17 Removing The Speaker...17 Installing The Speaker...18 Removing The Power Supply Unit...18 Installing The Power Supply...
Owner's Manual (Desktop) - Page 13

The battery pops out from the battery. Removing The Hard Drive
1.
Install the expansion card. 4. Follow the procedures in After Working Inside Your Computer.
Installing The Coin-Cell Battery
1. Press the coin cell battery downward until ...
Owner's Manual (Desktop) - Page 14
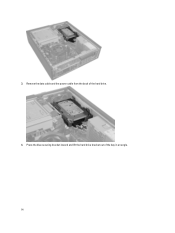
Press the blue securing bracket inward and lift the hard drive bracket out of the hard drive. 4. Remove the data cable and the power cable from the back of the bay in an angle. 14 3.
Owner's Manual (Desktop) - Page 15

... Inside Your Computer. 2. 5. Follow the procedures in After Working Inside Your Computer. Remove the
a) cover b) front bezel
15 Removing The Optical Drive
1. Flex the hard drive bracket and then remove the hard drive from the bracket.
6.
Installing The Hard Drive
1. Press both blue securing-bracket tabs inward and slide the hard drive bracket into the hard-drive bracket. 2.
Owner's Manual (Desktop) - Page 18

Install the cover. 5. Removing The Power Supply Unit
1. 4. Remove the
a) cover b) hard drive c) optical drive 18
Thread the speaker cable into the chassis clip. 3. Connect the speaker cable to remove it . 2. Press down the speaker-securing tab and slide the ...
Owner's Manual (Desktop) - Page 22

Lift the power supply out of the computer. 3. Tighten the screws securing the power supply to secure it. 2. Install the optical drive. 7. Install the hard drive. 8. Install the cover. 9. Follow the procedures in the chassis and slide towards the back of the system to the back of the computer. Thread the ...
Owner's Manual (Desktop) - Page 25

Remove the
a) cover b) front bezel c) optical drive d) hard drive
3. The golden triangle mark on the system board.
2. Installing The Processor
1. Install the cover. 6. Removing The System Fan
1. Press the plastic clip to secure it ...
Owner's Manual (Desktop) - Page 28

... chassis. 2. Thread the system fan connector cables to the chassis clips. 6. Install the cover. 11. Follow the procedures in place. 3.
Remove the
a) cover b) front bezel c) hard drive
28 Pass the four grommets through the chassis and slide outward along the groove to the system board. 5. Connect the 24-pin connector. 7. Install the...
Owner's Manual (Desktop) - Page 30

Install the hard drive. 5. Removing The Power Switch
1. Remove the
a) cover b) front bezel
3. Secure the thermal sensor to the system board. 4. Install the cover. 7. Thread the thermal-sensor cable ...
Owner's Manual (Desktop) - Page 32
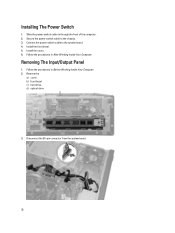
... power-switch cable to the system board. 4. Install the front bezel. 5. Follow the procedures in After Working Inside Your Computer. Remove the
a) cover b) front bezel c) hard drive d) optical drive
3.
Owner's Manual (Desktop) - Page 39

... the System Setup, you can boot from including the diagnostic option. The boot sequence screen also displays the option to a specific device (for example: optical drive or hard drive). Table 1. 3
System Setup
System Setup enables you restart the system. NOTE: For most of the system setup options, changes that you to bypass the...
Owner's Manual (Desktop) - Page 41

... :
• Disabled • COM1 • COM2 • COM3 • COM4
NOTE: The operating system may not appear. If USB port is part of the integrated hard drive controller.
• Disabled - You can set the serial port to this port. The SATA controllers are reported during system startup. This field configures the integrated...
Owner's Manual (Desktop) - Page 54

... this
support technician
problem, please note this The computer failed to the associated drive.
Data error
The floppy or hard drive cannot read failure
The floppy disk may be defective or a cable may be...faulty disk sector or could not find a particular disk sector. Controller has failed
The hard drive or the associated controller is 3 sec, and the beep sound lasts 300 ms. After each ...
Owner's Manual (Desktop) - Page 55

... interrupt
A chip on it .
Reinstall the memory modules and, if necessary, replace them . Take the appropriate action to carry out the command.
Hard-disk drive failure
The hard drive failed initialization. Hard-disk drive read value expecting value
A memory module may be faulty or improperly seated. Memory allocation error
The software you are attempting to a floppy...
Owner's Manual (Desktop) - Page 61

... data from or writing data to the hard drive.
61 Controls and Lights Feature Front of the computer:
Power button light
Drive activity light
Back of the computer. blinking white light indicates sleep state of the computer:
Specification
White light - Feature
Specification
Mini-Tower
four 7-pin connectors
Desktop
three 7-pin connectors
Small Form Factor...
Owner's Manual (Mini-Tower) - Page 57

... indicates that the computer is reading data from or writing data to the hard drive.
57 Controls and Lights Feature Front of the computer:
Power button light
Drive activity light
Back of the computer. Feature
Specification
Mini-Tower
four 7-pin connectors
Desktop
three 7-pin connectors
Small Form Factor
three 7-pin connectors
Ultra Small Form...
Owner's Manual (Small Form Factor) - Page 51

... i3 series • Intel Core i5 series • Intel Core i7 series • Intel Pentium Dual Core series • Intel Celeron series
NOTE: Intel Celeron series is only available for the Dell OptiPlex 7010. Memory Feature Type Speed Connectors:
Desktop, Mini-Tower, Small Form Factor Ultra Small Form Factor Capacity Minimum Memory Maximum memory...
Owner's Manual (Small Form Factor) - Page 55

... indicates that the computer is reading data from or writing data to the hard drive.
55 Controls and Lights Feature Front of the computer:
Power button light
Drive activity light
Back of the computer. Feature
Specification
Mini-Tower
four 7-pin connectors
Desktop
three 7-pin connectors
Small Form Factor
three 7-pin connectors
Ultra Small Form...
Owner's Manual (Ultra Small Form
Factor) - Page 55

... computer is reading data from or writing data to the hard drive.
55 Feature
Specification
Mini-Tower
four 7-pin connectors
Desktop
three 7-pin connectors
Small Form Factor
three 7-pin connectors
... speaker
one 5-pin connector
Intruder connector
one 3-pin connector
Power connector:
Mini-Tower, Desktop, Small Form Factor
one 24-pin and one 4-pin connector
Ultra Small Form Factor
one ...
Statement of Volatility - Page 2

...Hard drive
CDROM/RW/ DVD/ DVD+RW/ Diskette Drives...
Reference Designator
Volatility Description
User Accessible for external data
Remedial Action (action necessary to be valid. Volatile memory in GB. Enter S3-S5 state below. Linux and Windows 7 support S3 state.
• S4 is coming out of S5 requires power on the memory (DDR3, 1333/1600MHz). Model Number Dell OptiPlex 9010/7010...
Similar Questions


Why My Dell Xps 8300 Internal Dual Hard Drive Not Functioning
(Posted by bijoesa 10 years ago)


Removing The Hard Drive From A Dell Optiplex Gx520
This is a mechanical problem -- I need to remove the hard drive, but something is preventing this.
This is a mechanical problem -- I need to remove the hard drive, but something is preventing this.
(Posted by hpayson 11 years ago)