Dell PowerEdge 1750 Support Question
Dell PowerEdge 1750 Support Question
Find answers below for this question about Dell PowerEdge 1750.Need a Dell PowerEdge 1750 manual? We have 3 online manuals for this item!
Question posted by ffisher on June 9th, 2011
Raid Setup
Looking for instructions on setting up raid 5 on a poweredge 1750, and creating spare drives.
Current Answers
Related Dell PowerEdge 1750 Manual Pages
Microprocessor
Upgrade Installation Guide - Page 3

... outlet.
2 Open the system doors, or remove the system cover (see your Installation and Troubleshooting Guide).
CAUTION: Before you perform this procedure, read the safety instructions in the primary microprocessor socket. NOTE: In a single microprocessor system, the microprocessor must be present to accommodate secondary microprocessors.
Each microprocessor and its associated cache...
Microprocessor
Upgrade Installation Guide - Page 5

... ZIF socket, be sure that all pins are matched with the correct holes in the socket. a Ensure that all of the microprocessor and socket aligned, set the microprocessor lightly in the socket and ensure that the microprocessor socket release lever is positioned correctly, it snaps into the corresponding holes.
Microprocessor
Upgrade Installation Guide - Page 7
... cover (see your Installation and Troubleshooting Guide).
17 Reconnect your systems management software documentation.
18 Enter the System Setup program and ensure that the new microprocessor is stored in the System Setup program.
For instructions about running the diagnostics and troubleshooting any problems that may occur.
Microprocessor Upgrade Installation Guide
1-5
See your...
Information Update (.pdf) - Page 4

... in this document is strictly forbidden. Dell Computer Corporation disclaims any manner whatsoever without notice. © 2003 Dell Computer Corporation. Information in this text: Dell, PowerEdge, and the DELL logo are trademarks of your computer. Other trademarks and trade names may be used in this document to refer to either potential...
Information Update (.pdf) - Page 5

...provide remote management capabilities for PowerEdge™ systems. Collectively, these solutions are authorized to remove the system cover and access any of each setting. See your system or on... Guide for instructions about safety precautions, working inside the system. Installing or Replacing an ERA/O Card
1-1 View the system configuration screens in the System Setup program and make...
Information Update (.pdf) - Page 6
...cable from the FLOPPY connector on the backplane board.
b Disconnect the diskette-drive interface cable from the CD_ROM connector on the backplane board. See Figure ...cover
optional security screw latch
right cover
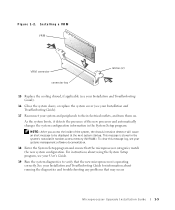
6 Remove the SCSI backplane board:
a Pull each hard-drive carrier partially out of its connector and up out of its slot, approximately 2.5 cm (1 inch). www.dell.com...
Information Update (.pdf) - Page 7
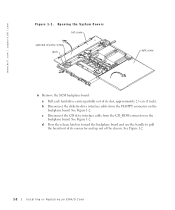
... (CD_ROM)
diskette drive interface connector (FLOPPY)
handle
release latch tabs (2)
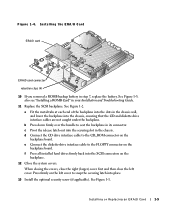
7 If the system has an optional ROMB card installed, remove the ROMB backup battery (not the ROMB card itself) to expose the ERA/O card connector. Installing or Replacing an ERA/O Card
1-3 see "Removing an ERA/O Card" for removal instructions before continuing with...
Information Update (.pdf) - Page 8

... seated into the connector.
1-4
Installing or Replacing an ERA/O Card
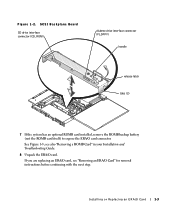
Removing the ROMB Backup Battery
ROMB backup battery
ROMB card
ERA/O card connector
battery standoffs (2)
RAID BATTERY connector
9 Install the ERA/O card in the ERA/O card connector (EMBEDDED_REMOTE_ ASSISTANT) on the system board;
Information Update (.pdf) - Page 9
... metal tabs at each end of the backplane into the slots in its connector. e Connect the diskette-drive interface cable to snap the securing latch into the chassis, ensuring that the CD and diskette drive interface cables are not caught under the backplane.
See Figure 1-1. When closing the covers, close the right...
Installation and
Troubleshooting Guide (.htm) - Page 5

... 1-1 Rack Mounting of Systems 1-1
Installation Instructions 1-2 Rack Requirements for VersaRails 1-3
Four-Post Rack Installation 1-3 Before You Begin 1-3 Recommended Tools and Supplies 1-3 RapidRails Rack Kit Contents 1-4 VersaRails Rack Kit Contents 1-4 Installation Tasks 1-5 ...
Installation and
Troubleshooting Guide (.htm) - Page 7

... Systems
Observe the following safety guidelines to help ensure your own personal safety and to any other rack, be components in the rack. CAUTION: Safety Instructions
Use the following precautions for use in a Dell™ rack cabinet using the customer rack kit. CAUTION: Do not move racks by trained service technicians...
Installation and
Troubleshooting Guide (.htm) - Page 8

...then slide the component into or out of a rack;
Installation Instructions
This installation guide provides instructions for trained service technicians installing one or more information on the ...rack kit for another system. www.dell.com | support.dell.com
CAUTION: Safety Instructions (continued)
• Use caution when pressing the component rail release latches and sliding ...
Installation and
Troubleshooting Guide (.htm) - Page 9
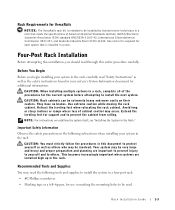
... rolling.
Recommended Tools and Supplies
You may be used
Rack Installation Guide
1-3 NOTE: For instructions on their casters.
Use extreme caution while moving the rack cabinet. They have no brakes....the rack, carefully read through this document to protect yourself as well as the safety instructions found in your system in a rack, complete all of the procedures for the current ...
Installation and
Troubleshooting Guide (.htm) - Page 22

See "Safety Instructions" at the front of this kit in a center-mount or a flush-mount configuration. Two-Post Rack Installation
The two-post rack kit is used to ...
Installation and
Troubleshooting Guide (.htm) - Page 33
... rack two-post kit, 1-18
marking the rack, 1-6
R
rack mount precautions, 1-3 rack requirements for
VersaRails, 1-3 rack unit, 1-6 RapidRails kit contents, 1-4 routing cables, 1-14, 1-26
S
safety instructions, 1-1 stiffening bracket, 1-22 stop blocks, 1-4, 1-13, 1-17
T
tools and supplies four-post kit, 1-3 two-post kit, 1-16
two-post kit installing cable-management arm, 1-26...
Similar Questions


