Dell XPS 8500 Support Question
Dell XPS 8500 Support Question
Find answers below for this question about Dell XPS 8500.Need a Dell XPS 8500 manual? We have 2 online manuals for this item!
Question posted by schoTh on September 22nd, 2013
How To Remove Dell Xps 8500 Power Supply
The person who posted this question about this Dell product did not include a detailed explanation. Please use the "Request More Information" button to the right if more details would help you to answer this question.
Current Answers
Related Dell XPS 8500 Manual Pages
Owner's Manual (PDF) - Page 2

... Corporation in any proprietary interest in this document to refer to change without the written permission of your product. Information in this text: Dell™, the DELL logo, and XPS™ are trademarks of these materials in the United States and/or other than its own.
2012 - 04
Rev. disclaims any manner whatsoever...
Owner's Manual (PDF) - Page 9

... Module 89
Prerequisites 89 Removing the Power Button Module 90 Replacing the Power Button Module 91 Postrequisites 91
20 Chassis Fan 93
Prerequisites 93 Removing the Chassis Fan 94 Replacing the Chassis Fan 95 Postrequisites 95
21 Processor Fan and Heat-Sink Assembly . 97
Prerequisites 97 Removing the Processor Fan and Heat-Sink Assembly. 97...
Owner's Manual (PDF) - Page 10
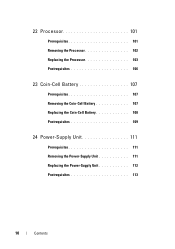
22 Processor 101
Prerequisites 101 Removing the Processor 102 Replacing the Processor 103 Postrequisites 106
23 Coin-Cell Battery 107
Prerequisites 107 Removing the Coin-Cell Battery 107 Replacing the Coin-Cell Battery 108 Postrequisites 109
24 Power-Supply Unit 111
Prerequisites 111 Removing the Power-Supply Unit 111 Replacing the Power-Supply Unit 112 Postrequisites 113
10
...
Owner's Manual (PDF) - Page 13

...Regulatory Compliance Homepage at dell.com/regulatory_compliance. CAUTION: To avoid damaging the components and cards, handle them by their electrical outlets.
4 Disconnect all power sources before connecting to... pins and contacts.
Safety Instructions
Use the following safety guidelines to the power source.
WARNING: Before working inside your computer, read the safety information that...
Owner's Manual (PDF) - Page 14

CAUTION: Only a certified service technician is authorized to remove the computer cover and access any connector pins.
When disconnecting cables...anything inside your computer, ground yourself by touching an unpainted metal surface, such as the metal at support.dell.com
14
Before you must disengage before disconnecting the cable. CAUTION: When you work, periodically touch an ...
Owner's Manual (PDF) - Page 20

Inside View of Your Computer
9 8 7
1 2
3 4
5 6
1 front bezel 3 graphics-card bracket (optional) 5 system board 7 power supply 9 secondary optical-drive
2 primary hard-drive 4 secondary hard-drive 6 card retention clamp 8 primary optical-drive
20
Technical Overview
Owner's Manual (PDF) - Page 23

... with your computer, read the safety information that shipped with the computer cover removed-at dell.com/regulatory_compliance.
4
Computer Cover
WARNING: Before working inside your computer and follow... applicable). 1 Lay the computer on its side with the computer cover facing up. 2 Remove the thumbscrew that sufficient space exists to the chassis, using a screw driver, if necessary....
Owner's Manual (PDF) - Page 27

... your computer and follow the steps in "Before You Begin" on page 23. Removing Memory Module(s)
WARNING: The memory module(s) may become very hot during normal operation....best practices information, see the Regulatory Compliance Homepage at dell.com/regulatory_compliance. See "Removing the Computer Cover" on page 13. Prerequisites
1 Remove the computer cover. Allow the memory module(s) to ...
Owner's Manual (PDF) - Page 28

...
Memory Module(s) Otherwise, your computer during a memory upgrade, keep them separate from any new module(s) that you may have, even if you remove the original memory module(s) from Dell. CAUTION: If you purchased the new module(s) from your computer may not boot. The recommended memory configurations are: matched memory modules installed in...
Owner's Manual (PDF) - Page 31

... an upright position. 2 Grasp and release the front bezel tabs sequentially, one at dell.com/regulatory_compliance. Removing the Front Bezel
1 Place the computer in "Before You Begin" on page 23. Front Bezel
31
Prerequisites
1 Remove the computer cover. See "Removing the Computer Cover" on page 13.
For additional safety best practices information, see the...
Owner's Manual (PDF) - Page 35

... computer cover. Graphics-Card Bracket (optional)
35 See "Removing the Computer Cover" on page 13.
7
Graphics-Card Bracket (optional)
WARNING:...off the chassis. 3 Set the graphics-card bracket aside in "Before You Begin" on page 23. Removing the Graphics-Card Bracket
1 Remove the screws that shipped with your computer and follow the steps in a secure location. For additional safety best...
Owner's Manual (PDF) - Page 37

... the system board, see the Regulatory Compliance Homepage at dell.com/regulatory_compliance. For additional safety best practices information, see "System-Board Components" on page 23.
2 Remove the graphics-card bracket, if applicable. Prerequisites
1 Remove the computer cover.
See "Removing the Computer Cover" on page 21. See "Removing the Graphics-Card Bracket" on page 13. The...
Owner's Manual (PDF) - Page 43

... Graphics-Card Bracket" on page 23.
2 Remove the graphics-card bracket, if applicable. See "Removing the Computer Cover" on page 35. 9
PCI-Express x1 Card(s)
WARNING: Before working inside your computer, read the safety ... on page 13.
PCI-Express x1 Card(s)
43
For additional safety best practices information, see the Regulatory Compliance Homepage at dell.com/regulatory_compliance.
Owner's Manual (PDF) - Page 49

...) and Bluetooth combo card. Your computer supports one half Mini-Card slot for Mini-Cards from sources other than Dell.
Prerequisites
1 Remove the computer cover. CAUTION: When the Mini-Card is already installed.
See "Removing the Computer Cover" on page 13. For additional safety best practices information, see "Protecting Against Electrostatic Discharge" in...
Owner's Manual (PDF) - Page 61

... Compliance Homepage at dell.com/regulatory_compliance. Primary Hard-Drive
Prerequisites
1 Remove the computer cover. WARNING: If you remove the hard drive from the primary hard-drive. 2 Remove the screws that shipped... the hard drive out towards the back of the hard drive. Removing the Primary Hard-Drive
1 Disconnect the power and data cables from the computer when the drive is on or...
Owner's Manual (PDF) - Page 67

... the power and data cables from the optical drive. 2 Remove the screws that shipped with your computer, read the safety information that secure the optical drive to the chassis. See "Removing the Front Bezel" on page 23.
2 Remove the front bezel. For additional safety best practices information, see the Regulatory Compliance Homepage at dell.com...
Owner's Manual (PDF) - Page 89

... that shipped with your computer and follow the steps in "Before You Begin" on page 31. 3 Remove the optical drive. See "Removing the Optical Drive" on page 67. 4 Remove the top cover. For additional safety best practices information, see the Regulatory Compliance Homepage at dell.com/regulatory_compliance.
Power Button Module
89
Prerequisites
1 Remove the computer cover.
Owner's Manual (PDF) - Page 111
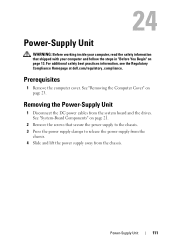
... the power supply to the chassis. 3 Press the power supply clamps to release the power supply from the
chassis. 4 Slide and lift the power supply away from the system board and the drives. Power-Supply Unit
111 Prerequisites
1 Remove the computer cover. See "Removing the Computer Cover" on page 23. For additional safety best practices information, see the Regulatory Compliance Homepage at dell...
Owner's Manual (PDF) - Page 112
3
2 1
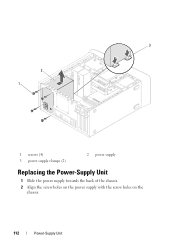
1 screws (4) 3 power supply clamps (2)
2 power supply
Replacing the Power-Supply Unit
1 Slide the power supply towards the back of the chassis. 2 Align the screw holes on the power supply with the screw holes on the
chassis.
112
Power-Supply Unit
Owner's Manual (PDF) - Page 113

... a key part of the system grounding.
4 Connect the DC power cables to the chassis. See "Replacing the Computer Cover" on page 25.
2 Follow the steps in "After Working Inside Your Computer" on page 21. Postrequisites
1 Replace the computer cover. 3 Replace the screws that secure the power supply to the system board and drives...
Similar Questions

Power Supply Lights
The third power supply light from the left just started to flash an orange light, normally it is unl...
The third power supply light from the left just started to flash an orange light, normally it is unl...
(Posted by RBrourke 8 years ago)


Inspiron 5110 Won't Turn On. No Power Supply Indicator On Laptop.
I have swapped battery and power supply. They work fine on other laptops, but none work on this one....
I have swapped battery and power supply. They work fine on other laptops, but none work on this one....
(Posted by cschwope 11 years ago)