Dell XPS Gen 3 Support Question
Dell XPS Gen 3 Support Question
Find answers below for this question about Dell XPS Gen 3.Need a Dell XPS Gen 3 manual? We have 2 online manuals for this item!
Question posted by hotsun on April 20th, 2014
How To Remove The Cpu Cooler Retention Plate From Dell Xps 8300 2012
The person who posted this question about this Dell product did not include a detailed explanation. Please use the "Request More Information" button to the right if more details would help you to answer this question.
Current Answers
Related Dell XPS Gen 3 Manual Pages
Owner's Manual - Page 1

Dell™ Dimension™ XPS Gen 3
headphone connector
microphone connector USB 2.0 connectors (2) IEEE 1394 connector
serial port parallel port
keyboard connector USB 2.0 connectors (6) VGA video connector
PCI card (4),... TV-OUT connector DVI video connector sound card connectors security cable slot padlock ring modem connector power connector
Model WHL
www.dell.com | support.dell.com
Owner's Manual - Page 5
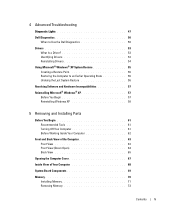
... 47
Dell Diagnostics 50 When to Use the Dell Diagnostics 50
Drivers 53 What Is a Driver 53 Identifying Drivers 53 Reinstalling Drivers 54
Using Microsoft® Windows® XP System ... Hardware Incompatibilities 57 Reinstalling Microsoft® Windows® XP 57
Before You Begin 57 Reinstalling Windows XP 58
5 Removing and Installing Parts
Before You Begin 61 Recommended Tools ...
Owner's Manual - Page 9

...; desktop (U.S.
You can use the CD to online support resources
• A diagnostic program for my computer • Drivers for technicians or experienced users.
• Additional information about setting up my computer • How to troubleshoot and solve problems • How to remove and install parts • Technical specifications • How to access Dell...
Owner's Manual - Page 11

... the arrow icon. 3 Click the topic that describes your call when contacting technical support. Dell Support Website - Finding Information
11 Contact information, order status,
warranty, and repair information •...and technical
support • Documentation for my computer
• How to use Windows XP • Documentation for my computer • Documentation for components, such
as a ...
Owner's Manual - Page 12

... Here
Operating System CD
The operating system is already installed on your computer.
After you ordered.
12
Finding Information See "Reinstalling Microsoft® Windows® XP" on the operating system you reinstall your operating system, use the Operating System CD. NOTE: The color of your CD varies based on page 57...
Owner's Manual - Page 13

Setting Up and Using Your Computer
13
Setting Up and Using Your Computer
Opening the Drive Door
Changing the Backlight Color
You can use this exclusive Dell™ Dimension™ XPS Gen 3 feature either to change the color of the backlight that illuminates the Dell name and displays around the badge on the front of your computer, or to turn off the backlight entirely.
Owner's Manual - Page 17

.... Setting Up and Using Your Computer
17 About Serial ATA Drives
Your Dell™ Dimension™ XPS computer supports up to the other, effectively doubling the amount of digital ... thinner and longer than a RAID level 0 configuration.
The Microsoft® Windows® desktop displays on changing the display settings for the data integrity requirements of viewable work space. For...
Owner's Manual - Page 55

...computer.
To access help, see the Windows desktop, reinsert the ResourceCD. 5 At the Welcome Dell System Owner screen, click Next. Advanced ...restart your computer. 3 When the InstallShield Wizard Complete window appears, remove the ResourceCD and click Finish to restart the computer.
4 When ...XP System Restore
The Microsoft® Windows® XP operating system provides System Restore to allow ...
Owner's Manual - Page 58

... appears. 3 Restart the computer. 4 Press immediately after the DELL™ logo appears. Windows XP Setup 1 When the Windows XP Setup screen appears, press to select To set up Windows now. 2 Read the information on your current Windows XP data, type r to select the repair option, and remove the CD. 4 If you to do so. Use...
Owner's Manual - Page 71
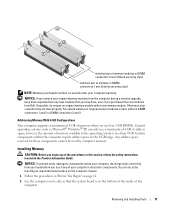
... 4 GB of address space; Removing and Installing Parts
71
You can only use four 1-GB DIMMs. Current operating systems, such as Microsoft® Windows® XP, can do not pair an original...2 (white securing clips)
NOTE: Memory purchased from Dell is on its side so that you may not start properly.
NOTICE: If you remove your original memory modules from the computer during a memory...
Owner's Manual - Page 74
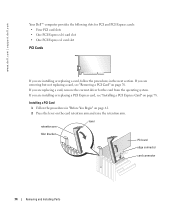
... page 78. If you are installing or replacing a PCI Express card, see "Removing a PCI Card" on the card retention arm and raise the retention arm. Installing a PCI Card 1 Follow the procedures in the next section.
www.dell.com | support.dell.com
Your Dell™ computer provides the following slots for PCI and PCI Express cards: •...
Owner's Manual - Page 76
...Removing a PCI Card
1 Follow the procedures in network adapter and you want to disable the integrated network adapter: a Enter system setup (see page 113), select Integrated Devices, and then change the setting for Network Interface Card to Off. www.dell.com | support.dell.com
8 Press the retention... integrated connector on the card retention arm and raise the retention arm. 3 If necessary, ...
Owner's Manual - Page 77
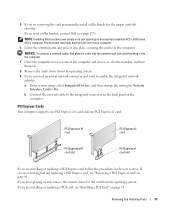
... PCI Express x16 card and one PCI Express x1 card.
If you removed an add-in the empty card-slot opening. If you need a filler bracket, contact Dell (see "Removing a PCI Express Card" on the back panel of your computer.
6 Lower the retention arm and press it into place, securing the card(s) in the...
Owner's Manual - Page 78
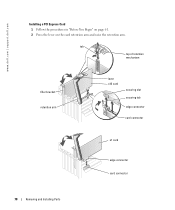
tab
top of retention mechanism
filler bracket retention arm
lever x16 card
securing slot securing tab edge connector
card connector
x1 card edge connector card connector
78
Removing and Installing Parts www.dell.com | support.dell.com
Installing a PCI Express Card 1 Follow the procedures in "Before You Begin" on page 61. 2 Press the lever on the...
Owner's Manual - Page 80
...documentation that came with the alignment bar. • The notch in the top of the retention mechanism, you can prevent the computer cover from closing properly or cause damage to Off. Do...dell.com | support.dell.com
8 If you replaced a card that was already installed in the computer and you removed the top of the card or filler bracket fits around the alignment guide.
10 Press the retention ...
Owner's Manual - Page 81
... Installing Parts
81 Removing a PCI Express Card
1 Follow the procedures in "Before You Begin" on page 61. 2 Press the lever on the card retention arm and raise the retention arm. 3 If necessary, disconnect any drivers required for the card as described in the computer. If you need a filler bracket, contact Dell (see page 114...
Owner's Manual - Page 98
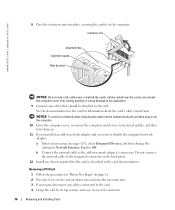
Press the tabs toward the center of the clip and lift up.
98
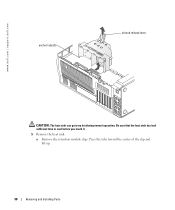
Removing and Installing Parts Be sure that the heat sink has had sufficient time to cool before you touch it.
5 Remove the heat sink:
a Remove the retention module clips. www.dell.com | support.dell.com
anchor tabs (3)
shroud release lever
CAUTION: The heat sink can get very hot during normal operation.
Owner's Manual - Page 99
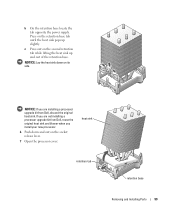
... are not installing a processor upgrade kit from Dell, discard the original heat sink. NOTICE: If you install your new processor.
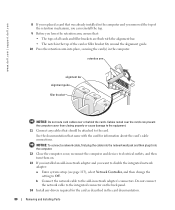
6 Push down on the second retention tab while lifting the heat sink up slightly. heat sink
retention tab
retention base
Removing and Installing Parts
99 b On the retention base locate the tab opposite the power supply...
Owner's Manual - Page 102
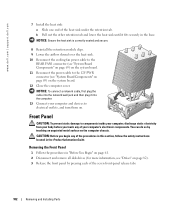
...them on. NOTICE: Ensure the heat sink is correctly seated and secure.
8 Reinstall the retention module clips. 9 Lower the airflow shroud over the heat sink. 10 Reconnect the cooling ...Product Information Guide.
www.dell.com | support.dell.com
7 Install the heat sink: a Slide one end of the seven front-panel release tabs.
102
Removing and Installing Parts
Removing the Front Panel
1 Follow...
Owner's Manual - Page 143

..., 15-16 connect two, 15-16 connect VGA, 15-16 display settings, 17 extended desktop mode, 17 hard to read, 44 problems, 44
motherboard. See system board
mouse connector,..., 12 reinstalling Windows XP, 57
Operating System CD, 12 overclocking, 29
P
password clearing, 119 jumper, 119
PCI cards installing, 74 removing, 76
PCI Express cards installing, 78 removing, 81
performance overclocking,...
Similar Questions


