Dewalt DW713 Support Question
Dewalt DW713 Support Question
Find answers below for this question about Dewalt DW713.Need a Dewalt DW713 manual? We have 2 online manuals for this item!
Question posted by schuckd on February 19th, 2022
Dsw 713
Are there crown stops adaptable with this model, DSW 713.
Current Answers
Answer #1: Posted by SonuKumar on February 20th, 2022 6:56 AM
SonuKumar

Member since:
May 9th, 2021 Points: 16,673,760

Member since:
May 9th, 2021 Points: 16,673,760
Please respond to my effort to provide you with the best possible solution by using the "Acceptable Solution" and/or the "Helpful" buttons when the answer has proven to be helpful.
Regards,
Sonu
Your search handyman for all e-support needs!!
Related Dewalt DW713 Manual Pages
Instruction Manual - Page 1

...-4-DEWALT
1-800-4-DEWALT
IN MOST CASES, A DEWALT REPRESENTATIVE CAN RESOLVE YOUR PROBLEM OVER THE PHONE.
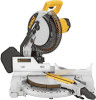
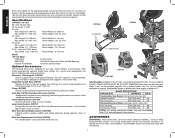
IF YOU HAVE A SUGGESTION OR COMMENT, GIVE US A CALL. Questions? DW713 10" (254 mm) Compound Miter Saw Scie à onglets mixtes de 254 mm (10 po) Sierra ingletadora compuesta de 254 mm (10")
Instruction Manual - Page 2
...DOUBLE INSULATION/POLARIZED PLUG INSTRUCTIONS 1 SAFETY INSTRUCTIONS FOR ALL TOOLS 1 ADDITIONAL SAFETY RULES 2 ELECTRICAL CONNECTION 3 UNPACKING YOUR...6 MITER POINTER ADJUSTMENT 6 BEVEL SQUARE TO TABLE 6 BEVEL POINTER...6 BEVEL STOP ...6 FENCE ADJUSTMENT 7 GUARD ACTUATION AND VISIBILITY 7 AUTOMATIC ELECTRIC BRAKE 7 MITER...MOLDING 11 CUTTING CROWN MOLDING 12
SPECIAL CUTS...13 MAINTENANCE...14 ...
Instruction Manual - Page 3
... 10 12
Not More Than
6 10 12 16
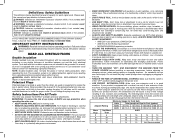
Minimum Gauge for which permits you and the tool's electrical system. English
Definitions: Safety Guidelines
The definitions below may result in the power cord.
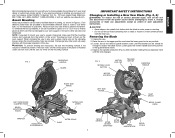
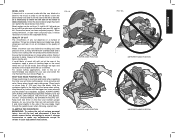
...before adjusting or changing set-ups, when making repairs or changing locations. Safety Instructions For All Tools
This miter saw . • KEEP GUARD IN PLACE and in good condition. Your shop ...
Instruction Manual - Page 4
... its intended function-check for your model. Do not use . Cleaning the blade and blade clamps allows you are against the fence and table. Don't leave tool until it will occur.
•...best results, do not use of a second is completely assembled and installed according to a complete stop. These can deflect and contact the guard, and can cause serious injury.
• OBTAIN ...
Instruction Manual - Page 5

...your power supply agrees with blade.
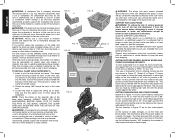
2. Unpacking Your Saw
Check the contents of harmful chemicals. DW713 miter saw on the skin may cause serious and permanent respiratory or other reproductive harm. English
...DO NOT PERFORM ANY OPERATION FREEHAND. TURN OFF TOOL AND WAIT FOR SAW BLADE TO STOP BEFORE MOVING WORKPIECE, CHANGING SETTINGS OR MOVING HANDS. One No. DW7053 Dust Bag...
Instruction Manual - Page 6
...; miter
Max. Adjustable Length Stop: DW7051 Requires the use only saw blades
with this tool could be more appropriate.
DW7080...cm). Height 3.5" (89 mm) Max. In some models) Equipped with Roller and Ball Bearings Automatic Electric Brake
...Worklight System: DWS7085 Lighting used to make repetitive cuts of crown molding. English
Press down lightly on each side. Height ...
Instruction Manual - Page 7
...not cut ferrous metal (containing iron or steel) or masonry or fiber cement product
with your tool are available for your local dealer or authorized service center. Clamping at any other job sites... and reclamped. If the saw to prevent movement. Removing the Blade
1.
To enhance the tool's portability, it can be raised far
enough to a piece of plywood, make any accessory for...
Instruction Manual - Page 8
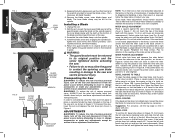
... left side fence clamping knob and slide the left on top of the saw . 2.
Suggestion: For accuracy, set the 45° bevel stop lock nut and turn off the tool and disconnect it from the power source before attempting to move the miter arm to move the Bevel Arm. Return the guard...
Instruction Manual - Page 9

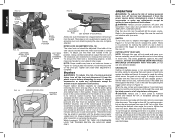
... injury, keep thumb underneath the handle when pulling the handle down which stops the saw turned off the tool and disconnect it from turning. NOTE: Certain special cuts will need readjustment to... move to the left bevel, the stop . If the condition persists, have the tool serviced by hand when installing or removing saw blades or for clearance...
Instruction Manual - Page 10
...new brushes. Brushes
WARNING: To reduce the risk of serious personal injury, turn off .
The tool should be adjusted if the table of wood, match the angle as close as described above....IF EQUIPPED)
Always be sure the blade has stopped before removing it is a commonly used brush in the same orientation in Figure 14. NOTE: Some models may be done safely by squeezing the trigger switch...
Instruction Manual - Page 11
...raising arm. Hold the workpiece tightly to the side of serious personal injury, turn off the tool and disconnect it , change accessories or make cutting easier, more accurate and safer. Keep both...left as written in position until the trigger has been released and the blade has completely stopped. For varied cutting applications, refer to the left side of any adjustments accept as desired...
Instruction Manual - Page 12
...or your saw.
SUPPORT FOR LONG PIECES
WARNING: To reduce the risk of serious personal injury, turn off the tool and disconnect it from the power source before attempting to , such as a substitute for your saw whenever the...to help feed, support or pull the workpiece. Your saw is the perfect tool for use the fine adjust knob to keep the ends from your local retailer or DEWALT service center ...
Instruction Manual - Page 14

...8226; All cuts made . Save left side fence out of the path of the blade before attempting any tool made with back of molding laying flat on the Bevel scale at 90° approx. 1" (25.4... Position molding with bottom of the saw table (Fig. 29).
3. Most, but not all Standard (U.S.) crown molding with the saw set on your right thumb on saw 2.
The chart below . There is better ...
Instruction Manual - Page 15
... right 31.62° 3. Miter table set right 31.62° 3. Save right end of the crown molding fence accessory (DW7084) is resting on the table at 45° 2.
Use of cut
OUTSIDE CORNER... miters, remember that no bevel cut these extrusions. Apply the stick wax directly to cutting crown molding using this method is required. Miter left at your local dealer. Save right side ...
Instruction Manual - Page 58

... pyramids on the surface of lozenge-shaped humps on the handgrip; and the array of the tool. the "D" shaped air intake grill; DEWALT Industrial Tool Co., 701 East Joppa Road, Baltimore, MD 21286
(AUG09)
Part No. N044443
DW713
Copyright © 2007, 2009 DEWALT The following are trademarks for one or more DEWALT power...
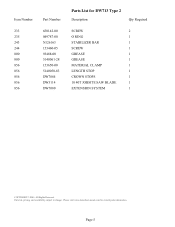
Parts Diagram - Page 2

Parts list, pricing, and availability subject to change. Please visit www.dewaltservicenet.com for DW713 Type 2
Description
Qty Required
SCREW,M5 X 16MM
3
SCREW,TAPTITE
3
SCREW,TAPTITE
6
SCREW
4
SCREW,TAPTITE
1
SCREW
1
LOCK SCREW
8
SCREW
4
SCREW
4
SCREW
2
SCREW
5
SCREW
3
SCREW
2
SCREW
1
SCREW
1
...
Parts Diagram - Page 3

... 2 All Rights Reserved.
Parts list, pricing, and availability subject to change. Please visit www.dewaltservicenet.com for DW713 Type 2
Description
Qty Required
ARM
1
INSERT
2
DUST CHUTE
1
GUARD
1
WRENCH
1
SHAFT, PIVOT
1
SPACER
2...,FLANGED
1
BUSHING
1
HANDLE ASSY
1
SWITCH
1
CORD ASSY
1
PROTECTOR, CORD
1
NUT,STOP
1
CARRYING HANDLE
1
COPYRIGHT© 2005.
Parts Diagram - Page 4

Please visit www.dewaltservicenet.com for DW713 Type 2
Description
Qty Required
TRUNNION
1
LOCKING PIN
1
O RING
1
BOLT
2
NUT
2
STUD
1
WASHER
1
BEVEL HANDLE
1
FENCE
1
LEFT FENCE
1
KNOB,LWR BEVEL
1
ROTARY TABLE
1
LOCK LEVER
1
PLATE
1
...
Parts Diagram - Page 5

Page 4 Parts list, pricing, and availability subject to change. Please visit www.dewaltservicenet.com for DW713 Type 2
Description
Qty Required
WARNING LABEL
1
NAME PLATE
1
SCREW
1
SCREW
2
SCREW
2
BRUSH & LEAD
2
BRUSH CAP
2
FIELD & FLD.CSE
1
FAN BAFFLE
1
END CAP
1
ARMATURE & BRGS
1
GEAR ...
Parts Diagram - Page 6
All Rights Reserved.
Parts list, pricing, and availability subject to change. Page 5 Please visit www.dewaltservicenet.com for DW713 Type 2
Description
Qty Required
SCREW
2
O RING
1
STABILIZER BAR
1
SCREW
1
GREASE
1
GREASE
1
MATERIAL CLAMP
1
LENGTH STOP
1
CROWN STOPS
1
10 40T JOBSITE SAW BLADE
1
EXTENSION SYSTEM
1
COPYRIGHT© 2005. Item Number
233 235 243 244 800...
Similar Questions

Crown Molding Stops
Can I purchase crown molding stops to fit the DW 713?
Can I purchase crown molding stops to fit the DW 713?
(Posted by Workr247 2 years ago)

Dw7084 Crown Stops
Hi there, I am looking for the crown stops for my DW713 miter saw. It looks like there is only one c...
Hi there, I am looking for the crown stops for my DW713 miter saw. It looks like there is only one c...
(Posted by christcanada 2 years ago)

Battery Charger Initialy Lite Then Suddenly Stop. Same 2nd Battery.
battery charger initialy lite then immediately stop charging.
battery charger initialy lite then immediately stop charging.
(Posted by joselualhati1955 8 years ago)
Bolt Size For Dewalt 734 Planner Tool Tray
I need the size of the two bolts used to attach the tool tray to a 734 DeWalt Planner.
I need the size of the two bolts used to attach the tool tray to a 734 DeWalt Planner.
(Posted by luklyd 8 years ago)
