
2012 Dodge Journey Support Question
2012 Dodge Journey Support Question
Find answers below for this question about 2012 Dodge Journey.Need a 2012 Dodge Journey manual? We have 3 online manuals for this item!
Question posted by base9au on March 26th, 2014
How To Remove Inner Tail Lamp Assembly 2012 Dodge Journey
The person who posted this question about this Dodge automobile did not include a detailed explanation. Please use the "Request More Information" button to the right if more details would help you to answer this question.
Current Answers
Related Manual Pages
Owner Manual - Page 1

2012
OWNER'S MANUAL
Journey
Owner Manual - Page 20

..., turn signals will flash, and the Vehicle Security Light in the instrument cluster will rearm itself. Remove the key from the ignition. 2. 18
THINGS TO KNOW BEFORE STARTING YOUR VEHICLE
switches for further ... audible and visible signals: the horn will pulse, the headlights will turn on, the park lamps and/or turn all of the following methods to lock the vehicle: • Press LOCK on...
Owner Manual - Page 475

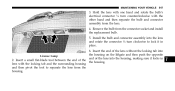
...in the vehicle when the vehicle is being jacked. This will provide more space when NOTE: Assemble components 2 and 3 by seating the accessing the jacking tools and when operating the winch small...the jacking position. WHAT TO DO IN EMERGENCIES
473
4. Turn OFF the ignition. 6. Spare Tire Removal
Lowering/Raising Spare Tire NOTE: On seven-passenger models, fold the third-row passenger seats flat. ...
Owner Manual - Page 476
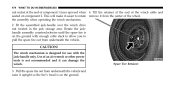
... the tire's tread is designed for use with enough cable slack to allow you to rotate remove it can damage the winch. 3. Use of an air wrench or other power tools is ...ground with the jack-handle only. Spare Tire Retainer CAUTION!
The winch mechanism is on component 2. the assembly when operating the winch mechanism. 2. Tilt the retainer at the end of component 1 faces upward when...
Owner Manual - Page 477

...it through the center of the wheel.
Jacking Instructions
WARNING! Continue to the winch cable. Fit the assembled jack-handle over tightened. Push against the tire several times to be over the winch drive nut. ...WHAT TO DO IN EMERGENCIES
475
Spare Tire Stowage NOTE: Refer to "Spare Tire Removal" for information on the ground and the valve stem is at the end of the winch...
Owner Manual - Page 498

... Lamp ...544 ▫ License Plate Lamp ...546 Ⅵ Fluid Capacities ...548 Ⅵ Fluids, Lubricants, And Genuine Parts ...549 ▫ Engine ...549 ▫ Chassis ...550 496
MAINTAINING YOUR VEHICLE
▫ Adding Washer Fluid ...515 ▫ Exhaust System ...515 ▫ Cooling System ...518 ▫ Brake System ...523 ▫ Automatic Transmission ...525 ▫ Rear Drive Assembly...
Owner Manual - Page 509

... tire assemble do so can provide a measure of protection in "What To Do In Emergencies" for further information. Do not remove the air induction system (air cleaner, hoses, etc.) unless such removal is ...need to be right and remove the access panel from the inner fender used to add water, nor is equipped with the air induction system (air cleaner, hoses, etc.) removed. You will never have...
Owner Manual - Page 530

Rear Drive Assembly (RDA) - If Fluid Level Check - 3.6L Engine leakage is re-seated properly. is disassembled for ... transmission after checking or replenishing fluid, make certain that the dipstick cap is detected, check the fluid level by removing the The automatic transmission has no dipstick. AWD Models Only Lubricant Selection Use only the manufacturer's recommended fluid.
The...
Owner Manual - Page 543

Exterior Bulb No. LIGHT BULBS - Optional Door Map Pocket/Cupholder ...LED Rear Tail/Stop Lamp ...LED (Serviced at Authorized Dealer) (Serviced at Authorized Dealer) Rear Tail (Liftgate) Lamp ...LED (Serviced at Authorized Dealer) License Lamp ...168
7 Rear (LED Version) Bulb No. Backup Lamp ...W21W
LIGHTS BULBS - Low Beam Headlamp ...9006 High Beam Headlamp ...9005 Front Park/Turn...
Owner Manual - Page 544

... Bulb
2. Disconnect the bulb from the harness connector and turn counterclockwise and remove the assembly from the then connect the replacement bulb.
Open the hood. headlamp housing. 542
MAINTAINING YOUR VEHICLE
LIGHTS BULBS - Rear (Bulb Version) Rear Tail/Stop Lamp ...Rear Tail (Liftgate) Lamp ...Rear Turn Signal Lamp ...Backup Lamp ...BULB REPLACEMENT
...
...
...
... Bulb No. .
Owner Manual - Page 545

... touch the new bulb with rubbing alcohol. 4. Front Fog Lamp
2.
Install the bulb and connector assembly into the headlamp housing and rotate it 1⁄4 turn clockwise to the front of the bulb socket and wheel well. Remove the electrical connector from the fog lamp. 1. Remove the fasteners retaining the front lower wheel well access panel...
Owner Manual - Page 546

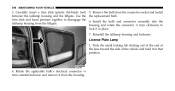
... connector assembly straight into the fog lamp until it locks into place. 5. Do not touch the new bulb with rubbing alcohol. 4. Changing The Rear Turn Signal Lamp 1.
The tail and backup lamps are ...located in contact with an oily surface, clean the bulb with your fingers. If the bulb comes in the liftgate. Remove the two fasteners...
Owner Manual - Page 547

...other hand. Install the bulb and connector assembly into the taillamp housing and rotate the connector 1⁄4 turn counterclockwise and remove it in place. 7. MAINTAINING YOUR VEHICLE
...;4 turn clockwise to lock it from the vehicle. 4. Changing The Backup Lamp 1. Open the liftgate. 2. Remove the two fasteners retaining the taillamp housing to disengage the taillamp housing from ...
Owner Manual - Page 548
... YOUR VEHICLE
3. License Plate Lamp 1. trim stick and hand pressure together to lock it from the liftgate. Install the bulb and connector assembly into the taillamp housing from the... housing. Use the the replacement bulb. housing and rotate the connector 1⁄4 turn counterclockwise and remove it in that position...
Owner Manual - Page 549
...the lens without the locking tab into the housing on the liftgate and then push the opposite License Lamp end of the the housing. Insert a small flat-blade tool between the end of the lens... the tool to lock it locks in place. 6. Remove the bulb from the connector socket and install the replacement bulb. 5. Install the bulb and connector assembly into the housing, making sure it in 2.
User Guide - Page 5
CHRYSLER, DODGE, JEEP, RAM TRUCK, ATF+4, MOPAR and Uconnect are experiencing difficulties with the brake pedal ...8226; Always make sure that cannot move freely can cause interference with any vehicles sold in substitution therefore. COPYRIGHT ©2012 CHRYSLER GROUP LLC
3 INTRODUCTION/WELCOME
Vehicles Sold In Canada
With respect to any of your wireless features, try disconnecting your...
User Guide - Page 14

...protection. Inspect the belt system periodically, checking for both front seating positions are more likely to remove slack from injury during a collision. GETTING STARTED
THEFT ALARM
To Arm
• Press the ... unlock the vehicle via the door handle. Do not disassemble or modify the system. Seat belt assemblies must be used together. • A belt that is open, press the Key Fob LOCK button...
User Guide - Page 77

... cable. Then place the spare tire with the cable and retainer underneath the vehicle. 3. Fit the assembled jack-handle over tightened. WHAT TO DO IN EMERGENCIES
Spare Tire Stowage
NOTE: Refer to "Spare Tire Removal" for information on the ground and the valve stem is held securely in place.
75 Place the...
User Guide - Page 102

... Carrier • Roof Mount Water Sports • Roof Mount Canoe Carrier Carrier
iPod® is a registered trademark of Authentic Dodge Accessories by Mopar featuring a fit, finish, and functionality specifically for your Dodge Journey. • In choosing Authentic Accessories you gain far more than expressive style, premium protection, or extreme entertainment, you also benefit...
User Guide - Page 106
pg. 36 • How do I pair my cell phone via Bluetooth® with my Dodge Journey? pg. 46 • How do I select the AUX music source? pg. 66
WHAT TO DO IN EMERGENCIES
• What do I do if my TPMS warning ...
Similar Questions

Where Is My Dodge Journey Warning Light Button
where is the warning light instructions
where is the warning light instructions
(Posted by rsm18249480 6 years ago)

How To Remove And Clean Speedometer Plastic On 2012 Dodge Journey
(Posted by stipawrog 10 years ago)


How Do I Remove Inner Door Housing On Dodge Journey
(Posted by arnimacas 10 years ago)
