
Electrolux EIED200QSW Support Question
Electrolux EIED200QSW Support Question
Find answers below for this question about Electrolux EIED200QSW.Need a Electrolux EIED200QSW manual? We have 6 online manuals for this item!
Question posted by ElectroluxAt49 on May 3rd, 2018
Vibration Flap Dryer Top Cover
Can a someone help with the replacement part that was on the dryer top cover... it was removed. It needs to be placed... it was referenced as the "vibration flap", looks like a dolphin fin that rubs the dryer drum to stop the vibration.
Current Answers
Answer #1: Posted by Odin on May 9th, 2018 5:25 PM
Odin

Member since:
April 10th, 2010 Points: 41,236,630

Member since:
April 10th, 2010 Points: 41,236,630
All available parts for this product are listed and linked at https://www.repairclinic.com/Shop-For-Parts/a8b2d2112480/Model-EIED200QSW00-Frigidaire-Dryer-Parts, at the left. (Frigidaire and Electrolux are the same company.) If you have a problem identifying the part you need, call the number at the top. If for any reason this website doesn't solve, try to get at least a part number from Electrolux [use the contact information here--https://www.contacthelp.com/electrolux/customer-service], and consider the applicable suggestions at http://bit.ly/2BHsd7d
Hope this is useful. Please don't forget to click the Accept This Answer button if you do accept it. My aim is to provide reliable helpful answers, not just a lot of them. See https://www.helpowl.com/profile/Odin.
Related Electrolux EIED200QSW Manual Pages
Installation Instructions (English Español Français) - Page 2

...gasoline or other flammable vapors and liquids in the vicinity of this dryer are known to cover every possible condition and situation that may cause bodily injury or property damage....• Immediately call the fire
department. Cartons covered with the National Fuel Gas Code, ANSI Z223.1/NFPA 54.
• The dryer is unpacked. Place all other appliance. CAN/CSA C22.2 No. 112 ...
Installation Instructions (English Español Français) - Page 3

... function
Electrical Power
‰ House power turned on ‰ Dryer plugged in
Final Checks
‰ Installation Instructions and Use and Care Guide read thoroughly
‰ Door latches and drum tumbles when cycle starts
‰ Registration card sent in
Pre-installation requirements
Tools and materials needed for installation:
or or
Adjustable Phillips, straight, & Adjustable...
Installation Instructions (English Español Français) - Page 4

...DRYER:
CIRCUIT -
branch circuit fused with clothes dryers. IMPORTANT
This dryer...14-30R)
The dryer MUST employ a...dryer. GROUNDING CONNECTION - Individual,...dryers. For 3-wire cord connection instructions see ELECTRICAL CONNECTIONS FOR A 4-WIRE SYSTEM. NOTE
Dryers... -
The dryer is prohibited ...accessible when the dryer is not recommended...30R)
The dryer MUST employ a... of this dryer with 15...
Installation Instructions (English Español Français) - Page 5

... (minimum) rigid or flexible metal duct and approved vent hood which has a swing-out damper(s) that open when the dryer is made up of plastic duct or metal foil duct, replace it with a rigid or semirigid metal duct. WARNING
FIRE HAZARD
Failure to natural gas, causing gas leaks. Flexible venting materials...
Installation Instructions (English Español Français) - Page 6

...that extend into the laundry area. The dryer must be accomplished by installing a quick-turn 90° dryer vent elbow directly to meet minimum installation depth. Dryer vent elbows are available...curtains, paper) to assemble the exhaust system. Regularly inspect the outdoor exhaust opening and remove any accumulation of lint around the outdoor exhaust opening and in a fire ...
Installation Instructions (English Español Français) - Page 12
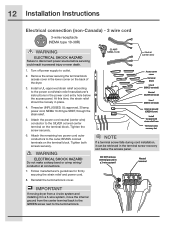
... installation, it in place.
4.
Tighten the screw securely.
6. Attach the remaining two power cord outer conductors to the terminal block.
Neutral terminal
IMPORTANT
If moving dryer from a 4-wire ... back of the dryer.
3.
Remove the screw securing the terminal block access cover in a 3-wire system!! Thread an UNPLUGGED, UL-approved, 30 amp. DO NOT remove internal ground in ...
Installation Instructions (English Español Français) - Page 13

...block and attach it can be loosely in the lower corner on the back of the dryer. 3. Turn off power supply to the outer, BRASS colored terminals on the terminal ...dryer harness ground wire from the (GREEN) ground screw next to the power cord/strain relief manufacturer's instructions in personal injury or even death.
1.
Remove the screw securing the terminal block
access cover in place....
Installation Instructions (English Español Français) - Page 15

...Replace washer if it is torn or worn out. RUBBER WASHER MUST BE PRESENT AND UNDAMAGED
COLD INLET HOSE TO WASHER
3. Turn off COLD water supply to clear any contaminants in the line.
4. Remove COLD inlet hose from dryer drum... Cold water faucet MUST be installed within 42 inches (107 cm) of your dryer's water inlet. RUBBER WASHERS MUST BE PRESENT Water pressure MUST be between 30 ...
Installation Instructions (English Español Français) - Page 19

...need a screw driver with a #2 square bit. 3 Protect flat , covered work surface, such as top of the door with both hands, separate the door from power source! WARNING
ELECTRICAL SHOCK HAZARD
Failure to 90 degree angle.
2 Remove... death. Removing door and hardware
Tools needed:
Screwdrivers with a soft cloth or towel. 4 Be sure dryer is unplugged from the hinge.
4 Gently place door face...
Installation Instructions (English Español Français) - Page 23
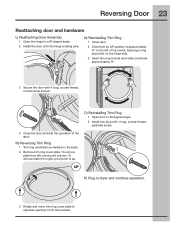
... the latch. M) Reversing Trim Ring
1 Trim ring orientation is up. To remove
plate from right, pivot point is marked on the hinge side.
3 Insert trim ring in trim and reinsert.
Opening in dryer and continue operation.
3 Rotate and move trim ring cover plate to 90 degree angle. 2 Install trim plug with 4 long, course...
Complete Owner's Guide (English) - Page 3

... any appliance. • Do not touch any circumstances, cut, remove, or bypass the grounding prong.
Failure to cover every possible condition and situation that may occur. Common sense and ... Care Guide, Installation Instructions and on electric dryers (not provided with unit except those manufactured for future reference.
240 v Electric Dryer
120 v Gas Dryer
10-30R 3-wire
(fused 30 amp)...
Complete Owner's Guide (English) - Page 4

... the surrounding area.
• Do not operate the dryer if the lint screen is removed from service or discarded, remove the dryer door to prevent accidental entrapment.
• Failure to ...place laundry or throw rugs against the front or back of the dryer.
• Do not spray any type of aerosol into, on product labels.
• Before the dryer is blocked, damaged or missing. Cartons covered...
Complete Owner's Guide (English) - Page 7

... air flow mixes with air movement throughout the dryer, including the air duct, blower, and exhaust system. Repeat stain removal process and wash again before operating your new dryer:
A. D.
Dryer heat may permanently set of time, or after a heavy load has remained in the dryer drum for an extended period, creating a temporary flat spots...
Complete Owner's Guide (English) - Page 9

... to dry loads containing a mix of fabrics. This helps reduce wrinkling and makes items easier to the console.
Press... on every model. Cycle Selection
Operating Instructions 9
This manual covers many models and not all cycles, options, or features listed...cycle will automatically be dried at the back of the dryer drum sense the moisture level of installation and electrical voltage or...
Complete Owner's Guide (English) - Page 13

...dryer drum, resting the back support on the moisture sensor bars and the front legs on DOOR REVERSAL, refer to the Installation Instructions supplied with a reversible door. SANITIZING
EXT. The weight should not be displayed when the cycle is selected. Repeat to unlock the controls when you are dry, remove...door is displayed during the cycle.
Place items to be displayed at the
...
Complete Owner's Guide (English) - Page 15

... and replace.
Remove cleanser residue before drying the next load.
• Every 18 months an authorized servicer should clean the dryer cabinet interior and exhaust duct. The dryer must be... opening and in place.
• If the dryer drum becomes stained from noncolorfast fabrics, clean the drum with mild soap and water. IMPORTANT
Do not store or place laundry products on the...
Complete Owner's Guide (English) - Page 17

...dryer. OCCURRENCE POSSIBLE CAUSE
SOLUTION
Dryer does not start. Drying cycle takes too long, outside of the drum finish. Thermal limiter tripped. If 1 Replace fuse.
Exhaust duct must have not been met. High humidity. Remove...cord is not covered by foreign objects or permanently attached items is not securely plugged Make sure the plug fits tightly in place, the duct ...
Product Specifications Sheet (English) - Page 1

... PN # EPWD15IW
Dryer Stacking Kit - PN # 137067200 Drying Rack - Height (Without 15" Pedestal)
38"
(With 15" Pedestal)
53"
Width
27"
Depth (to meet your needs, so the option you need - "My Favorite...Yes
Touch-2-Open™/ (Close) Door
Yes
Exact Dry™ Moisture Sensor
Yes
Painted Dryer Drum
Yes
Tumble Speed (RPM)
50
Reversible Door
Yes
Adjustable Leveling Legs
Yes
NSF®...
Product Specifications Sheet (English) - Page 2

... drawer pedestal, or stacked above matching Electrolux Washer, which requires installation of elbows needed.
• Exhaust installation requires minimum 4"-diameter rigid or semi-rigid metal duct...refer to improve our products. We reserve the right
to level dryer properly and reduce excessive noise and vibration. Installations requiring countertop and / or cabinetry will require custom building...
Dryer Cleaning Advisory (English) - Page 1
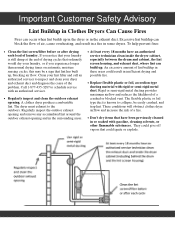
... in some dryers. Call 1-877-435-3287 to the outdoors. Regularly inspect the outdoor exhaust opening and remove any accumulated lint... and in inefficient drying and possible fire.
Replace flexible plastic or foil, accordion-type ducting material with ...dryer cabinet, especially between the drum and cabinet, the lint screen housing, and exhaust duct, where lint can build up. To help...
Similar Questions

Drum Starts To Turn And Stalls Out After 5-10 Seconds - ??
Removed rear panel, if remove belt off motor and takeup tension wheel, the drum turns easily but wit...
Removed rear panel, if remove belt off motor and takeup tension wheel, the drum turns easily but wit...
(Posted by farrellssmith 3 years ago)

?dryer Runs But Does Not Heat Up.
Where are the '2 house fuses' located?
Where are the '2 house fuses' located?
(Posted by slmcqueen 7 years ago)

What Does It Mean When Dryer Will Not Stop When Door Is Open
(Posted by gniesanm 10 years ago)
How To Clean Lint From Electrolux Eied55hiw0 Dryer
(Posted by saFICKL 10 years ago)