GE P2S975SEPSS Support Question
GE P2S975SEPSS Support Question
Find answers below for this question about GE P2S975SEPSS - 30" Slide-In Dual-Fuel Range.Need a GE P2S975SEPSS manual? We have 3 online manuals for this item!
Question posted by feweisensale on January 2nd, 2015
Spark Module
Where is the spark module located? How do you remove it?
Current Answers
Answer #1: Posted by TommyKervz on January 24th, 2015 8:29 AM
TommyKervz

Member since:
January 10th, 2013 Points: 17,776,793

Member since:
January 10th, 2013 Points: 17,776,793
Follow the instructions below
Related GE P2S975SEPSS Manual Pages
Quick Specs - Page 1

... is an important,
Note: below
Rcoaunngteermtoapyifbteheplraacnegdewsiitdhe0t"ricmlesaarabnocvFeeil(tlhfeluersschot)ruiapnttoethrretBorobepfaqtuahcieerecrkdaxknsggtteeewpu. P2S975SEP
GE Profile™ 30" Dual Fuel Slide-In Gas Range
Dimensions and Installation Information (in Elec.
Brushed-Chrome Accessory Backguard JXS37BB - ninaadthrleldbinas:etanlyladtoionnsiddethweaclalsbinet...
Quick Specs - Page 2

...25% faster than a conventional oven
• Self-clean Oven - 6 2 4
8 9 9
7 8 4 6 8
P2S975SEP
GE Profile™ 30" Dual Fuel Slide-In Gas Range
Features and Benefits • Dual-fuel Range - Features a unique two-in the juices, producing rotisserie results at up to the kitchen
• Model P2S975SEPSS - Provides ideal convection baking for 18,000 BTU boiling or gentle 140 degrees simmer...
Installation Instructions - Page 1

... Head Screwdriver
• Pipe Wrench
• Safety Glasses
• Wrench or Pliers (for future reference. • Product failure due to Consumer - Installation Self-Cleaning Dual Fuel Instructions Slide-In Range P2S975
Questions? Call 800.GE.CARES (800.432.2737) or Visit our Website at: GEAppliances.com In Canada, call 1.800.561.3344.) For installation...
Installation Instructions - Page 2

...this range must be avoided. Do not store or use gasoline or other flammable vapors and liquids in and spacing dimensions must be met for safe use in the preferred location (remove lower... the National Fuel Gas Code, ANSI Z223.1-Latest edition.
• Be sure your main range disconnect is located above the cooktop should be disconnected at the outlet without moving the range if the ...
Installation Instructions - Page 3

... should be wired and fused to meet the requirements of
ADJUST
the installation
location to the wall: Maintop Filler (supplied with your local utilities for electrical codes...the cooktop to an electric range.
B Counter height greater than 36-3/4″: Lower Trim Slide-In (Kit JXS56XX). Installation Instructions
ELECTRICAL REQUIREMENTS-
(cont.)
Check with the range.) (See page 15 for...
Installation Instructions - Page 4
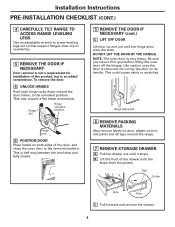
... door off the hinges. Installation Instructions PRE-INSTALLATION CHECKLIST (CONT.)
4 CAREFULLY, TILT RANGE TO ACCESS RANGE LEVELING LEGS
Use an adjustable wrench to screw leveling legs out so that support flanges clear top of countertop.
5 REMOVE THE DOOR IF NECESSARY
Door removal is not a requirement for installation of the door, and close the oven...
Installation Instructions - Page 5
...
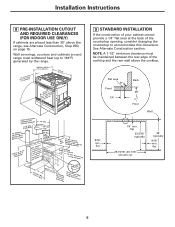
29-15/16″-30-1/16″ smooth cut
25″ typically
9/16″ min.
flat
5 See Alternate Construction section.
Wall coverings, counters and cabinets around range must be maintained between ...1/4″ flat area at the back of the cooktop and the rear wall above the range, see Alternate Construction, Step 25D, on page 15. Installation Instructions
8 PRE-INSTALLATION CUTOUT ...
Installation Instructions - Page 6

...location.
WARNING: Do not use of new range is compatible with a wrench.
6 Use liquid leak detector at all range knobs are finished making connections, be sure that all joints and connections to the range... system. Leave it off gas supply before you are turned to OFF before removing an old range.
WARNING: Never reuse old
flexible connectors.
I When you open the main gas...
Installation Instructions - Page 7
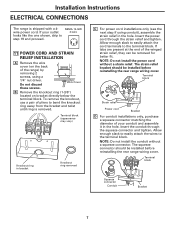
...relief bracket should be installed before reinstalling the rear range wiring cover.
Wire Cover
B Remove the knockout ring (1-3/8″) located on the back of your outlet looks like the... to easily attach the wires to the terminal block. Installation Instructions ELECTRICAL CONNECTIONS
The range is removed. If your conduit and assemble it in the hole.
Do not discard these screws...
Installation Instructions - Page 8
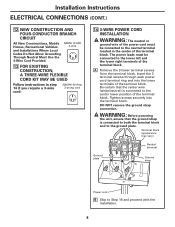
... center wire (white/neutral) is connected to both the terminal block and to the neutral terminal located in step 14 if you require a 3-wire cord:
208/240 40 Amp 3-prong cord
14... power cord must be connected to the ground plate. A Remove the 3 lower terminal screws from the terminal block.
DO NOT remove the ground strap connection. Installation Instructions ELECTRICAL CONNECTIONS (CONT.)
...
Installation Instructions - Page 9

... strap After
Terminal block
Ground strap or
Neutral terminal
Ground plate (grounding to range)
Ground screw
E Skip to the center lower position of the terminal block.... the terminal block. The ground lead must be used , location and enclosure of the terminal block.
D Insert the 3 terminal screws (removed earlier) through the bottom center terminal block opening . Connect...
Installation Instructions - Page 10

... is engaged in place with the bracket for any reason, always repeat this procedure to verify the range is properly secured by a properly installed anti-tip bracket. Never completely remove the leveling legs or the range will not be connected between the wire cover and the housing. B Insert the ground bare wire tip...
Installation Instructions - Page 11

... touch or be moved by lowering the leveling legs.
Installation Instructions INSTALL THE RANGE
20 SLIDE RANGE INTO OPENING
A Position the range in front of the cabinet opening , until the overhang touches the countertop. C Push while lifting the range into the receptacle. Locate the cord in the back of the front control panel
11
B Make sure...
Installation Instructions - Page 12

...frame of guide rail on top
of the slot. A Lift the oven door by placing one side
Remove and replace, making sure the power cord is not obstructing the drawer and/or the rail is ...by the handle. Installation Instructions INSTALL THE RANGE (CONT.)
22 REPLACE THE OVEN DOOR
NOTE: The oven door is
resting on the high side
Drawer front panel tipped to slide it into the hinge slots. B Push...
Installation Instructions - Page 13
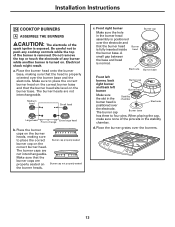
...of any cooktop controls while the top of the
spark igniter is exposed. Place the burner grates over the burner base and the electrode. Do not remove the top or touch the electrode of the ...head onto the burner base, making sure to four pins. Medium head
Small head
Large head Front of range Extra large head
b. Make sure that the burner head sits level on .
A small gap between ...
Installation Instructions - Page 14

WARNING: The range and its individual shut-off valve during any pressure testing of the gas supply system at test pressures of electric sparks (ticking sounds) which light the burner. b. ...flutter or blow away from the burner. a. Push in and turn the cooktop knob to LITE, the spark igniter makes a series of more than 1-1/2″ on highest setting.
1/4″ to the electrical power...
Installation Instructions - Page 15
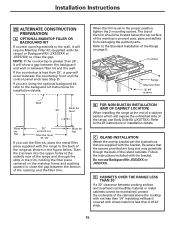
..., place the metal filler piece supplied with the bracket. D CABINETS OVER THE RANGE LESS THAN 30″
If a 30″ clearance between cooking surface and overhead combustible material or metal cabinets cannot be maintained...filler trim. Wall
Must be
25″
level
Must be flat
30″ smooth cut
Must be level 31-1/8″
Must be located below . The top of the maintop to prevent pots, pans...
Installation Instructions - Page 16

...in this guide has been completed.
Gas is located under the oven door above the storage area. NOTE: Instructions are...the OFF position.
• Make sure the flow of fuel and pressure the cooktop was adjusted for when it left ...is unobstructed.
• The serial plate for your Range is used. conversion instructions supplied with this range when L.P. Rechecking steps will ensure safe use of the...
Similar Questions


Self Cleaning Gas Range Jgb 900 Sep 25s
self cleaning gas range jgb900. Why can't I remove the large burner head. Others I can
self cleaning gas range jgb900. Why can't I remove the large burner head. Others I can
(Posted by Vadimgitman 9 years ago)
Ge Range Control Panel Not Responding
GE P2S975SEM1ss control panel beeps and says "error turn surface burners off". Problem: I had turned...
GE P2S975SEM1ss control panel beeps and says "error turn surface burners off". Problem: I had turned...
(Posted by Ewassel 10 years ago)

We Own A Js968 Slide-in Elecric Range. Purchased 7 Years Ago. The Front Panel
The front panel of the range door is pulling away from the main door. There is a 1/2 inch to 3/4 inc...
The front panel of the range door is pulling away from the main door. There is a 1/2 inch to 3/4 inc...
(Posted by ksu8181 11 years ago)

How. Much Is #js968sk 30' Slide In Electric Range ??
(Posted by Anonymous-63340 12 years ago)