GE P2S975WEMWW Support Question
GE P2S975WEMWW Support Question
Find answers below for this question about GE P2S975WEMWW.Need a GE P2S975WEMWW manual? We have 2 online manuals for this item!
Question posted by dochop3063 on September 17th, 2014
Spark Module On Ge Range P2s975wem1ww
The person who posted this question about this GE product did not include a detailed explanation. Please use the "Request More Information" button to the right if more details would help you to answer this question.
Current Answers
Answer #1: Posted by BusterDoogen on September 17th, 2014 1:51 PM
BusterDoogen

Member since:
October 30th, 2011 Points: 28,565,437

Member since:
October 30th, 2011 Points: 28,565,437
Go here for the part. Be sure to select the extended model of your range to view the correct part.
I hope this is helpful to you!
Please respond to my effort to provide you with the best possible solution by using the "Acceptable Solution" and/or the "Helpful" buttons when the answer has proven to be helpful. Please feel free to submit further info for your question, if a solution was not provided. I appreciate the opportunity to serve you!
Related GE P2S975WEMWW Manual Pages
Installation Instructions - Page 1
... to leave these
instructions for local inspector's use.
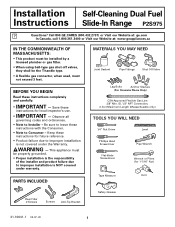
• IMPORTANT - Installation Self-Cleaning Dual Fuel Instructions Slide-In Range P2S975
Questions? Call 800.GE.CARES (800.432.2737) or Visit our Website at: ge.com In Canada, call 1.800.361.3400 or Visit our Website at: www.geappliances.ca
IN THE COMMONWEALTH OF...
Installation Instructions - Page 2

...use any other flammable vapors and liquids in the vicinity of this or any phone in your range is not followed exactly, a fire, explosion or gas leak may affect its use gasoline or..., service agency or the gas supplier.
Installation and service must conform with local codes or in this range must be avoided.
• Do not install the unit near an outside door or where a draft...
Installation Instructions - Page 3

...Anti-Tip device WB2X7909. Rating plate is located above the cooktop should engage and prevent the range from the wall for safe use a three-wire, single-phase A.C. 208Y/120 Volt or ... have the electrical wiring and hookup of the Canadian Electrical Code. Failure to wire your main range disconnect is properly installed and grounded by writing:
and 21.
Failure to be provided above ...
Installation Instructions - Page 4
... fit may occur. D Island Installation: To provide an optimum installation, the top surface of the countertop must be made or gaps between the countertop and range cooktop may cause excessive gaps. Visit GE Web Site (See page 1)
b.
C One side is not enclosed by a cabinet: Bodyside (Kit JXS77XX). ADJUST
4 CAREFULLY, TILT...
Installation Instructions - Page 5
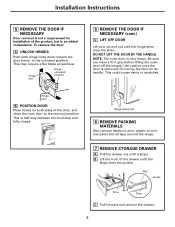
... locks down toward the door frame, to the removal position. Hinge arm
B POSITION DOOR Place hands on trim and panel and all tape around the range.
7 REMOVE STORAGE DRAWER
A Pull the drawer out until it stops. DO NOT LIFT THE DOOR BY THE HANDLE.
B Lift the front of the drawer until...
Installation Instructions - Page 6
... /P8E″adngeel
Flat area R
Front
1/4″
Back
36″
Floor
Wall
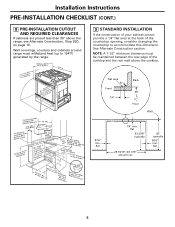
9/16″ min. See Alternate Construction section. Wall coverings, counters and cabinets around range must be maintained between the rear edge of the countertop opening, consider changing the countertop to accommodate this dimension. Fpaloatcellkronawagteiendsawtpriuptclhitainocnes F9r-o1m/2″WMailnls.
30...
Installation Instructions - Page 7

...1/2″ NPT elbow on pressure regulator. Gas Inlet
NOTE: When screwing on all range knobs are turned to gas supply line with proper flare union adaptor. Gas supply to...union adaptor, hold the gas inlet firmly with a wrench.
7 F Connect flexible appliance connector to the range.
Leave it off valve in the gas supply line in the system. Installation Instructions GAS CONNECTIONS
10 ...
Installation Instructions - Page 8

...: Do not install the conduit without a strain relief. Installation Instructions ELECTRICAL CONNECTIONS
The range is removed. Insert the conduit through the strain relief and tighten. Terminal block
Squeeze ...bracket directly below the terminal block.
To remove the knockout, use a pair of the range) by removing 2 screws, using conduit), assemble the strain relief in the hole. Insert...
Installation Instructions - Page 10
... terminal ring, through each power cord terminal ring and into the frame of the range.
Tighten screws securely into the lower left and the lower right terminals of the...Before
Terminal block
Ground strap After
Terminal block
Ground strap or
Neutral terminal
Ground plate (grounding to range)
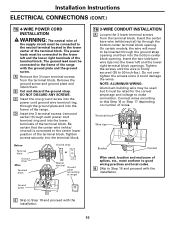
16 3-WIRE CONDUIT INSTALLATION
A Loosen the 3 lower terminal screws from the terminal block. ...
Installation Instructions - Page 11
...strap. DO NOT DISCARD ANY SCREWS.
Bracket
11 B Insert the ground bare wire tip between the range frame and the ground plate (removed earlier) and secure it could damage the wires. Tighten the...Ground strap
After
or
Neutral terminal
Terminal block
Wire tips
Ground screw
Ground plate (grounding to range)
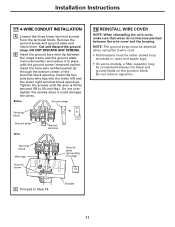
18 REINSTALL WIRE COVER
NOTE: When reinstalling the wire cover, make sure that wires do ...
Installation Instructions - Page 12

...bracket as shown in Fig. 1 as Floor-Wood and Wall. Top front
edge of the range opening. Install the sleeve anchors into the predrilled concrete holes and install the lag and wall ...sleeve anchors. Note the angle of the 4 holes identified in each. b. Installation Instructions INSTALL THE RANGE
19 INSTALL THE ANTI-TIP BRACKET
A LOCATE THE BRACKET a. Fig. 1
Adjacent cabinet
FLOOR-WOOD
...
Installation Instructions - Page 13
...touches the countertop. Countertop
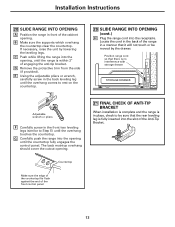
Make sure the edge of the countertop fits flush against the end of the range in a manner that it will not touch or be sure that there is within 2″ of ... OF ANTI-TIP BRACKET
When installation is complete and the range is in place, check to be moved by lowering the leveling legs.
Position range cord so that the rear leveling leg is fully inserted ...
Installation Instructions - Page 14
... must be completely obstructing drawer in this area
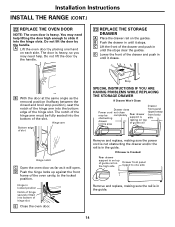
tipped away Rear drawer from body support is side resting on each side. Installation Instructions INSTALL THE RANGE (CONT.)
22 REPLACE THE OVEN DOOR
NOTE: The oven door is in the guide.
14
If Drawer is Crooked:
Rear drawer support is on the...
Installation Instructions - Page 15

Installation Instructions
24 COOKTOP BURNERS
A ASSEMBLE THE BURNERS
CAUTION: The electrode of range Extra large head
b. a.
Medium head
Small head
Large head Front of the
spark igniter is removed.
The burner cap
Burner base
has three to place the correct burner head on the correct burner base and that the burner ...
Installation Instructions - Page 16
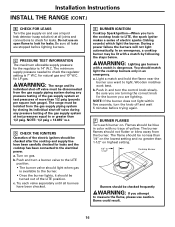
... Installation Instructions INSTALL THE RANGE (CONT.)
B CHECK FOR LEAKS Turn the gas supply on and use an open flame to look for leaks. b. E BURNER IGNITION
Cooktop Spark Ignition-When you want ...the control knob slowly. The burner flames should be disconnected from the burner. WARNING: The range and its individual shut-off and wait 5 minutes before lighting burners. D CHECK THE IGNITERS...
Installation Instructions - Page 17

... 25″, it will expose the unfinished side of the range, use the filler kit, place the metal filler piece supplied with the range) or Backguard Kit (JXS32XX or JXS37XX) to close the ...at the end of a cabinet section which will require Maintop Filler Kit (supplied with the range to the back of the range as shown in the proper position, tighten the 2 mounting screws. If you use Body ...
Installation Instructions - Page 18
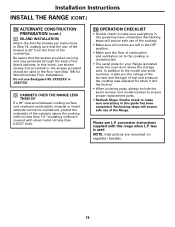
... this guide has been completed. Do not use of the countertop. D CABINETS OVER THE RANGE LESS THAN 30″
If a 30″ clearance between cooking surface and overhead combustible ...OFF position.
• Make sure the flow of the island cabinets. Installation Instructions INSTALL THE RANGE (CONT.)
25 ALTERNATE CONSTRUCTION PREPARATION (cont.)
C ISLAND INSTALLATION Attach the Anti-Tip bracket ...
Similar Questions

I Have A Ge Range, Model Numberwhat Is The Part Number For The Bake Oven Element
I have a GE range, model number JCBP65S P1SS. What is the part number for the bake oven element?
I have a GE range, model number JCBP65S P1SS. What is the part number for the bake oven element?
(Posted by klear29663 11 months ago)
Where Is The Noisy Fan Located On Ge Range Zdp30n4hss Located.
Where is the noisy fan located on ge Range zdp30n4hss located.
Where is the noisy fan located on ge Range zdp30n4hss located.
(Posted by Sabzkooh 8 years ago)

Spark Module
Where is the spark module located? How do you remove it?
Where is the spark module located? How do you remove it?
(Posted by feweisensale 9 years ago)

Ge Range Control Panel Not Responding
GE P2S975SEM1ss control panel beeps and says "error turn surface burners off". Problem: I had turned...
GE P2S975SEM1ss control panel beeps and says "error turn surface burners off". Problem: I had turned...
(Posted by Ewassel 10 years ago)

Ge Range Model #jsp42snss
I have a GE Range Model# JSP42SNSS, & the top works fine but the display & oven doesnt. Does...
I have a GE Range Model# JSP42SNSS, & the top works fine but the display & oven doesnt. Does...
(Posted by shakaicon 12 years ago)