
Haier HLP021 Support Question
Haier HLP021 Support Question
Find answers below for this question about Haier HLP021 - PULSATOR Portable Washer.Need a Haier HLP021 manual? We have 1 online manual for this item!
Question posted by tommcelhaney on November 22nd, 2011
Hlp021 Lights Flashing
When i run my HLP021 the water fills but before the wash cycle starts all the light flash and a beeping noise. What do I need to do to get it to wash. After it failed I manually set it to drain and it pumped the water out fine. I just can't get it to wash/agitate.
Current Answers
Related Haier HLP021 Manual Pages
User Manual - Page 2
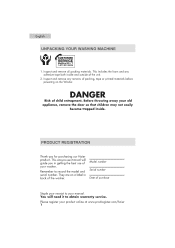
... or printed materials before powering on a label in getting the best use manual will need it to your washer. DANGER
Risk of the unit.
2.
Model number Serial number Date of ... 24/7 1-877-337-3839
1. They are on the Washer. PRODUCT REGISTRATION
Thank you in back of your manual.
English
UNPACKING YOUR WASHING MACHINE
4-'. Inspect and remove any adhesive tape both inside...
User Manual - Page 4

... Tape Measure - To balance washer 5. Hydrogen gas may be ensured to use extension cords or adapters to connect the unit to carry out. This will need to reduce the risk of ... If this is the case turn on all the hot faucets and let the hot water run for any electrical appliances, smoking, lighting a match/lighter, or using this product requires service, we strongly recommend that a...
User Manual - Page 6

English
TABLE OF CONTENTS
UNPACKING YOUR WASHING MACHINE IMPORTANT SAFETY INSTRUCTIONS UNPACKING AND CHECKING PARTS WASHER PARTS AND FEATURES CONTROL PANEL INSTALLATION INSTRUCTIONS OPERATING YOUR WASHER CHOOSING A CYCLE PROPER CARE AND CLEANING TROUBLESHOOTING GUIDE WARRANTY
PAGE 1
2-4 6 7 8 10 15 17 21 23 26
5
User Manual - Page 7
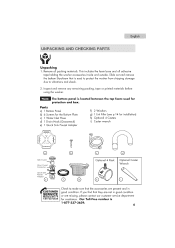
...Inspect and remove any remaining packing, tape or printed materials before using the washer. Slide out and remove the bottom Styrofoam that is
1-877-337-3639....condition.
Parts a) 1 Bottom Panel b) 6 Screws for the Bottom Plate c) 1 Water Inlet Hose d) 1 Drain Hook (Gooseneck) e) 1 Quick Sink Faucet Adapter
f) 2 Washers g) 1 Lint Filter (see p.14 for installation) h) Optional 4 Casters i) ...
User Manual - Page 8
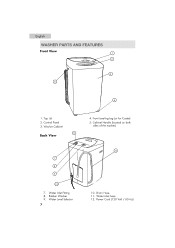
Cabinet Handle (located on both sides of the washer)
B
10
10. Water Inlet Fitting 8. Drain Hose 11. Top Lid 2. Control Panel 3. Washer Cabinet
11
Back View
7 8 9
12
7. Front Leveling Leg (or for Caster)
5. Power Cord (120 Volt / 60 Hz) Rubber Washer 9. Water Level Selector 7
4. Water inlet hose 12. English
WASHER PARTS AND FEATURES
Front View
1
c :.
3 5
4
1.
User Manual - Page 9
...',±%
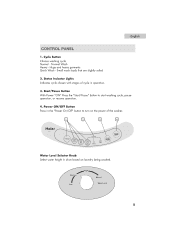
Water Level Selector Knob Select water height in operation.
3. English
CONTROL PANEL
1. Huge and heavy garments Quick Wash - Start/Pause Button
With Power "ON" Press the "Start/Pause" button to turn on the power of cycle in drum based on laundry being washed.
,00000, High ft waraviss,
Medium
Manual
( Low
Water Level
8 Cycle Button
Choose washing cycle Normal -
User Manual - Page 10
...the "CYCLE" button, then press the "START" button. Select water height.
Screw on the side of Washer
5. log
Drain Hook
Drain hose
Water inlet hose
Washer
Sink Faucet
Silver Faucet Connector
Quick Sink Faucet Adapter
Rear View of the drum.
6.
Power On/Off
9. Proceed by pressing the "POWER ON" button. 8. CYCLE
NORMAL WASH
Start Pause
9 English
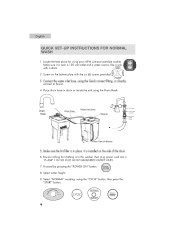
QUICK SET-UP...
User Manual - Page 11

...; Any floor unevenness should be placed and used at room temperatures ONLY. Cold Environments • The washer must be stored at or below freezing. • If you received this washing machine. Do not install or operate
this appliance in an area where room temperature is below freezing or outside temperature is unplugged...
User Manual - Page 12

... the wash cycle operation.
O
11 Place the panel against the bottom of the washer.
•...washer to provide you may reroute the drain hose to other side, then re-insert hose to the left or right side for draining...washer will cause damage to the front of the washer and tighten. (6 screws are supplied.)
4. FRONT
1.
English
Installing the Bottom Panel
The bottom panel blocks noises...
User Manual - Page 13
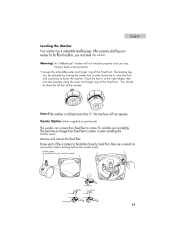
...is best practice.
• Loosen the adjustable outer and larger ring of the washer.
Locking caster; An "off-balance" washer will not operate. This should be adjusted by hand first, then use a... 2°, the machine will not function properly and can be done for mobility and portability. Note: If the washer is at the right height, then lock that position using the outer and larger ring...
User Manual - Page 14
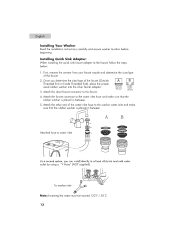
... from your faucet nozzle and determine the size/type of the water inlet hose to a fixed utility hot and cold water outlet by using a "Y Hose" (NOT supplied) . Once you can install directly to the washer water inlet and make sure that the rubber washer is placed in between .
5.
A
Outside Thread
B
Large Inside thread
4. English
Installing...
User Manual - Page 15
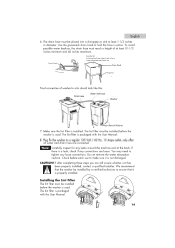
..., check if any loose connections. Drain Hook
Laundry tub: Just hang hook over side of at least 31-1/2 inches minimum and 40 inches maximum.
Do not remove the water absorption cushion. If there is packaged with the User Manual.
8. The lint filter is used .
CAUTION! We recommend
I that the washer be placed into a drainpipe or...
User Manual - Page 16

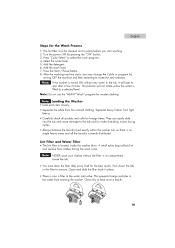
.... the desired setting.
On/Off
Start/Pause: (2)
• Press this button
Start
once again to resume the wash cycle. CYCLE Select: (3)
• Select your desired cycle program by holding the knob in the
manual position, until the desired water level is achieved
STATUS
Function and Status Indicator Lights: (5)
• The function display lights indicate that the washer is not...
User Manual - Page 17
...filter must be cleaned and in its compartment inside the washer drum. Select the water level. 5. Press the Start / Pause button. 8. The pulsator will start washing. 2. Separate heavy fabrics from entering the washer. Note: NEVER wash your clothes without any water in the water from light
fabrics. • Carefully check all the laundry is located inside the tub.
• You must clean...
User Manual - Page 18
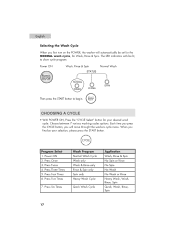
... set for the NORMAL wash cycle, for your selection, please press the START button. Choose between 7 various washing cycles options. Press Six Times
Wash Program Normal Wash Cycle Wash only Wash & Rinse only Rinse & Spin only Spin only Heavy Wash Cycle
Quick Wash Cycle
Application Wash, Rinse & Spin No Spin or Rinse No Spin No Wash No Wash or Rinse Heavy Wash, Wash, Rinse, Spin Quick, Wash...
User Manual - Page 20

... approximately 10 minutes after setting to your wash load.
The washer will stop running. Closing the Top Lid For safety purposes, the top lid must not exceed 122°F/50°C. Mph
Manual Wafer Lavol
• Turning the knob to "MANUAL" will add more water to the desired water level by manually adding water. End-of-Cycle Signal The machine will...
User Manual - Page 21

... on the size of the detergent also affects the wash result. Besides the performance of the washing machine, the quality of the load, the water
type (hard or soft) and whether the clothes are heavily soiled or lightly soiled. Refer to spill undiluted bleach onto the washer cabinet or
onto clothing. It is a strong chemical...
User Manual - Page 24

... the OFF position. You may
need to start
the wash process. • The wash process is on "Pause" mode. You may need to press the button to
verify that there are set it is plugged in the wash and rinse cycle. Press this button to be
replaced. • Check if the washer is checking to set properly. You may have...
User Manual - Page 26

... side. Move the laundry around to
avoid slanting. Spinning will be removed and the spinning will start in Program Select - Do not mix heavy clothes such as the washtub is setting the drain
time. Sharp objects such as blouses, light shirts and delicate items. • Clothes have soap residue - The wash load is filled, the slanting will...
User Manual - Page 28

...Dry Cycle Settings / 3 Temperature Settings • End-of Compact Portable washers. • Efficient, Compact and Portable ...Washer • Plugs into Any Household Outlet
Uses Standard 120 volt - 15 Amp Outlets No Special Wiring Unit Dimensions (WxDxH): 24.8" x 16.73" x 26.97"
27 Ft. English
Welcome to the world of Haier Compact Portable Laundry! The perfect Compact Dryer for your Compact washer...
Similar Questions

Do I Need To Winterize My Haier Portable Washer?
Hi,I have a Haier portable washing machine that I use at our seasonal cottage. I would like to leave...
Hi,I have a Haier portable washing machine that I use at our seasonal cottage. I would like to leave...
(Posted by almac34 3 years ago)

Video On How To Repair A Haier Hlp21n Portable Washer Belt
(Posted by amazisusu 9 years ago)


Display Problem With Haier Xqj50-31 Portable Washer
I bought a used Haier XQJ50-31 Portable Washing Machine. I thought it was working properly until I r...
I bought a used Haier XQJ50-31 Portable Washing Machine. I thought it was working properly until I r...
(Posted by annabelle60634 12 years ago)

Haier Hlp21e Portable Washer
I have a Haier HLP21E that just went through both wash and rinse cycles and then alarmed out. I trie...
I have a Haier HLP21E that just went through both wash and rinse cycles and then alarmed out. I trie...
(Posted by lpfg05 13 years ago)