
Homelite UT13124 Support Question
Homelite UT13124 Support Question
Find answers below for this question about Homelite UT13124.Need a Homelite UT13124 manual? We have 2 online manuals for this item!
Question posted by bdpersaud on September 5th, 2023
Blades
Where can I buy 20 inch mulching blades for the above lawn mower. Thank you
Current Answers
Answer #1: Posted by INIMITABLE on September 5th, 2023 4:48 PM
INIMITABLE

Member since:
April 3rd, 2020 Points: 2,077,740

Member since:
April 3rd, 2020 Points: 2,077,740
I hope this is helpful? PLEASE "ACCEPT" and mark it "HELPFUL" to complement my little effort. Hope to bring you more detailed answers
-INIMITABLE
Answer #2: Posted by SonuKumar on September 5th, 2023 9:00 PM
SonuKumar

Member since:
May 9th, 2021 Points: 16,619,310
Member since:
May 9th, 2021 Points: 16,619,310
https://www.ereplacementparts.com/homelite-ut13124-electric-lawn-mower-parts-c-18807_18820_508063.html
https://www.partselect.com/Models/UT13124/
https://www.partswarehouse.com/Homelite-UT13124-Electric-Lawn-Mower-s/586254.htm
Please respond to my effort to provide you with the best possible solution by using the "Acceptable Solution" and/or the "Helpful" buttons when the answer has proven to be helpful.
Regards,
Sonu
Your search handyman for all e-support needs!!
Related Homelite UT13124 Manual Pages
User Manual - Page 1

SAVE THIS MANUAL FOR FUTURE REFERENCE UT13118 20 in . - Thank you for , it will give you years of rugged, trouble-free performance. WARNING: To reduce the risk of operation, and operator safety.
Properly cared for your purchase. OPERATOR'S MANUAL
ELECTRIC LAWN MOWER
18 in . -
UT13120
Your lawn mower has been engineered and manufactured to our high standard...
User Manual - Page 2

......7 Features...8-9 Assembly...9-11 Operation...12-13 Maintenance...14-16 Troubleshooting...17 Exploded View/Parts List ...18-19 Warranty ...20 Parts Ordering / Service ...Back Page
INTRODUCTION
This product has many features for making it easy to maintain and operate.
User Manual - Page 3
... serious personal injury.
Keep machine in good working condition.
Stop the motor and wait until the blade comes to be sure the equipment is intended.
Do not force the lawn mower. The plug will require the use one way. If the plug still does not fit, contact a qualified electrician to...
User Manual - Page 4

... until you are available having builtin GFCI protection and may ricochet back toward anyone. Stop the blade when crossing gravel surfaces.
Objects struck by the lawn mower blade can be performed by qualified repair personnel only. The cutting blade continues to rotate for a few seconds after the motor is running.
Avoid holes, ruts...
User Manual - Page 7

... connect the plug end of the extension cord. It should be performed only by a qualified service technician. Do not operate this product on 12 gauge - 20 amp circuit.
If damaged replace immediately. An undersized cord will overheat. This type of the working with a damaged cord since touching the damaged area could...
User Manual - Page 8

..., 12 Amps No-load Speed 3,600 r/min. (RPM) Cutting Path 20 in . to 3-3/4 in . rear Weight 53 lb. to 3-3/4 in . Wheel Size 7 in . front, 8 in . CORD RETAINER
GRASS CATCHER (MODEL UT13120 ONLY)
HEIGHT ADJUSTMENT LEVER
MOTOR/BLADE CONTROL ASSEMBLY
SIDE DISCHARGE DEFLECTOR
MULCHING PLUG (MODEL UT13120 ONLY)
Page 8
Fig. 2 FEA...
User Manual - Page 9
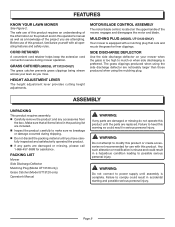
... on the upper handle of the project you mow.
MULCHING PLUG (MODEL UT13120 ONLY)
Your mower is complete. SIDE DISCHARGE DEFLECTOR
Use the side discharge deflector on your lawn as a knowledge of the mower, engages and disengages the motor and blade. PACKING LIST
Mower Side Discharge Deflector Mulching Plug (Model UT13120 only) Grass Catcher (Model UT13120 only...
User Manual - Page 10
...
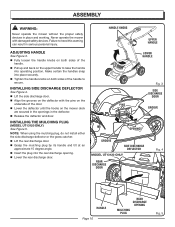
GROOVE
HOOKS OPENINGS
GROOVE
SIDE DISCHARGE DEFLECTOR
MODEL UT13120 ONLY
REAR DISCHARGE
DOOR
Fig. 4
HANDLE Page 10
REAR DISCHARGE
OPENING
MULCHING PLUG
Fig. 5 Failure to secure.
ASSEMBLY
WARNING:
Never operate the mower without the proper safety devices in serious personal injury. Make certain the handles snap into the rear discharge opening. ...
User Manual - Page 11
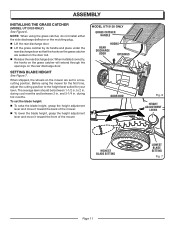
NOTE: When using the mower for the first time, adjust the cutting position to the height best suited for your lawn.
during hot months.
SETTING BLADE HEIGHT
See Figure 7. The average lawn should be between 2 in . When installed correctly, the hooks on the grass catcher will extend through the openings on the grass catcher are...
User Manual - Page 12

... that could damage the lawn mower blades
mower in any attachments or accessories not recommended by the mower in the cut portion of the lever release. CORD RETAINER
MOWER PLUG
WARNING:
Do not...tangling. Page 12
NOTE: A high-pitched noise and sparking may use of disconnecting the lawn mower
it around trees, shrubs, or other obstacles. OPERATION
WARNING:
Do not allow familiarity ...
User Manual - Page 13
...Page 13
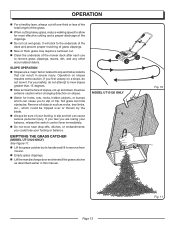
Fig. 11 OPERATION
For a healthy lawn, always cut off one-third or less of the total... feel you could be tripped over or thrown by the blade.
Always be sure of your safety, do not... Operation on a slope, do not attempt to remove from mower.
Empty grass clippings.
Lift the rear ... prevent proper mulching of slopes, not up and down. It will...
User Manual - Page 14
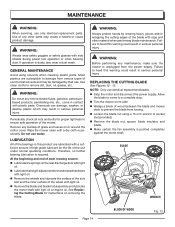
... of any time let brake fluids, gasoline, petroleumbased products, penetrating oils, etc., come to a complete stop. Turn the mower on its side. � Wedge a block of wood between the blade and mower
deck to heed this product are susceptible to damage from the power supply. WARNING:
Always protect hands by their...
User Manual - Page 15

... best mowing performance, the mower blade must be required. Following the instructions in the Replacing the Cutting
Blade section, remove the mower blade. However, if your lawn has sandy soil, more frequent sharpenings may be kept sharp.
An unbalanced blade will cause excessive vibration when the mower is usually sufficient. SHARPENING THE BLADE
See Figure 14. Under normal...
User Manual - Page 16

... children. Do not store near corrosive materials such as fertilizer or
rock salt.
STORING THE MOWER
See Figure 17. Disconnect the mower from the power supply. Turn mower on its side. Using a flat blade screwdriver, pry off the hubcap. Remove the cotter pin from the power supply. �...
User Manual - Page 17

... control switch replaced by grinding each cutting edge equally.
Balance the blade by an authorized service center.
Lawn is unbalanced.
Connect the extension cord to push.
Stop the motor, disconnect the power source, and inspect for the mower to cut evenly. Mower not mulching properly. Possible Cause
Solution
Carriage bolts not seated properly.
Reconnect the...
User Manual - Page 18
...45 15
44 16
18 19 17
27
26
30
29 32
33
89 7
41
6
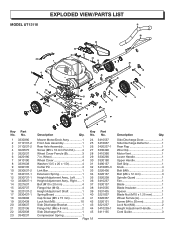
Key Part No. Mower Motor/Deck Assy 1 24 Front Axle Assembly 1 25 Rear Axle Assembly 1 26 Screw (M5 x 10 ...1 Knob 4 Bolt (M8 2 Bolt (M6 x 12 mm 3 Spindle Guard 1 Fan 1 Blade 1 Blade Insulator 1 Spacer 1 Blade Nut (M10 x 1.25 mm 1 Wheel Ferrule (A 1 Screw (M4 x 20 mm 2 Lock Nut (M4 2 Height Adjustment Handle 1 Cord Guide 3
User Manual - Page 19

...Ring Washer 2 49 Rear Compression Spring 1 50 Mulching Plug 1 51 Rear Shield 1 52
Page ... 3330291 3410835-3 3221237 3490291 3411135 3320237
Description
Qty. Mower Motor/Deck Assy 1 27 Front Axle Assembly 1 28...Spindle Guard 1 Fan 1 Blade Insulator 1 Spacer 1 Blade 1 Blade Nut (M10 x 1.25 mm 1 Upper Handle 1 Lower Handle 1 Soft Grip 1 Bolt (M8 2 Screw (M4 x 20 mm pan hd 2 Grass...
User Manual - Page 20

... that each new product and service part is manufactured for the Great States Corporation lawn mower company under this warranty any defective product or part from the original date of products...first with tool functionality. Freight costs from Homelite Consumer Products, Inc.
Page 20 This product is free from defects in material and workmanship and agrees to repair or replace...
User Manual - Page 22

Be sure to the housing. OPERATOR'S MANUAL
ELECTRIC LAWN MOWER
18 in the space provided below. For the location of this tool is found on a plate or label attached to provide all relevant information when ...)
HOMELITE CONSUMER PRODUCTS, INC.
1428 Pearman Dairy Road Anderson, SC 29625
Phone 1-866-457-5888 www.homelite.com Please record the serial number in . - UT13118 20 in. -
Parts List - Page 1

...UT13124
2 3
5 0
6
7
8
9
10
e e 13 12
•
tkeitm4
8
20... 9 10 11 12 13 14 15 16 17 18 19 20 21 22 23 24 25 26 27 28 29 30 31 ... discharge door side discharge deflector flange bolt spring board side discharge pin spindle guard fan blade blade insulator spacer
Qty. Key No.
1
37
1
38
2
39
1
40
1
...
Description
blade nut Tin left front wheel deck extension spring link bar 20 in ...
Similar Questions


Need A Grass Catcher Bag For A Homelite Electric Model Ut13124 20inch 12 Amp
(Posted by Craig81745 2 years ago)

How Do You Remove A 24 Volt Sealed Maintenance Free Battery On A Homelite Cordl
I am getting rid of a Homelite 20 inch 24 volt cordless lawn mower but I have to remove the battery ...
I am getting rid of a Homelite 20 inch 24 volt cordless lawn mower but I have to remove the battery ...
(Posted by SallyKarel 9 years ago)

Where Can I Buy A Replacement Rear Flap For A Homelite Electric Mower # Ut 13124
(Posted by matmac1164 9 years ago)

How Do I Remove Safety Switch On My Lawn Mower?
How do I remove safety switch from bottom of bar near top of handle on my 20 inch, 24 v, cordless la...
How do I remove safety switch from bottom of bar near top of handle on my 20 inch, 24 v, cordless la...
(Posted by janiceaia 11 years ago)