Hotpoint HTS18GBS Support Question
Hotpoint HTS18GBS Support Question
Find answers below for this question about Hotpoint HTS18GBS - 18.2 cu. Ft. Top Freezer Refrigerator.Need a Hotpoint HTS18GBS manual? We have 1 online manual for this item!
Question posted by jerryschartoff on June 18th, 2014
Refrigerator Door Intermittently Become Miss Aligned
The person who posted this question about this Hotpoint product did not include a detailed explanation. Please use the "Request More Information" button to the right if more details would help you to answer this question.
Current Answers
Related Hotpoint HTS18GBS Manual Pages
Installation Instructions - Page 1

...-22 Warranty for Canadian Customers 19 Warranty for U.S. Refr Top-Freezer igerators
ge.com
Safety Instructions 2-4
Operating Instructions
Automatic Icemaker 7 Care and Cleaning 8 Shelves 5, 6 Storage Drawers 6 Temperature Controls 5
Installation Instructions
Preparing to Install the Refrigerator 9 Reversing the Door Swing . . .13-16 Water Line Installation . . . . . .10-12
Troubleshooting...
Installation Instructions - Page 4

... ÉLECTRIQUE
Ne coupez ni retirez en aucun cas la troisième broche (mise à la terre) de la fiche du cordon d'alimentation.
The refrigerator should always be plugged into its own individual electrical outlet which could cause a fire hazard from overheated wires.
Saisissez fermement la fiche du cordon et...
Installation Instructions - Page 5

...down To remove a full-width shelf when the fresh food compartment door cannot be moved to hook into the left is the coldest. ... to hook into the slot in both compartments-fresh food and freezer. These shelves can turn the dial to the setting that is...and out 1 Tilt up at 5.
ge.com
Turning the dial to the refrigerator.
At first, set the dial at front, then off power to 0 ...
Installation Instructions - Page 7

...24 hours to the ON (down ) position
Feeler arm model
Automatic Icemaker (on the freezer compartment temperature, room temperature, number of about 45 minutes before you may hear the icemaker... together. Avoid cleaning the cold glass cover with the sweep of door openings. About the automatic icemaker.
When the refrigerator has been connected to the water supply, move the feeler arm to...
Installation Instructions - Page 8

... until the legs again bear the weight of the refrigerator. Pull the refrigerator straight out and return it straight in the fresh food and freezer compartments.
Turning the control to the 0 position does not remove power to position by taping them to 0. Leave the doors open box of water. Sweep away or vacuum up...
Installation Instructions - Page 9

....geappliances.ca
BEFORE YOU BEGIN
Read these
instructions with the Consumer.
• Note to Consumer - Installation Instructions Models 16, 17, 18
If you to move the refrigerator away from moving when the doors are adjustable. A water supply kit (containing copper tubing, shutoff valve, fittings and instructions) is transferred from Parts and Accessories, 1.800...
Installation Instructions - Page 10

... All installations must be in areas where temperatures fall below ) is not warranted by the refrigerator or icemaker manufacturer. Do not use any electrical device (such as described above. The water...least 8′ (2.4 m) as a power drill) during installation, be sure both ends of the refrigerator to move out from Parts and Accessories, 1.800.661.1616.
• A cold water supply....
Installation Instructions - Page 11

...valve to drill a 1/4″ hole may result in the wall or floor (behind the refrigerator or adjacent base cabinet) as possible.
Tighten the clamp screws until the sealing washer begins to... using a sharp bit. Shut the water off any burrs resulting from a GE SmartConnect™ Refrigerator Tubing kit, insert the molded end of a vertical water pipe. Route the tubing through the tubing...
Installation Instructions - Page 12

...or below.
It will need to pry open the clamp.
1/4″ Copper Tubing
Tubing Clamp
Refrigerator Connection Reattach the access cover.
1/4″ Compression Nut
Ferrule (sleeve)
SmartConnect™ Tubing
Power...NOTE: In lower water pressure conditions, the water valve may cause leaks. Push the refrigerator back to the wall.
10 START THE ICEMAKER
On power switch models, set the icemaker...
Installation Instructions - Page 13

...
Phillips screwdriver
Masking tape
5/16″ hex-head socket driver
T20 or T25 Torxdriver (needed for
the doors.
Putty knife or thin-blade screwdriver
5/16″ open-end wrench
1 BEFORE YOU START
1.1 Unplug the refrigerator from the cabinet.
IMPORTANT: Once you ever want to change the hinges back to the right side...
Installation Instructions - Page 14
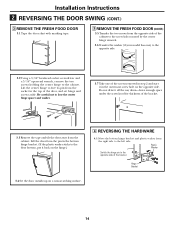
...″ open-end wrench, remove the two screws holding the center hinge to the cabinet. Lift the center hinge to the opposite side of the door, and set hinge and screws aside. Do not drive it back on a non-scratching surface.
14 Plastic Washer
Switch the hinge pin to free its...
Installation Instructions - Page 15
...side.
NOTES: • Some hinges have four holes.
Top
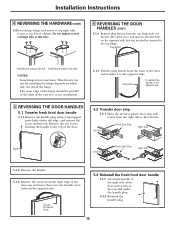
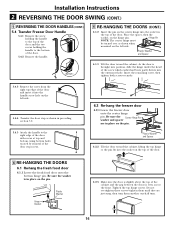
5.2 Transfer door stop
5.2.1 Move the metal or plastic door stop and screws from the right side to the edge of the case ...left of the top hinge.
Installing the hinge on the opposite side.
5 REVERSING THE DOOR HANDLES
5.1 Transfer fresh food door handle
5.1.1 Remove the handle plug using a tape-tipped putty knife under the handle ...
Installation Instructions - Page 16
... screws at top and bottom, using bottom holes vacated by removal of the door stop as shown when
mounted on the left side.
5.4.4 Transfer the door stop screws.
6.2 Re-hang the freezer door
6.2.1 Lower the freezer door onto the center hinge pin. Hinge Pin
NOTE: The center hinge must
be turned over as shown in
the...
Installation Instructions - Page 17

... air duct in • Check to 5 minutes).
■ Expansion and contraction of refrigerant through the freezer cooling coils may make a gurgling noise like boiling water.
■ Water dropping on the...8226; Push the plug completely into the drain pan.
■ Closing the door may not need adjusting. Refrigerator is blocking air duct in .
Review the charts on the defrost heater can...
Installation Instructions - Page 18

...• Keep an open box of food are opened) Refrigerator has odor
18
Possible Causes
Normal when refrigerator is normal) Automatic icemaker does not work (on some ...door openings. Icemaker is not on but the water • Move the feeler arm to the STOP (up cubes in the refrigerator; Interior needs cleaning.
• Foods with more storage space and a larger space and a larger freezer...
Installation Instructions - Page 19

...finish after delivery. • Improper installation-proper installation includes adequate
air circulation to the refrigeration system, adequate electrical, plumbing and other connecting facilities. • Replacement of house fuses...single family domestic use in the owner's manual, proper setting of the Refrigerator or from failure of controls. • Product not accessible to obtain service...
Installation Instructions - Page 21
... : Veuillez mettre dans une enveloppe et envoyez à :
OWNERSHIP REGISTRATION P.O. BOX 1780 MISSISSAUGA, ONTARIO L4Y 4G1 (FOR CANADIAN CONSUMERS ONLY)
✁ Cut here
21 For refrigerators installed in the U.S.
✁ Cut here
Please place in envelope and mail to :
General Electric Company Warranty Registration Department P.O.
Installation Instructions - Page 22

... Number
First Name
Mr. ■
Ms. ■
Mrs. ■
Miss ■
Street Address
Last Name
Apt. #
E-mail Address*
Zip
City
State...GEA's privacy and data usage policy, go to receive communications from GEA's carefully selected partners.
For refrigerators installed in the U.S.
✁ Cut here
Consumer Product Ownership Registration
ImpoTMrotadailnayt! FAILURE TO COMPLETE AND ...
Installation Instructions - Page 23

... office or your receipt here. During this Limited Warranty.
This warranty is needed to state. Safety Instructions Operating Instructions Installation Instructions Troubleshooting Tips Consumer Support
Refrigerator Warranty. (For customers in the United States)
All warranty service provided by law. Staple your state's Attorney General.
GE PROFILE MODELS ONLY:
Five Years (GE...
Installation Instructions - Page 24

... day of the year! E1C 9M3
Register Your Appliance
ge.com In the U.S.: www.Hotpoint.com
Register your new appliance on our Website with your door. In Canada: www.geappliances.ca
Printed in Canada should be used by phone at 1.800.661.1616 during normal business hours. GE Appliances Website
ge...
Similar Questions


My Freezer Door Pops Open When I Shut The Refrigerator Door
How to keep the freezer door from popping open
How to keep the freezer door from popping open
(Posted by shobertwilliam 10 years ago)

Misaligned Fresh Food Door.
After moving the product to another location I noticed that the fresh food door would not close prop...
After moving the product to another location I noticed that the fresh food door would not close prop...
(Posted by AL7812003 11 years ago)

Where Is Fuse Bx Located For Refrigerator?
(Posted by ultima8 11 years ago)

How Do I Get The Refrigerator Door To Close Completely And Evenly?
(Posted by techman2192 11 years ago)