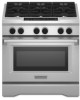
KitchenAid KDRS467VSS Support Question
KitchenAid KDRS467VSS Support Question
Find answers below for this question about KitchenAid KDRS467VSS.Need a KitchenAid KDRS467VSS manual? We have 3 online manuals for this item!
Question posted by Dk on April 22nd, 2011
Burner Won't Light
We have the left front burner on this stove not working. Someone had a cooking issue and junk got in it. Does it come apart to clean? I see a nut on top the burner when I take the burner cover off. Thanks for any help.
Current Answers
Related KitchenAid KDRS467VSS Manual Pages
Dimension Guide - Page 1

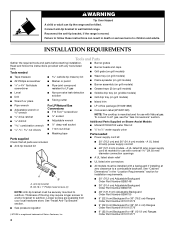
... cord. q A circuit breaker is properly grounded.
Additional Installation Requirements The installation of this kit are not sure the range is recommended. 30", 36", and 48" Professional Dual Fuel Convection Ranges
PRODUCT MODEL NUMBERS
KDRS407VSS KDRS462VSS KDRS463VSS
KDRS467VSS KDRS483VSS KDRU707VSS
GAS REQUIREMENTS
KDRU763VSS KDRU767VSS KDRU783VSS
Type of Gas
Natural Gas: This...
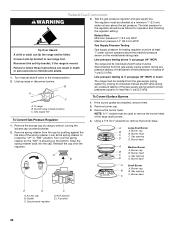
Installation Guide - Page 3

This symbol alerts you to light any appliance. • Do not touch any electrical switch. • Do not use any other appliance.
-
Gas suppliers recommend that can kill ...injured if you what the potential hazard is not followed exactly, a fire or explosion may result causing property damage, personal injury or death.
-
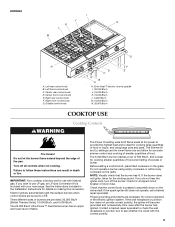
RANGE SAFETY
Your safety and the safety of others .
Installation Guide - Page 4
...8328;" wrench
drive ratchet drill bit combination wrench nut drivers
For LP/Natural Gas Conversions ■ T15 Torx®..." (76.2 cm) Ranges Order Part Number W10115773
■ 9" (22.9 cm) Backguard for 36" (91.4 cm) Ranges Order Part Number W10115776... mounted to ¼" water supply union
Parts needed
■ Burner grates ■ Burner heads and caps ■ Grill grate (on grill models)
...
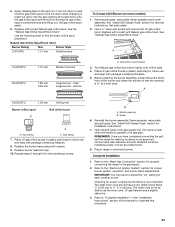
Installation Guide - Page 10

... for elevations up about the inlet pressure. Burner Input Rating - Line pressure testing above ½ psi gauge (14" WCP) The range and its individual manual shutoff valve during any...reduced at test pressures in back or other injury.
5. Keep shipping pallet under range.
INSTALLATION INSTRUCTIONS
Unpack Range
WARNING
3. For 48" (121.9 cm) models only, rotate center support ...
Installation Guide - Page 16

... slots. Place rack in the Use and Care Guide. Slide drip tray into the anti-tip bracket.
2.
Remove cooktop burner caps and grates from rear of the grill
basin. Check that the range is not level, adjust the leveling rods.
Rear tabs and slots
2. There are guides to assure correct placement of...
Installation Guide - Page 18

... want
to LO and using a butane extension lighter, light the burner.
9. After verifying the proper burner operation, turn each side. Dual Flame Burner
A B
4. Control console bracket
6. Remove the round gasket from the valve stem. 7. Lower (simmer) flame
Single Flame Burner
To Adjust Flame Height: 1. Unplug range or disconnect power. 2. Remove the control knobs.
8. Remove the control...
Installation Guide - Page 19

... Check that you need adjustment.
15. For oven use and cleaning, read the Use and Care Guide. When oven has been on the front of the range.
3. Loosen screw to LP gas, the screw should be ...tight; Single flame burner adjustment screw (on left side of the control console. 18. See the Use and Care Guide for operating
instructions. Lift up against front of range until the top...
Installation Guide - Page 20

... supply pressure for operation and checking the regulator setting:
LP Gas: Minimum pressure 11" (27.9 cm) WCP Maximum pressure 14" (35.5 cm) WCP. To range B. Remove burner cap. 3. Securely tighten all gas connections.
Remove spring retainer from the cap by closing its individual shutoff valve must be isolated from the gas supply...
Installation Guide - Page 21

... burner. Burner head
C. Burner cap
B
B. Apply masking tape to the end of this manual to help hold the gas orifice spud in the "Installation Instructions" section of a 7 mm nut ... test the range for the remaining burners. Burner base
5. Plug in the gas supply line. Burner cap
B
B. Before replacing the burner assembly, loosen the screw at the
front of the burner and rotate ...
Installation Guide - Page 22
... the access cap by pushing against the flat side of the large dual burners.
4. Burner base
A
Medium Burner
A. Access cap B. NAT position E. Shutoff valve (closed position. 2.
Burner cap
B
B. Gas pressure regulator
C
D. LP position
22 Reconnect the anti-tip bracket, if the range is showing on the model/serial rating plate.
NOTE: A ⁷⁄₈" socket...
Installation Guide - Page 23
... down tightly onto orifice base. 4. Refer to help hold the gas orifice spud in range or reconnect power. The small inner cone should have to the gas pipe. Apply masking tape to the end of a 7 mm nut driver to the "Electronic Ignition System" section for proper cooktop burner flame is ³⁄₈" (9.0 mm...
Installation Guide - Page 27

... P9-5
P8-4 R
P8-6 BK
P1-1 R P1-2 Y P1-3 BK
P9-2 BK
Hall Effect Sensor
Blower
R
W
BK
BK BK
W
Halogen Lights 25W/120V Bulb Operate In All Modes Except Self-Clean
BK W
T1-1 R/W T1-2
T2-1 R/W T2-2
Left 18"
Oven
BK
BK BK
W BK
R
WY 18" Door Lock Latch
R
R
R
Temp Sensor 1080 At 21 C (70 F) 1654...
Use & Care Guide - Page 9
...after the burner has ignited. Right rear control knob F. Right front control knob G.
IMPORTANT: Your cooktop is included with your new range.
Left front ...G
N
E
A.
Electric igniters automatically light the surface burners when control knobs are turned to follow these instructions can result in the Installation Instructions for cooking large quantities of food.
Center front ...
Use & Care Guide - Page 10
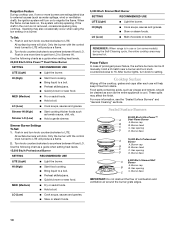
... to LITE will help keep it free from LO to LITE will produce a flame.
2.
Sealed Surface Burners
20,000 Btu/h Ultra Power™
A
Dual-Flame Burner
A. Push in the room is not removed, occasional sparking may become hot. After burner lights, turn knob counterclockwise to setting. When the flame comes back on a burner.
For more burners are extinguished...
Use & Care Guide - Page 11

... even cooking, foods such as shown above. Clean clogged burner ports with a damp cloth.
3. Even-Heat™ Grill (on the burner. A clean burner cap will avoid loss of a cast-iron grate, a wave tray, a flame spreader, a burner assembly, 2 grease trays and a drip tray. Remove the burner cap and burner head (15,000 and 5,000 Btu/h burners) from the burner base and clean according...
Use & Care Guide - Page 13
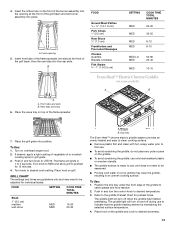
... light coating of vegetable oil or nonstick cooking spray...to clean cooking surface. ■ Remove plastic film and clean ...the griddle and cook to
catch grease ...uneven cooking surface. Place food on top of the grill basin and set burner assembly ... FOOD
SETTING
COOK TIME TOTAL ...light will turn on the front of the burner...1 to desired cook setting. The flame...1. The griddle light will turn off ...
Use & Care Guide - Page 15

... Clock set /start
L. Cook time (length of day display
PO
NM
L
K
J
G. Left oven selector G. If a command pad is not in use the pad of cooking time) R.
Press OFF ...76.2 cm) and 36" (91.4 cm) Range Control Panel
C
D
E
F
G
CLEAN TIME NIGHT
F
PROBE TEMP LIGHT
MIN HR SEC MIN
C
DELAY
B
ON
HR MIN CONTROL LOCKED COOK TIME
START TIME
STOP TIME
MED LOW HI
A
... working.
Use & Care Guide - Page 26
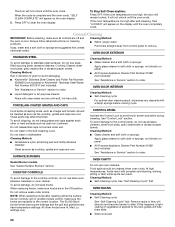
...clean water and dry with soft, lint-free cloth.
Cleaning Method: Rub in dishwasher. PORCELAIN-COATED GRATES AND CAPS
Cleaning Method: ■ Glass cleaner and a soft cloth or sponge:
Apply glass cleaner to the rack guides will help.... To avoid damage to soft cloth or sponge, not directly on burners while wet. Cleaning Method: ■ Glass cleaner and soft cloth or sponge:
Apply glass...
Use & Care Guide - Page 27
...or more people, lift the oven door while holding both the left and right oven lights will come on the soil for 30 minutes. The oven lights will shut. 4. Do not use a soft bristle barbecue ...to cool completely before cleaning. On 48" (121.9 cm) ranges, both
sides. Grease Trays and Drip Tray Allow cooktop to move and install oven doors. Remove glass light cover by snapping back into...
Use & Care Guide - Page 28
...See "Cooktop Controls" section.
■ Is the range level? See "Sabbath Mode" section. Oven temperature too...Cooking" section.
■ Is the Control Lock set correctly? Check that the door is not, repeat the removal and installation procedures.
If it dry. You should not extend more people, lift the oven door and insert both hanger arms into place.
3. Burner sparks but does not light...
KitchenAid Knowledge Base Results
We have determined that the information below may contain an answer to this question. If you find an answer, please remember to return to this page and add it here using the "I KNOW THE ANSWER!" button above. It's that easy to earn points!-
Cleaning the refrigerator
... removable parts and interior surfaces can make this answer more useful. Use a clean sponge or soft cloth and a mild detergent in the home, the condenser should be improved Thank you Not Helpful Helpful Answers others found helpful Cleaning and caring stainless steel surfaces Cleaning your appliance? Paper towels scratch and may suddenly break if nicked, scratched... -
Using the 50-lb. ice maker controls
... to the ice maker. Discard the first batch produced. Bottom freezer/French door refrigerators Thin, soft or clumps of ice. ice maker controls. Clean/Reset The Clean/Reset status light will turn off the feature. To stop making ice - This tells you it is recommended that you when it is making cycle, select... -
Ice Droplets in the Freezer Compartment - Side by Side Refrigerator
... how we can cause ice droplets to appear if the door was left open for some sweating or moisture to occur. Go Back to ...The answer could be improved Thank you Not Helpful Helpful Answers others found helpful Frost or ice buildup in...issues, but may not completely eliminate ice droplets. Share Delicious Digg Facebook Reddit StumbleUpon Twitter Print Email this answer helpful...
Similar Questions

Kitchenaid Kfdd500ess Range Was Missing Lp Conversion Kit.
How can I get the correct LP conversion kit for my Kitchenaid? We bought the range through Lowe's bu...
How can I get the correct LP conversion kit for my Kitchenaid? We bought the range through Lowe's bu...
(Posted by clendepj 8 years ago)

Door Won't Close
the door lock mechanism on this range is preventing the door from completely closing, so I can't run...
the door lock mechanism on this range is preventing the door from completely closing, so I can't run...
(Posted by neilnfw 8 years ago)

Range Hood
I am purchasing this range and can only find an insert that has 400 cfm in it to fit the custom wood...
I am purchasing this range and can only find an insert that has 400 cfm in it to fit the custom wood...
(Posted by fredbroc 10 years ago)

Fault Code
my kitchenaid range model # kdrs467vss is coming up with fault code f6-e0
my kitchenaid range model # kdrs467vss is coming up with fault code f6-e0
(Posted by Anonymous-60268 12 years ago)

How Can I Get The Orifices To Convert To Propane On The Kdrs467vss 30
(Posted by tomaras46 13 years ago)