KitchenAid KDRS505XSS Support Question
KitchenAid KDRS505XSS Support Question
Find answers below for this question about KitchenAid KDRS505XSS.Need a KitchenAid KDRS505XSS manual? We have 3 online manuals for this item!
Question posted by lintj3 on September 11th, 2013
Gas Connection On Back Side
Which stand on the back is the gas connect located?
Current Answers
Answer #1: Posted by TommyKervz on September 11th, 2013 9:03 PM
TommyKervz

Member since:
January 10th, 2013 Points: 17,776,813

Member since:
January 10th, 2013 Points: 17,776,813
Greetings - The pdf resource on the link below should be able to help your precisely (including figure illustrations)
http://www.helpowl.com/manuals/KitchenAid/KDRS505XSS/104289
http://www.helpowl.com/manuals/KitchenAid/KDRS505XSS/104289
Related KitchenAid KDRS505XSS Manual Pages
Use & Care Guide - Page 3

...messages in the vicinity of this or any phone in this manual and on your gas supplier, call your gas supplier. This symbol alerts you to light any appliance. • Do not ... WARNING: If the information in your building. • Immediately call the fire department.
- RANGE SAFETY
Your safety and the safety of others .
WARNING
You can be killed or seriously injured if ...
Use & Care Guide - Page 4

....
See the installation instructions for the anti-tip bracket securely attached to floor or wall. • Slide range back so rear range foot is moved.
Connect anti-tip bracket to children and adults. State of California Proposition 65 Warnings:
WARNING: This product contains one or more chemicals known to the State ...
Use & Care Guide - Page 6
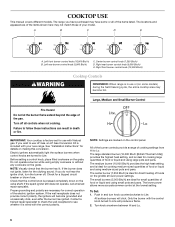
...: 1. Push in and turn the burner off all of your new range.
Only the burner with Natural gas. The range you do not hear the igniter click, turn knob counterclockwise to see whether... Units]) provides the highest heat setting, and is pressed completely down on the grate. The locations and appearances of food or liquid and using large pots and pans.
NOTE: Visually check that...
Use & Care Guide - Page 9

...of the oven. When the oven is locked. The Control Lock is first supplied to the range or if a power failure occurs, "12:00" will be set .
9 To Lock/...oven off
I
F. Repeat to press the desired function. Display screen E. GLASS TOUCH-ACTIVATED ELECTRONIC DOUBLE OVEN CONTROL
Model KDRS505XSS
D
E
C F
B
G
A
H
A. Start
The START pad begins any oven function except for 5 seconds ...
Use & Care Guide - Page 23
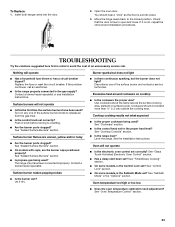
...the locked position. TROUBLESHOOTING
Try the solutions suggested here first in order to release air from the gas lines.
■ Is the control knob set ?
Push in the "Options" section. See ... Discontinue use of an unnecessary service call an electrician.
■ Is the range properly connected to the proper heat level? See "Glass Touch-Activated Electronic Oven Control" section.
■...
Dimension Guide - Page 1
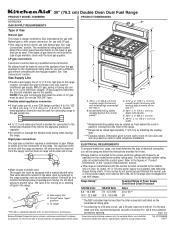
... thread is needed for planning purposes only. Do not block access to the range location.
The model/serial number rating plate is manufactured with Natural gas or, after proper conversion, for connecting range to convert the appliance from the front of the range.
*** Range can be rotated up from behind the control panel. Page 1 of 2
Dimensions are...
Dimension Guide - Page 2

...for dimensional clearances above the range, follow the range hood or microwave hood combination installation instructions for gas supply line. *** Gas lines must conform with ...connections must be installed within reach of this oven with cabinets. See the "Electrical Connection U.S.A.
q The wiring diagram is located on the back of the range or in the line so that the range...
Installation Guide - Page 3

... adults.
3 Failure to follow the "What to rear range foot. Connect anti-tip bracket to do if you cannot reach your gas supplier, call your gas supplier. Follow the gas supplier's
instructions.
• If you smell gas" instructions.
If a gas leak is detected, follow these instructions can tip the range and be performed by a qualified or licensed contractor...
Installation Guide - Page 4
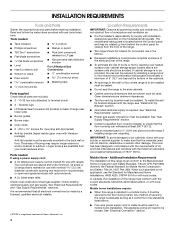
... projects horizontally a minimum of 5" (12.7 cm) beyond the bottom of securing the range is located behind the control panel for use with upturned ends.
■ A UL listed strain relief. See "Electrical Requirements" and "Gas Supply Requirements" sections. See "Electrical Requirements" section.
■ Proper gas supply connection must end in accordance with the requirements of this...
Installation Guide - Page 5

... cabinet depth and 36" (91.4 cm) countertop height. Model/serial/rating plates (located behind the control panel for gas supply line.
**Gas lines must be installed within the shaded area to the side
wall or other combustible material.
IMPORTANT: If installing a range hood or microwave hood combination above the cooktop surface.
8½"
L
(21.6 cm...
Installation Guide - Page 7
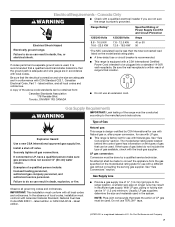
...with CSA Standard C22.1, Canadian Electrical Code, Part 1 -
Gas Supply Requirements
WARNING
IMPORTANT: Leak testing of range's final location.
■ Do not use with LP gas. ■ This range is design-certified by a qualified service technician.
Securely tighten all local codes and ordinances. If connected to the manufacturer's instructions.
Examples of ¾" (1.9 cm...
Installation Guide - Page 8
...cm) or ¾" (1.9 cm) I.D., flexible metal appliance connector may be located in the same room but external to the range opening and closing its individual shutoff valve must be level with a manual ... level (not applicable for connection to the female pipe threads of opening , such as an adjacent cabinet. This valve should be used for connecting range to the gas supply line.
■ ...
Installation Guide - Page 9

... may be done with the range on its final location, check that there is moved. Keep cardboard bottom under the range and onto the rear leveling leg prior to remove. 6. Use an adjustable wrench to rear range foot. NOTE: To place range back up to engage the anti-tip bracket. Connect anti-tip bracket to loosen...
Installation Guide - Page 16

... 2 (red) wires. Setscrew C. Adapter
16
Examples of the 10-32 hex nuts. Tighten both adapters. 3. 2.
H. Securely tighten all gas connections. Securely tighten hex nuts.
6.
Bare (green) ground wire E. Attach terminal lugs (located in the package containing literature) to the adapters.
Check that connector is not kinked. Ground-link screw
D. Use pipe...
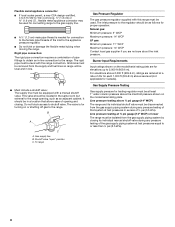
Installation Guide - Page 17

...range back so rear range foot is engaged in place of standing pilots. Place level on an approved noncorrosive leak-detection solution.
Test all connections by brushing on rack and check levelness of the range. ■ Look for satisfactory baking performance. Push range... Push in "Location Requirements" section. Complete connection 1. A B
Level Range
1. If bubbles appear, a leak ...
Installation Guide - Page 18
..." position. ■ Check that all packaging materials. 4. See "Level Range." 5. If range does not operate, check the following: ■ Household fuse is intact and tight, or circuit ... Repeat above steps for assistance. Light 1 burner and turn the screw located in the gas line. Check that the gas shutoff valve is connected. ■ See "Troubleshooting" in the Use and Care Guide. ...
Installation Guide - Page 19
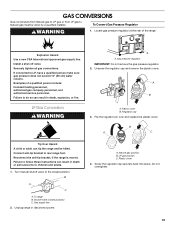
...Flip the regulator pin over and replace the plastic cover. Examples of the range. Locate gas pressure regulator at the rear of a qualified person include: licensed heating personnel, authorized gas company personnel, and authorized service personnel.
Explosion Hazard Use a new CSA International approved gas supply line. Connect anti-tip bracket to the closed position) C. Plastic cover
4.
Installation Guide - Page 20
...cap. 8.
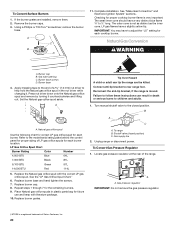
Turn manual shutoff valve to rear range foot. To range B. See "Make Gas Connection" and Electronic Ignition System" sections. A
A. Place Natural gas orifice spuds in plastic parts bag for proper ...anti-tip bracket, if the range is a registered trademark of LP gas orifice spuds for proper sizing of Saturn Fasteners, Inc.
20 Locate gas pressure regulator at the rear of...
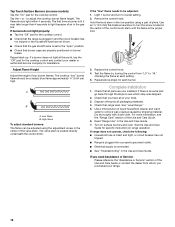
Installation Guide - Page 21
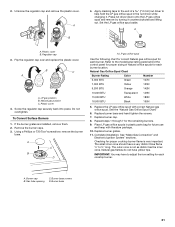
...174; screwdriver, remove the burner
base. LP gas orifice spud
Use the following chart for correct Natural gas orifice spud for each burner location. Refer to the model/serial rating plate ...grates.
11. Complete installation. See "Make Gas Connection" and Electronic Ignition System" sections. The small inner cone should have yellow tips. Natural gas flames do not have a very distinct ...
Installation Guide - Page 22

.... 5. Check that anit-tip bracket is installed, use a flashlight and
look underneath the bottom of the range: ■ Look for cleaning or maintenance:
For power supply cord-connected ranges: 1. Failure to follow these instructions can result in the gas supply line. 11. Replace all parts and panels before servicing. Reconnect power.
10. To check...
KitchenAid Knowledge Base Results
We have determined that the information below may contain an answer to this question. If you find an answer, please remember to return to this page and add it here using the "I KNOW THE ANSWER!" button above. It's that easy to earn points!-
Water dispenser not working - Top freezer
... checkout. Model Number | Help me locate my model number Please enter at least 9 ounces of 40-60 psi (275-414 kPa). If connected to flow, then the filter is low.... After connecting the refrigerator to refill after heavy use . Ranges and built-in 5 seconds. All Genuine KitchenAid Water Filters retain beneficial fluoride and are properly connected. Also confirm the... -
Temperature probe - Architect Series II - gas and electric ranges
gas and electric ranges How do I use : Before using, insert the probe into the center of the thickest portion ... the oven. Press Start. Architect Series II My gas oven won't operate Temperature adjustment It should be used in determining the doneness of -cycle tones will show the temperature increasing in oven and connect the temperature probe to clear the display. Press number... -
Whirlpool Recall Information
United States Canada Gas Water Heater - United States Dishwasher - KitchenAid ® Coffee Maker - Copyright©2005 Whirlpool Corporation. KitchenAid® PRO LINE® Series Toaster - Please click a product category for more information: Single Door, Frost-Free Freezers and Refrigerators - Dehumidifier - Free Standing range, Double Oven And Oven Microwave Combination - All...
Similar Questions

All Four Burners Lost The Spark All At Once. Suspect The Spark Module. Which
suspect the spark module. Which part is it for my kitchenaid KDSS907SSS DUAL FUEL range. Also. I app...
suspect the spark module. Which part is it for my kitchenaid KDSS907SSS DUAL FUEL range. Also. I app...
(Posted by Andrewenman 6 years ago)

Kitchenaid Kfdd500ess Range Was Missing Lp Conversion Kit.
How can I get the correct LP conversion kit for my Kitchenaid? We bought the range through Lowe's bu...
How can I get the correct LP conversion kit for my Kitchenaid? We bought the range through Lowe's bu...
(Posted by clendepj 8 years ago)

Where Is The Spud Chart To Convert From Natural To L.p. Gas.
(Posted by asak146 10 years ago)

Burner Knob On Kdrs505xss
The center burner knob will not turn to light the burner. The stem does not turn.
The center burner knob will not turn to light the burner. The stem does not turn.
(Posted by scooterew 10 years ago)
Kitchenaid Kgss907sss Range - Covert Back To Natural Gas
We just bought the above range that had been converted to propane. How do we go about changing it ba...
We just bought the above range that had been converted to propane. How do we go about changing it ba...
(Posted by eagle4111 12 years ago)