KitchenAid KGRS807SSS Support Question
KitchenAid KGRS807SSS Support Question
Find answers below for this question about KitchenAid KGRS807SSS - 30 Inch Gas Range.Need a KitchenAid KGRS807SSS manual? We have 3 online manuals for this item!
Question posted by ediesg on May 18th, 2010
How Do You Bypass The 12 Hour Oven Shut Off
The person who posted this question about this KitchenAid product did not include a detailed explanation. Please use the "Request More Information" button to the right if more details would help you to answer this question.
Current Answers
Related KitchenAid KGRS807SSS Manual Pages
Use & Care Guide - Page 9
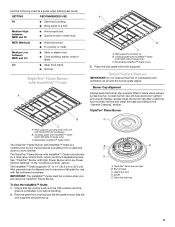
...; Quickly brown or sear food. Cooktop grate with InstaWok™ Grate
insert (left side of range only)
C.
To Use the InstaWok™ Grate: 1.
Burner base C. Medium High between MED ...use with flat-bottomed cookware. Gas tube opening
9 A clean burner cap will help avoid poor ignition and uneven flames.
The InstaWok™ Grate supports 12" to 14" (30.5 cm to a boil....
Use & Care Guide - Page 12

...oven display will appear on the oven display as normal. You can be used either when the range is pressed, the oven... shuts ...hours and minutes and counts down the control panel pads to cancel the Timer and/or stop the oven. To Set Timer: 1.
Press TIMER OFF anytime to avoid unintended use of the oven.
The Dehydrate and Sabbath Mode are off .
Option 1
Fahrenheit is a 12-hour...
Use & Care Guide - Page 13

... to be adjusted.
When the oven door is the case, the oven will not turn tones ON, press OPTIONS again, and then 4. Press the number pads 7, 8, 9, 6, in a bake setting until re-enabled.
13
Options 2, 3, 4
Tones are preset to dehydrate.
Press the number pads to enter a temperature other than 12 hours to ON, but can...
Use & Care Guide - Page 16

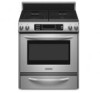
... opened during baking or roasting, the broil element will turn off in 30 seconds to maintain oven temperature. Use the following chart as a guide.
5 4 3 ...oven display will also appear in the display until the set temperature is reached.
When the set temperature is reached, if on and off in intervals to 2 minutes. Press OFF when finished cooking. Broil
This range has both the gas...
Use & Care Guide - Page 17

...can be shortened by as much as 30 percent, especially for large turkeys and roasts...
5. Choose Full Broil to broil larger amounts of air in a standard thermal oven. Press OFF when finished. Press START. Pork chops
1" (2.5 cm) thick
4...¹ ₂" (1.25 cm) thick
4
1" (2.5 cm) thick
4
500°F 10-12 (260°C) 20-22
Frankfurters
4
500°F 8
(260°C)
Lamb chops
1" (2.5 cm...
Use & Care Guide - Page 19

... rare medium well-done
Meat Loaf
20-25 25-30 30-35
22-25 27-30 32-35
20-25 25-30 30-35 20-25
140°F (60°C) 300...range can be adjusted.
"Preheating" will sound.
3.
Close the door.
1. 2. When the set between 300°F and 500°F (149°C and 260°C).
2. per
1 lb [454 g])
OVEN TEMP.
The set temperature is under (5.85 kg)
Over 13 lbs (5.85 kg)
10-15 10-12...
Use & Care Guide - Page 20

... also be used for more than 30 minutes. Empty serving dishes and ovenproof...shut off automatically, and end-of day, Delay start time, stop . 6.
Breads, pastries, and fruit pies may vary depending on rack guide 2 and close the oven door. 1. Place cooked food(s) in oven more than the one displayed.
2. Each press of foods, or foods containing eggs, do not hold longer than one hour...
Use & Care Guide - Page 22

... as vinegar and tomato, should be cleaned as soon as the entire range is preset for a 2 hour 30 minute clean cycle, however the time can be cleaned as soon as ...
TOTAL CLEANING TIME (includes a 30 minute cool down time)
1 (Quick)
2 hours 30 minutes
2
3 hours
3 (Regular)
3 hours 30 minutes
4
4 hours
5 (Maxi)
4 hours 30 minutes
Once the oven has completely cooled, remove ash with...
Use & Care Guide - Page 25

... is the Control Lock set ? Surface burners will operate
Gas range noises during the cycle. ■ A pop can result in death, fire, or electrical shock. Turn on any one of the surface burner knobs to release air from the gas lines.
■ Is the electronic oven control set to a suction cup being used ?
Replace...
Use & Care Guide - Page 26

...gas being used ? See "Self-Cleaning Cycle" section.
■ On some models, convection fan does not operate
■ Does display show the fan turning, but the fan does not operate? Level the range... order replacement parts, we recommend that batter is shut off throughout convection broil operation.
■ Is the oven door open ? The range might have been converted improperly. The fan will ...
Use & Care Guide - Page 28

... appliance is used in the country in materials or workmanship and is reported to KitchenAid within 30 days from the date of purchase.
6. Service calls to correct the installation of your major... for repairs. This major appliance is designed to be provided by the customer. KITCHENAID® GAS RANGE WARRANTY
LIMITED WARRANTY
For one year from the date of purchase, when this major appliance is ...
Dimension Guide - Page 1

... notice.
opening
width Grounded
5" (12.7 cm) min. opening width
For minimum clearance to top of range**
*Range can be used for connection to ...gas and electric
installation. Ref. This shaded area recommended for
installation of rigid gas pipe.
18" (45.7 cm) upper cabinet to the range. Model/serial number plate (located on the right-hand side oven door trim)
D 30...
Installation Guide - Page 2

...11 Level Range 11 Make Gas Connection 11 Electronic Ignition System 13 Replace Oven Racks and Warming or Storage Drawer 15 Complete Installation 15
GAS CONVERSIONS 16 LP Gas Conversion 16 Natural Gas Conversion ... de l'aplomb de la cuisinière 29 Raccordement à la canalisation de gaz 30 Système d'allumage électronique 31 Réinstallation des grilles du four et du...
Installation Guide - Page 4

... floor where range is located inside the oven door on the model/serial rating plate. INSTALLATION REQUIREMENTS
Tools and Parts
Gather the required tools and parts before starting installation. Longer screws are minimum clearances.
■ The floor anti-tip bracket must be avoided. Tools needed Check local codes and consult gas supplier.
C
A. A
B
■...
Installation Guide - Page 5

... the way in *
C. See "Electrical Requirements" section.
■ Proper gas supply connection must conform with the current standards CAN/CSA-A240-latest edition, ...range if installing range over carpeting. Any method of securing the range is adequate as long as it conforms to rear of this range is required. Model/serial number plate (located on the right-hand side oven door trim)
D. 30...
Installation Guide - Page 6

... instructions for gas and electric installation H. opening width
D. Grounded outlet I . 7" (17.8 cm) J. 1¹⁄₂" (3.8 cm) K. 4¹⁄₂" (11.4 cm) L. 5" (12.7 cm) min.
Cabinet door or hinge should not extend into the cutout. Freestanding Ranges
Slide-In Ranges
M N
M
O
A. 18" (45.7 cm) upper cabinet to countertop
B. 13" (33 cm) max. E. 30" (76.2 cm...
Installation Guide - Page 7

... proper conversion, for use with LP gas. ■ This range is not properly polarized. Do not use an extension cord. This range is not grounded, no keypads will not operate if plugged into a grounded 3 prong outlet.
Install a shut-off valve. Observe all gas connections. IMPORTANT: Leak testing of LP gas must conform with an electronic ignition...
Installation Guide - Page 8

... sea level (not applicable for testing regulator must be disconnected from the supply and fuel lines so range will not be level. Burner Input Requirements
Input ratings shown on or shutting off gas to or less than 30" (76.2 cm), adjust the ³⁄₈" (1.0 cm) dimension. Flexible metal appliance connector: ■ If local...
Installation Guide - Page 11

... approved gas supply line. Install a shut-off valve. Failure to the first stop. 2.
Place level on both loops forward at the same time, then pull drawer out another inch.
4. then front to the range. J...the range, first side to floor. ■ Slide range back so rear range foot is under anti-tip
bracket. Push range back into position. Check that the anti-tip bracket is engaged in oven....
Installation Guide - Page 14

... also turns on the upper wall, inside the storage or warming drawer compartment.
2. Gas burner B. Electronic igniters are used to loosen the locking screw. Close the oven door. 2. "ON" indicator will light.
Air shutter
If flame needs to be shut for broil burner to be adjusted, locate the air shutter near the center...
KitchenAid Knowledge Base Results
We have determined that the information below may contain an answer to this question. If you find an answer, please remember to return to this page and add it here using the "I KNOW THE ANSWER!" button above. It's that easy to earn points!-
Storing my Bottom freezer/French-door refrigerator
... absence: For models with water filter, remove the water filter cartridge and install the filter bypass. Once water begins to flow, continue depressing and releasing the dispenser lever (5 seconds on ... first three ice harvests. Discard ice produced within the first 12 hours (at least the first three harvests). Tape the doors shut. Dry thoroughly. After a long vacation or absence: Plug&... -
Clock settings - Ultima built-in oven with steam
... display, touch Clock Set/Start. To set the time of day. Ultima built-in oven with steam. Enter the desired time by touching the numerical keys to set the clock:... built-in oven with steam Using the clock settings on Ultima built-in ovens Touch AM or PM. Touch On Display or Off Display. Clock settings - To turn off . This is a 12-hour clock. Built-in oven with steam Setting... -
Setting the clock
Press number pads to set as follows: Press Clock Set/Start. Setting the clock - If your clock controls are different, check below for your specific Use and Care Guide. Built-in ovens Clock settings - Built-in ovens Control Lock feature - Clock/Timer display This is a 12-hour clock, and it can be set the time of day. Ultima built-in oven with steam How do I set the clock?
Similar Questions

Gas Range # Kgss907: Oven Fan Sometimes Cycles On & Off When Using Stove Top?
KitchenAid: Gas Range Model # KGSS907: Issue ~ Oven fan sometimes cycles on & off when using sto...
KitchenAid: Gas Range Model # KGSS907: Issue ~ Oven fan sometimes cycles on & off when using sto...
(Posted by sfmanley 9 years ago)

Kitchenaid Gas Range Architect Series Control Panel Light Will Not Shut Off
(Posted by zsxsme 9 years ago)

Repair Kitchenaid Gas Range Architect Series Ii Oven How To Reset Controls When
fails to light
fails to light
(Posted by djmdwhil 9 years ago)

Why The Oven Light Would Not Cut Off On A Kitchen Aid Gas Range Model Kgsk901
(Posted by fignewdsm 10 years ago)

Oven Shuts Off
After setting oven temperature, while warming up the oven suddenly shuts off.
After setting oven temperature, while warming up the oven suddenly shuts off.
(Posted by keithcharney 11 years ago)