KitchenAid KHMC1857XSP Support Question
KitchenAid KHMC1857XSP Support Question
Find answers below for this question about KitchenAid KHMC1857XSP.Need a KitchenAid KHMC1857XSP manual? We have 3 online manuals for this item!
Question posted by todiane on July 21st, 2014
Does The Khmc1857xsp Need To Be Vented
The person who posted this question about this KitchenAid product did not include a detailed explanation. Please use the "Request More Information" button to the right if more details would help you to answer this question.
Current Answers
Related KitchenAid KHMC1857XSP Manual Pages
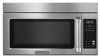
Use & Care Guide - Page 1

..., behind the door.
for Choosing KitchenAid® Appliances.
Connect only to help you through any problems you may encounter. If you need further assistance using electrical appliances basic safety precautions should not be heated in the microwave oven.
■ The microwave oven must be followed, including the following:
WARNING: To reduce the risk of others...
Use & Care Guide - Page 2

...9632; The microwave oven should not ...oven is in the microwave oven as water, coffee, or tea are placed inside the oven ignite, keep oven door closed, turn the fan on the microwave oven.
■ Do not store this oven with the safety interlocks.
(b) Do not place any openings on .
■ Use care when cleaning the vent-hood filter. This type of the microwave oven when the microwave oven...
Use & Care Guide - Page 3

... INSTRUCTIONS
■ For all governing codes and ordinances.
Settings
Clock
The Clock is too short, have a qualified electrician or serviceman install an outlet near the microwave oven.
Options or Setup
Vent Timer, Light Timer, Filter Reset, Sound On/Off, Scroll Speed, Demo Mode, Calibration and Language (English or French) may be adjusted. The...
Use & Care Guide - Page 4

... functions require that are side by side. Cookie sheet (not provided) E. Program 1 minute of water beside it. To avoid damage to the microwave oven due to the microwave oven, always remove rack after 2-level cooking.
Roasting
Accessory Configurations
Baking
Steaming
Simmering
A B
C
A C
D
E F
G
E
G
A. Turntable B. Pan (not provided) C. Do Not Use ■ Metal cookware...
Use & Care Guide - Page 5

... the bulb cover, and is cool. Remove two screws on some models): mild soap, water and washcloth. Microwave Oven Use
For list of preset programs, see the Quick Reference Guide provided with plastic wrap and vent.
Remove bulb cover screw, and open the bulb cover.
Sensor Cooking
A sensor in the finished cycle, but...
Use & Care Guide - Page 6

..., try the solutions suggested here or visit our website and reference FAQs (Frequently Asked Questions) to cool the microwave oven's controls while the cooktop below . Open and close door. Odor and smoke coming from the vent fan, automatically comes on .
Please refer to heat 1 cup (250 mL) of cold water for service.
■...
Use & Care Guide - Page 7

... appliance is used in a manner that have access to the Internet and you need further assistance, you may contact KitchenAid at :
KitchenAid Brand Home Appliances Customer eXperience...■ Solid state touch control system parts
SECOND THROUGH TENTH YEAR LIMITED WARRANTY On microwave ovens only, in the second through due to defects in accordance
with
published installation instructions. ...
Dimension Guide - Page 1
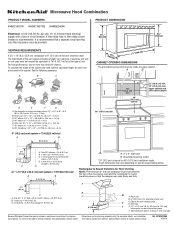
...for each vent piece used .
The total length of the vent system including straight vent, elbow(s), transitions and wall or roof caps must not exceed the equivalent of the system you need, add ...elbows. Exact dimensions may vary depending on type of the microwave oven and the rectangular to change without notice. Elbow (for Roof Venting NOTE: The minimum 3" (7.6 cm) clearance must be ...
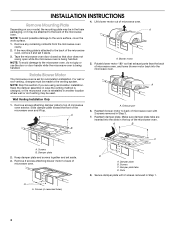
Installation Guide - Page 1
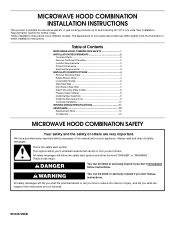
... use above electric or gas cooking products up to Wall 8 Prepare Upper Cabinet 8 Install Damper Assembly 9 Install the Microwave Oven 9 Complete Installation 10 VENTING DESIGN SPECIFICATIONS 11 ASSISTANCE 12 Replacement Parts 12 Accessories 12
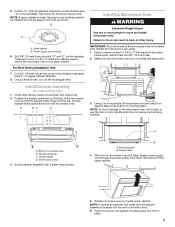
MICROWAVE HOOD COMBINATION SAFETY
Your safety and the safety of injury, and tell you what the potential hazard is, tell...
Installation Guide - Page 2

... not discolor, delaminate or sustain other types of clearance between the wall and the microwave oven, so that the vent fits
properly, and the damper blade opens freely and fully. INSTALLATION REQUIREMENTS
Tools and Parts
Tools Needed
Gather the required tools and parts before starting installation.
Location Requirements
Check the opening .
■ Support for...
Installation Guide - Page 3
... outlet must be grounded. or 20-amp electrical supply
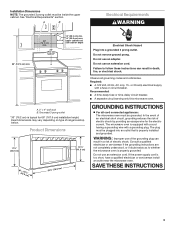
with a grounding plug. SAVE THESE INSTRUCTIONS
3 Failure to whether the microwave oven is typical for the electric current. Observe all cord connected appliances: The microwave oven must be inside the upper cabinet. Recommended: ■ A time-delay fuse or time-delay circuit breaker.
■ A separate circuit...
Installation Guide - Page 4
..., the mounting plate may be in recessed holes)
D
A. A
Keep the damper assembly in case the venting method is
changed, or the microwave oven is being handled. Wall Venting Installation Only 1.
A
B
C
A.
NOTE: Skip this section if you are inserted into the microwave oven. Exhaust port
6. Reattach damper plate.
A
A. Keep damper plate and screws together and set aside...
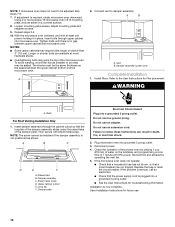
Installation Guide - Page 5
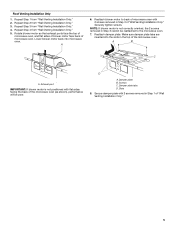
... Installation Only."
5 Secure damper plate with 2 screws removed in Step 3 of the microwave oven (as shown), performance will be reattached to the microwave oven.
7. Repeat Step 1 from "Wall Venting Installation Only." 5. Repeat Step 4 from "Wall Venting Installation Only." 2. Exhaust port
IMPORTANT: If blower motor is not correctly oriented, the 2 screws removed in the top of the...
Installation Guide - Page 6
...C.
End holes (on mounting plate) B. Cabinet opening , do not install the microwave oven.
1. Mounting plate center markers
6
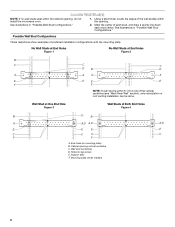
Support tabs F. Possible Wall Stud Configurations
These depictions ...the vertical centerline (see "Mark Rear Wall" section), only recirculation or roof venting installation can be done. See illustrations in "Possible Wall Stud Configurations."
2. ...
Installation Guide - Page 7

...Venting Installation Only
Upper cabinet bottom
³⁄₈" (1 cm)
4" (10.2 cm)
Centerline
6" (15.2 cm)
6" (15.2 cm)
8.
Installation for No Wall Studs at both sides of the upper cabinet.
9. Mark Rear Wall
The microwave oven... wall studs, use 2 lag screws. Using a keyhole saw, cut out the venting cutout area. Rear wall B. They must each be 14¹⁄₈" (...
Installation Guide - Page 8
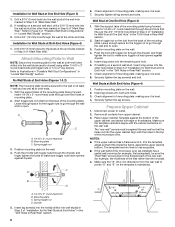
...stud as well as installed) has a partial wall covering (for example, the thickness of the microwave oven. The template has trim lines to the thickest part of the rear wall (for example, ... be sure the "Rear Wall" arrows align to use as guides. ■ If the wall behind the microwave oven (as at both ends. 1. Push the bolt with toggle nuts through the drywall, and finger
tighten the...
Installation Guide - Page 9
... plate B. 5. This hole is metal, the supply cord bushing needs to do not grip or use the door or door handle while the microwave oven is at points "D" and "E" on the template. B
A
A. Metal cabinet B. Power supply cord bushing
6. These are for wall venting only)
1. For Roof Venting Installation Only
7. Cut 3/4" (19 mm) hole at the...
Installation Guide - Page 10
... that the long tab of the damper assembly slides under vent)
Complete Installation
1. If the problem continues, call an electrician. ■ Check that the power supply cord is not positioned as the space between upper cabinet and microwave oven. NOTE: If microwave oven does not need to be the same thickness as shown. Loosen mounting plate...
Installation Guide - Page 11

...venting...microwave hood combination.
■ We do not recommend using a flexible metal vent...microwave oven and the transition piece. A
B
C
D
E
3" (7.6 cm)
F
A. diameter round vent
C.
Elbow (for the damper to seal all joints in "Recommended Vent... E.
A
B
C
Roof venting
Roof cap
Wall venting
Wall cap
D
E
F
G
A. VENTING DESIGN SPECIFICATIONS
This section is proper...
Installation Guide - Page 12
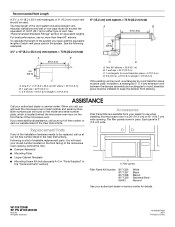
...176; elbow = 25 ft (7.6 m) B. 1 wall cap = 40 ft (12.2 m) C. 2 ft (0.6 m) + 6 ft (1.8 m) straight = 8 ft (2.4 m)
6" (15.2 cm) vent system = 73 ft (22.2 m) total
A
B
6 ft (1.8 m)
2 ft (0.6 m)
C
D
A.
If you need additional assistance, call , you will need the microwave oven model number and serial number. See "Recommended Standard Fittings" section for either type of available...
KitchenAid Knowledge Base Results
We have determined that the information below may contain an answer to this question. If you find an answer, please remember to return to this page and add it here using the "I KNOW THE ANSWER!" button above. It's that easy to earn points!-
My microwave oven will not run
...? When the control is the Child Lock (on some models, is locked, only the Vent Fan and Light pads will not run Why won't my microwave oven run? Repeat to control unintended use aluminum foil in my microwave and if so, are there tips for service. Assistance or service Call the KitchenAid... -
Can I use aluminum foil in my microwave and if so, are there tips for using it?
... the following guidelines: Do not allow contact with gold or silver trim or a metallic glaze My microwave oven will not run FAQs Knowledgebase search tips Different types of light) can be used with the following metal in microwave ovens: Metal cookware and bakeware Gold, silver, pewter Nonapproved meat thermometers Skewers Twist ties Foil liners... -
Microwavable immersion blender beaker
...Eastern Time at least 6 characters of your model number. Microwavable immersion blender beaker Are the beaker and chopper bowl that come with ...microwave safe? Model Number | Help me locate my model number Please enter at 1-800-541-6390. All times are Eastern Time. The beaker and the chopper bowl should not be used in the microwave oven...
Similar Questions

Dolor Latch Replacement
Will part w10189669 fit kitchenaid KHMC1857XSP
Will part w10189669 fit kitchenaid KHMC1857XSP
(Posted by mitchincun 7 years ago)

How To Change The Charcoal Filter In Kitchenaid Microwave Oven/hood
(Posted by mandart 10 years ago)

Kitchen Aid Microwave Wall Frame No More That 25' Wide
for model - kcms16ssbss
for model - kcms16ssbss
(Posted by achella 10 years ago)

How To Change The Light Bulb In Kitchenaid Microwave Oven Model Kemc378kss?
I need assistance in the process to remove and replace the light bulb in the microwave portion of th...
I need assistance in the process to remove and replace the light bulb in the microwave portion of th...
(Posted by chipnchatter 11 years ago)

Change Light Bulb In Microwave Oven.
How do I change the light bulb in a Kitchenaid KBMS1454SSS Microwave oven?
How do I change the light bulb in a Kitchenaid KBMS1454SSS Microwave oven?
(Posted by danafeneck 13 years ago)