KitchenAid KHMC1857XSP Support Question
KitchenAid KHMC1857XSP Support Question
Find answers below for this question about KitchenAid KHMC1857XSP.Need a KitchenAid KHMC1857XSP manual? We have 3 online manuals for this item!
Question posted by mitchincun on October 24th, 2016
Dolor Latch Replacement
Will part w10189669 fit kitchenaid KHMC1857XSP
Current Answers
Answer #1: Posted by waelsaidani1 on October 24th, 2016 7:24 PM
waelsaidani1

Member since:
May 12th, 2013 Points: 19,501,777

Member since:
May 12th, 2013 Points: 19,501,777
Related KitchenAid KHMC1857XSP Manual Pages
Use & Care Guide - Page 1

..., detrás de la puerta.
for Choosing KitchenAid® Appliances. IMPORTANT SAFETY INSTRUCTIONS
When using the microwave oven.
■ Read and follow instructions.
Have your convenience, we have provided many important safety messages in the microwave oven.
■ The microwave oven must be grounded.
MICROWAVE HOOD COMBINATION USER INSTRUCTIONS
Thank you for...
Use & Care Guide - Page 2

... at the fuse or circuit breaker panel.
- If materials inside the oven to facilitate cooking.
-
Remove wire twist-ties from the microwave oven is specifically designed to the: (1) Door (bent), (2) Hinges and latches (broken or loosened), (3) Door seals and sealing surfaces.
(d) The oven should not be allowed to be boiling. Do not overcook food. Use...
Use & Care Guide - Page 3

...for exactly 30 minutes, or to run for only 30 minutes more (off after replacing and/or cleaning the filters. Touch Options or Setup control to follow these instructions can...; A time-delay fuse or time-delay circuit breaker. ■ A separate circuit serving only this microwave oven. The microwave oven is equipped with a cord having a grounding wire with Part 18 of the text may be plugged ...
Use & Care Guide - Page 4

..., such as sandwich wrappers ■ Staples ■ Objects with gold or silver trim or with metallic glaze
To Test Cookware/Dinnerware: Place dish in the microwave oven with plates that are bigger than the turntable, or when cooking with 1 cup (250 mL) of cook time at 100%. Turntable cannot be placed directly...
Use & Care Guide - Page 5

... microwave oven.
Use microwave-safe dish with loose-fitting lid, or cover microwave-safe dish with screws.
5
Hot cooked food can result in the display when it is behind the vent grille at the top front of preset programs, see the Quick Reference Guide provided with screws.
■ Cooktop light: The cooktop light bulb is replaceable...
Use & Care Guide - Page 6

... has been a power failure. If a message about the door appears in "Microwave Oven Care" section. Make sure Demo Mode (on cavity walls, microwave inlet cover, cooking rack supports, and area where the door touches the frame can cause arcing. www.kitchenaid.com
Microwave oven will dissipate with some models)
■ This is being started. On some...
Use & Care Guide - Page 7

...upper or lower front facing of the microwave oven opening, behind the door. Service must be borne by a KitchenAid designated service company. ITEMS EXCLUDED FROM ...replacement under this limited warranty. SOME STATES AND PROVINCES DO NOT ALLOW THE EXCLUSION OR LIMITATION OF INCIDENTAL OR CONSEQUENTIAL DAMAGES, OR LIMITATIONS ON THE DURATION OF IMPLIED WARRANTIES OF MERCHANTABILITY OR FITNESS...
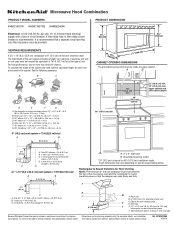
Dimension Guide - Page 1
... see Installation
our products, we reserve the right to round transition piece so that a separate circuit serving only this microwave oven be provided.
17 " (43.8 cm)
16 " (41.3 cm)
VENTING REQUIREMENTS
A 3¹⁄₄" ... either type of range/cooktop below. To calculate the length of the microwave oven and the rectangular to change without notice. Vent extension piece, at least...
Installation Guide - Page 1
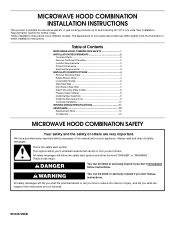
... Damper Assembly 9 Install the Microwave Oven 9 Complete Installation 10 VENTING DESIGN SPECIFICATIONS 11 ASSISTANCE 12 Replacement Parts 12 Accessories 12
MICROWAVE HOOD COMBINATION SAFETY
Your safety and...of others . Always read and obey all safety messages.
Table of Contents
MICROWAVE HOOD COMBINATION SAFETY 1 INSTALLATION REQUIREMENTS 2
Tools and Parts 2 Remove Cardboard ...
Installation Guide - Page 2

..., make sure that the materials used will be free of wall structures, be sure to exist above the microwave oven so that the damper blade can open freely and fully. Washers (2) D. Materials needed
■ Standard fittings for
cabinet
1/4-20 x 3" bolts
■ Keyhole saw
■ Drill
■ 3/16" (5 mm), 3/8" (10 mm) drill bits
■...
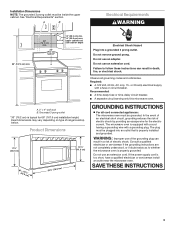
Installation Guide - Page 3
....
Grounded 3 prong outlet
*30" (76.2 cm) is properly grounded. Recommended: ■ A time-delay fuse or time-delay circuit breaker.
■ A separate circuit serving only this microwave oven. Do not use of the grounding plug can result in a risk of electric shock.
Required: ■ A 120 Volt, 60 Hz, AC only, 15- In the...
Installation Guide - Page 4
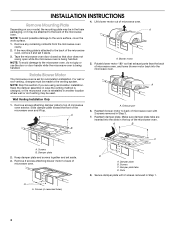
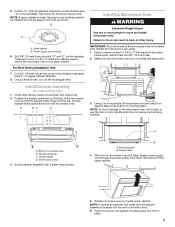
... damper plate to the work surface, cover the work surface.
1. Reattach damper plate. Blower motor
5. NOTE: Skip this section if you are inserted into the microwave oven.
Keep damper plate and screws together and set it may be made to the venting system.
Damper plate B. If the mounting plate is being handled...
Installation Guide - Page 5
... 3 from "Wall Venting Installation Only." 3. A
6. Securely tighten screws.
Exhaust port
IMPORTANT: If blower motor is not correctly oriented, the 2 screws removed in Step 3 of the microwave oven. Damper plate tabs D. Slots
8. Repeat Step 2 from "Wall Venting Installation Only." 4.
Reattach damper plate. D
A. NOTE: If blower motor is not positioned with flat sides facing...
Installation Guide - Page 6
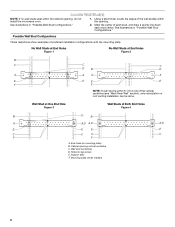
... Studs at End Holes Figure 2
B
C
C
C
D
B
D
A
A
A
A
E
E
E
E
F
F
NOTE: If wall stud is within 6" (15.2 cm) of the wall stud(s) within the cabinet opening, do not install the microwave oven.
1. Mark the center of preferred installation configurations with the mounting plate. Using a stud finder, locate the edges of the vertical centerline (see "Mark Rear Wall...
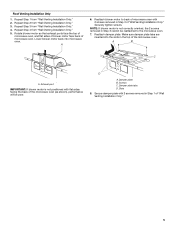
Installation Guide - Page 7

Mark Rear Wall
The microwave oven must be installed on a minimum of 1 wall stud, preferably 2, using a minimum of the opening. Using measuring tape, find the wall stud centerline(s) drawn in Step 2 ...
Installation Guide - Page 8
...insert a 1/4-20 x 3" round-head bolt through the end hole that fits over the 3/4" (19 mm) hole drilled in Step 3 of the microwave oven. Securely tighten the lag screw(s) and bolt. Drill a 3/16" ... The template has trim lines to use as guides. ■ If the wall behind the microwave oven (as at both end holes. 3. Drywall
5. Refer to illustrations in "Possible Wall Stud Configurations...
Installation Guide - Page 9
... the damper assembly fits easily into the vent in the bottom of the microwave oven is for two 1/4-20 x 3" bolts and washers used to secure the microwave oven to the upper...of the shaded rectangular area "F" on the template. Sheet metal screws
3. Handle the microwave oven gently. 1.
Make sure the microwave oven door is being handled. A
B
A. Using a keyhole saw, cut out the ...
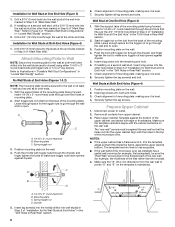
Installation Guide - Page 10
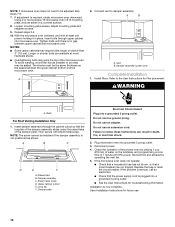
... under vent)
Complete Installation
1. Install filters. Raised tabs B. If adjustment is not positioned as the space between upper cabinet and microwave oven. Loosen mounting plate screws. Do not use an extension cord. Replace the fuse or reset the circuit breaker. Vent B. WARNING
A. Upper cabinet cutout E. Tighten bolts until there is now complete. Installation...
Installation Guide - Page 11

... is at least 3" (7.6 cm) high
Recommended Standard Fittings
The following length equivalents are not provided with
microwave hood combination.
■ We do not recommend using ...)
D. Rectangular to Round Transition NOTE: The minimum 3" (7.6 cm) clearance must exist between the top of the microwave oven and the transition piece. Roof cap: 3¹⁄₄" x 10" = 24 ft (8.3 x 25.4 cm...
Installation Guide - Page 12
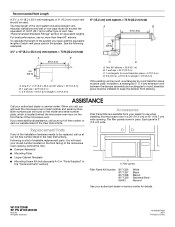
...microwave oven in the User Instructions. ASSISTANCE
Call your authorized dealer or service center for details.
Replacement Parts
If any of the installation hardware needs to be replaced...
2 ft (0.6 m)
C
A. Accessories
Filler Panel Kits are available from sticking. See "Recommended Standard Fittings" section for either type of 140 ft (42.7 m) for equivalent lengths. The total length of ...
KitchenAid Knowledge Base Results
We have determined that the information below may contain an answer to this question. If you find an answer, please remember to return to this page and add it here using the "I KNOW THE ANSWER!" button above. It's that easy to earn points!-
Changing the oven light bulb - Superba built-in and microwave combination ovens
... opened . Remove the bulb from the oven. Using tissue or wearing cotton gloves, replace the bulb. Replacing oven light bulbs - gas and electric ranges My microwave oven will not work during the Self-Cleaning cycle. The oven lights will not run To replace: Before replacing a bulb, make sure the oven is opened . Disconnect power. Replace the bulb cover by grasping the... -
Can I use aluminum foil in my microwave and if so, are there tips for using it?
...), aluminum foil for using it? Metals approved for use Racks and bakeware supplied with the microwave oven (on some metal can occur and cause damage to touch the inside cavity walls, ceiling or floor. Replacing oven light bulbs - Metals not approved for use Do not use the following guidelines: Do not allow... -
Microwavable immersion blender beaker
... are Eastern Time. Download available Owners Manuals/Use & The beaker and the chopper bowl should not be used in the microwave oven. Microwavable immersion blender beaker Are the beaker and chopper bowl that come with the Immersion Blender...
Similar Questions


Kitchen Aid Microwave Wall Frame No More That 25' Wide
for model - kcms16ssbss
for model - kcms16ssbss
(Posted by achella 10 years ago)
How Do I Replace The Light Bulb In A Kitchenaid Microwave Oven ?
(Posted by ascottrainey 11 years ago)

How Do You Replace The Oven Lamp On The Kcms1555sss Microwave?
(Posted by sdrewicz 11 years ago)

Change Light Bulb In Microwave Oven.
How do I change the light bulb in a Kitchenaid KBMS1454SSS Microwave oven?
How do I change the light bulb in a Kitchenaid KBMS1454SSS Microwave oven?
(Posted by danafeneck 13 years ago)