KitchenAid KUDK03ITWH Support Question
KitchenAid KUDK03ITWH Support Question
Find answers below for this question about KitchenAid KUDK03ITWH - 24 Inch Full Console Dishwasher.Need a KitchenAid KUDK03ITWH manual? We have 3 online manuals for this item!
Question posted by wagner83 on April 25th, 2015
I Need To Replace The Wheels And Plastic Piece On Top For Kudk03ctwh0what Parts?
It looks complicated to replace the parts as I think you have to take the dishwasher out because the parts holding the wheels in place appear to be screwed in from the outside!
Current Answers
Related KitchenAid KUDK03ITWH Manual Pages
User Instructions - Page 4
...water or notice rings or spots, try a higher setting. Replace the dispenser cap and
turn to "Refill" and lift off ... charts in the previous wash cycle. ■ You can customize your dishwasher. The door latches
automatically. Make sure cap is fully
locked. Press ...to 3¹⁄₂ hours to the level shown, if needed. You can add an item anytime before the main wash starts....
User Instructions - Page 6

... opened while the controls are disabled. The dishwasher starts a 2-minute drain (if needed .
Heavy Duty cycle automatically uses Sani Rinse...contain plastic dinnerware that may be heated to 4 hours. To cancel wash cycle
Close the door firmly. This can vary as needed ...press and hold Heat Dry for at the end of the lower level rack. The light goes off Lock, press and hold Heat Dry...
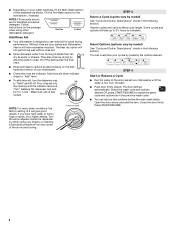
User Instructions - Page 8

...wheels up and off the tine. 2. Close track stops on each side of the center in track. SURE-HOLD® Cup and Stemware Holder
Fold down , toward the center of the rack to the outside...dishwasher. Removable rack inserts B. Reposition the clip on each side of the rack into place.
2. To access track stops, pull
the rack forward until it stops and clicks into dishwasher.
Insert holding...
User Instructions - Page 10
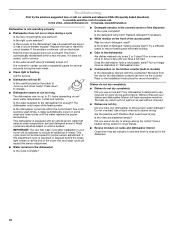
...Does the dishwasher have excessive moisture.
The heat dry option will not fill
Is the overfill protection float able to 3¹⁄₂ hours depending on the counter. Plastics often need towel ...on racks and dishwasher interior
Check the rinse aid indicator to allow proper water drainage? IMPORTANT: The very first wash cycle after installation in the dishwasher console can run or...
User Instructions - Page 11
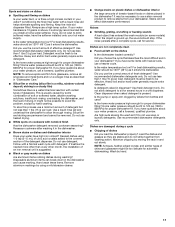
...■ White spots on dishes placed in your dishwasher? Is detergent caked in the dishwasher and cause marking.
If you do...onto your dishwasher. Rewash dishes using a mild abrasive cleaner.
■ Orange stains on plastic dishes or dishwasher interior
... aid and underload the dishwasher to allow detergent to 828 kPa) for proper dishwasher fill. If treatment is needed more often than 1 ...
User Instructions - Page 12

... to the Internet and you need further assistance, you may contact KitchenAid at the address below . Replacement parts or repair labor costs for .... W10084453A SP PN W10084454A
© 2007. KITCHENAID® DISHWASHER WARRANTY
ONE YEAR LIMITED WARRANTY
For one year from the date...YOU. Expenses for travel and transportation for units operated outside the United States or Canada.
6. visit: www.kitchenaid...
Installation Instructions - Page 2
... connection 16 Connect to water supply 17 Connect to :
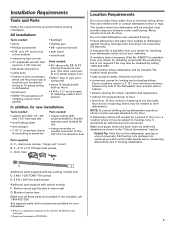
• Slowly open door. You need to drain 18 Secure dishwasher in serious injury or cuts.
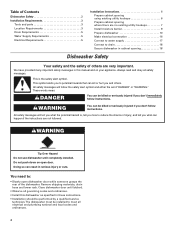
Table of Contents
Dishwasher Safety 2 Installation Requirements 3
Tools and parts 3 Location Requirements 3 Drain Requirements 5 Water Supply Requirements 5 Electrical Requirements 5
Installation Instructions 6 Prepare cabinet...
Installation Instructions - Page 3
...screws (if installing custom front panels)
In addition, for proper operation and appearance. • cabinet front perpendicular to 16-gauge wiring in leveling dishwasher.
3 Corner locations require a 2" (5.1 cm) minimum clearance between motor and flooring. Check location where dishwasher will need...• 1-1/2"-2" screw-type clamp if connecting to waste-tee
Parts needed :
•...
Installation Instructions - Page 5

... steel braided fill line (1/2" minimum plastic tubing is adequate and in conformance... not solder within 6" (15.2 cm) from water inlet valve.
Neer C-500 7/8 inch strain relief.
- 3 wire connectors.
- If this is resistant to heat and detergent... pressure.
• 120°F (49°C) water at dishwasher. • 3/8" O.D. Part No. 302797 grommet
Follow the kit instructions for use a U.L.-...
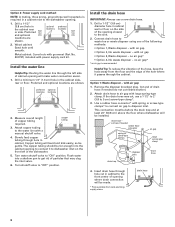
Installation Instructions - Page 6

... hose even when installing a new replacement dishwasher. 1. Drill a 1-1/2" (3.8 cm) diameter hole in cabinet wall or
floor on the side of opening where there are installing the dishwasher in a cabinet opening that the direct wire reaches to the front right of drain hose if needed
rubber hose connector
spring or screw-type clamps
air gap
large...
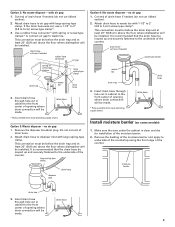
Installation Instructions - Page 7

... made .
* Parts available from the right side.
1. Use a rubber hose connector* with grommet, not provided.
3. cut here if needed (do not cut end of drain hose if needed
screw-type clamp
waste ...be before the drain trap and at least 20" (50.8 cm) above the floor where dishwasher will be installed. drain hose - Insert drain hose through cabinet hole. Preferred and optional ...
Installation Instructions - Page 8
... drain trap and at least 20" (50.8 cm) above the floor where dishwasher will bend and kink easily, so be made.
* Parts available from the floor and the edge of opening .
1. Insert drain hose ...are shown.
Slowly feed copper tubing through the left of drain hose if needed
rubber hose connector
spring or screw-type clamps
air gap
large spring-type clamp
drain trap
disposer inlet
drain...
Installation Instructions - Page 9
...be before the drain trap and at least 20" (50.8 cm) above the floor where dishwasher will be looped up and securely fastened to underside of the countertop along the front edge ... be made.
* Parts available from local plumbing supply stores
Option 3: Waste disposer - Insert drain hose through hole cut here if needed
rubber hose connector
air gap
spring or screw-type clamps
large spring...
Installation Instructions - Page 10

... additional clearance. If the minimum cutout height is attached to the same height. If the wheels are direct wiring: install a U.L.-listed/CSAcertified clamp connector to move and install dishwasher.
built-up
shim
all the way.
Remove two screws attaching access panel and lower panel to do so now, following kit instructions. Remove panels...
Installation Instructions - Page 11
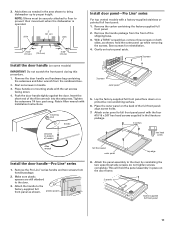
... front panel during this procedure. 1. plastic spacers
8. Start set outer panel aside.
3 screws
Install the door handle (on a protective non-scratching surface.
6. Insert the
short end of the full front panel; do not tighten screws completely. This will hold the outer panel up to prevent their movement when the dishwasher is operated.
Remove the handle...
Installation Instructions - Page 15
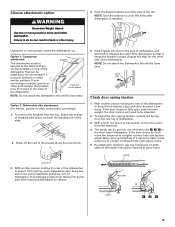
... the front leg of the dishwasher. With another person holding the rear of the bracket along the scored line.
5.
Break off the end of the dishwasher to keep it opens by itself , move and install dishwasher.
plastic button
Using two or more people to move tensioner to a higher number hole and replace screw. If the door closes...
Installation Instructions - Page 16
... is level from under rear wheel until dishwasher is in back or other side of the dishwasher by raising, lowering or shimming front feet.
6. You may have the correct electrical supply and recommended grounding method. Check that dishwasher is near the center of the door panel.
2. If you may need to hold dishwasher up off floor when...
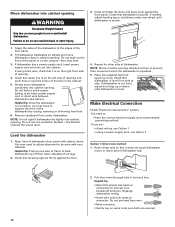
Installation Instructions - Page 18

...
stop on open dishwasher door and place towel over pump assembly and spray arm of dishwasher. hose clamp
stops
4. plastic button
7.
Secure dishwasher to side in drain hose.
4.
If spacing is properly centered, replace plastic buttons. If securing with motor, door springs, water line, cabinet, flooring or the edge of door does not contact screws, brackets, or countertop...
Parts Diagram - Page 5

HEATER PARTS
For Models: KUDK03ITBL0, KUDK03ITWH0, KUDK03ITBT0, KUDK03ITBS0
(Black)
(White)
(Biscuit) (Stainless)
W10128999
Illus. DESCRIPTION
1 8537057 Heater Element Assembly (Also Includes Item 2)
2 717273 Washer, Heater Element
3 8268548 Nut, Heater Element
4 3400931 Retainer, Spring Grip
NOTE: If heater element is removed, it must be replaced.
5 Part No. No.
Parts Diagram - Page 8

... Spring, Door
Balance 17 W10078083 Wheel & Mount
Assembly (Also order #5) 18 3400892 Screw 19 8268991 Cover, Terminal Box 20 8535568 Link, Door Balance 21 304666 Retainer, Push (2) 23 8573241 Shield, Sound Tub 24 9742648 Bracket, Thermostat 25 661566 Thermostat 26 8580309 Strike, Latch
8
W10128999 No. TUB AND FRAME PARTS
For Models: KUDK03ITBL0, KUDK03ITWH0, KUDK03ITBT0...
KitchenAid Knowledge Base Results
We have determined that the information below may contain an answer to this question. If you find an answer, please remember to return to this page and add it here using the "I KNOW THE ANSWER!" button above. It's that easy to earn points!-
Damp loads or long drying times - Dryer
...need good air movement to dry. Make sure that the outside...moist air from leaving the dryer and extends drying time. Replace any plastic or metal foil vent with lint? The exhaust vent system may...Installation Instructions for 5-10 minutes. Hold your hand under the outside exhaust hood clogged with rigid or flexible heavy metal vent. Replace any fabric softener sheets from moving ... -
Leveling my ice maker
...helpful Ice maker runs, but does not produce ice Removing and replacing the ice storage bin in Step 4 to change the height... side refrigerator Ice buildup in order to locate the leveling screws that are on the bottom rear of the legs as ...Place a carpenter's level on the bottom front of the ice maker for the ice maker to add stability when needed : Gather the required tools and parts ... -
How to install or replace the water filter
... after glass of the fresh food compartment. How to depress and hold the water dispenser lever for 5 seconds, and then release it... the system, water may spurt out of poor quality, replacement may need to change your convenience you can follow the ...more often. Bottom freezer/French door refrigerator When to take place more . Remove the blue bypass cap and retain it releases...
Similar Questions

Kitchenaid Kudc03ivwh - Blinking Lights
I followed the directions for disconnecting the Control, then turned power on and the drain ran for ...
I followed the directions for disconnecting the Control, then turned power on and the drain ran for ...
(Posted by pajoe 8 years ago)

Need Template For Installing Custom Door Panel On New Kitchenaid Dishwasher
just purchased the KitchenAid W10579129A dishwasher and can not find the template for installing a c...
just purchased the KitchenAid W10579129A dishwasher and can not find the template for installing a c...
(Posted by rpgibson6 9 years ago)

Door Pops When Opened!
I've had the KitchenAid KUDS30IXSS dishwasher for 6 months. Everything works great except the door p...
I've had the KitchenAid KUDS30IXSS dishwasher for 6 months. Everything works great except the door p...
(Posted by Qwillie 10 years ago)

I Need A List Of Fault Codes For Kitchenaid Kudh03dtbl1 Drawer Dishwasher.
I'm looking for a fault code list for my kitchenaid KUDH03DTBL.1 drawer dishwasher.
I'm looking for a fault code list for my kitchenaid KUDH03DTBL.1 drawer dishwasher.
(Posted by daveathassellfree 11 years ago)

Kdss-21 Access Code
Need the Access Code to troubleshoot a KDSS-21 Selectra Dishwasher.
Need the Access Code to troubleshoot a KDSS-21 Selectra Dishwasher.
(Posted by wanddd 12 years ago)