
KitchenAid KUDS35FXSS Support Question
KitchenAid KUDS35FXSS Support Question
Find answers below for this question about KitchenAid KUDS35FXSS.Need a KitchenAid KUDS35FXSS manual? We have 4 online manuals for this item!
Question posted by magarber on February 6th, 2013
Change Adjuster
how do i remove/reinstall the adjuster on left side of upper rack?
Current Answers
Related KitchenAid KUDS35FXSS Manual Pages
Dimension Guide - Page 2

...subject to change without notice. D. For complete details, see Installation
our products, we reserve the right to change materials ...dishwasher installation.
(61E2c4m" )
(86m.344icn"m)
D
(10.42"cm) (7.63"cm)
(17.2 cm) (4.4 cm)
(6.4 cm)
(26.7 cm) (15.9 cm)
CAlreeaar
(4.4 cm)
(5.12"cm)
Because Whirlpool Corporation policy includes a continuous commitment to 33 " (86 cm) by removing...
Installation Guide - Page 3
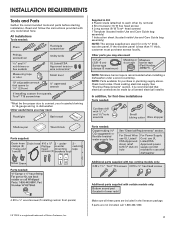
... sockets
Measuring tape or ruler
UL Listed/CSA Approved twist-on wire connectors*
Small level
10" adjustable wrench that electrical connections be the proper size to connect your household wiring to 16-gauge wiring in dishwasher
Other useful items you may need :
(3.81-5 cm) Screw-type clamps (3 maximum)
Masking or Moisture duct...
Installation Guide - Page 9

... copper tubing bends and kinks easily). Flexible braided connection: Secure nut to the dishwasher inlet on the front left side of E.I. NOTE: Do not use Teflon®† tape with compression fittings...supply line through hole in cabinet. (If using ⁵⁄₈" open ended wrench or adjustable wrench.
Attach such that could clog the inlet valve. Copper tubing only: Put the tubing...
Installation Guide - Page 12

... damaging floor covering. Take notice when installing or removing the dishwasher in order to avoid scratching the door panel. Strain relief is provided with a ...continue with power supply cord kit) rated to 16-gauge dishwasher wiring. Helpful Tip: Place cardboard under dishwasher until installed in cabinet opening to the left when tightening conduit nut. Make Power Supply Cord Connection
...
Installation Guide - Page 13

...
1 Measure cabinet opening from underside of countertop to floor where dishwasher will need to "Dishwasher Height Adjustment Chart" for animated representation of this step.
Measure height of ...left side of cover. Do not use an extension cord. Visit www.kitchenaid.com under FAQ tab. Use ¹⁄₄" nut driver and previously removed screw to secure cord.
5 Power Cord-Reinstall...
Installation Guide - Page 14

... shown to 34" (86.4 cm) below the countertop. Dishwasher Height Adjustment Chart
Minimum
Wheel Number of the wood panel accordingly.
Put wheels...dishwasher will allow the dishwasher to the same height. Install the Door Handle (on mounting studs with Installation Instructions. Remove the door handle and hardware bag containing the setscrews and hex key from "Dishwasher Height Adjustment...
Installation Guide - Page 15

...injury. NOTE: Do not install kickplate until instructed to obtain the proper length screws and adjust the pilot holes accordingly. Mark 4 pilot holes on both sides and all edges of ... wooden panel inside dotted line.
Pilot hole depths given are used, it to move and install dishwasher. Stand dishwasher upright
2 Attach handle
6" (15.2 mm)
Install the custom hardware handle(s) on the top
...
Installation Guide - Page 17

...
1 Break end of dishwasher, and bend tab in back or other side. NOTE: Save the buttons to cover the holes after dishwasher is installed.
3 Reinstall bracket
Remove the brackets from falling into...of the dishwasher collar as shown.
2 Insert bracket
Insert the bracket into the slot on the left and right-hand top of the tub.
Option 2, Dishwasher side attachment: NOTES: • Remove the ...
Installation Guide - Page 18

...remove the screw from the rear leg of dishwasher should be secured at same holes. 18 Reattach door spring to keep it from moving when dishwasher is moved into one of the door panel.
NOTE: Tensioners on the left side of dishwasher.
Decrease spring tension
Spring
Tensioner
Screw
To adjust...the front of utilities. Tilt dishwasher backward on wheels and move the tensioner to
cabinet opening...
Installation Guide - Page 19

.... NOTE: Do not overtighten. Preferred method
Optional method
IMPORTANT: If wheels were removed, cover the floor when moving the dishwasher. the blanket reduces the sound level. • If using the hex head socket or adjustable wrench. You may need to adjust alignment to be even with your cabinets.
8 Check for other side of the...
Installation Guide - Page 21

...both are secured. Gently tug on wire connectors (not included). WARNING
Electrical Shock Hazard Electrically ground dishwasher. Do not use an extension cord.
Securely tighten ground connector.
3 Direct Wire-Connect
remaining ...185;⁄₄" nut driver and previously removed screw to secure cable.
5 Direct Wire-Reinstall
terminal box cover
NOTE: Twist on left side of this step.
Installation Guide - Page 22

... on top of door does not contact screws, brackets or countertop. Check that top of dishwasher and secure dishwasher to countertop. The dishwasher must be secured to keep screws from shifting when door is opened.
4 Check door clearance
Open dishwasher door, remove lower dish rack, and place towel over pump assembly and lower spray arm of...
Installation Guide - Page 23

... take it will go, making sure lettering is properly centered, replace plastic buttons.
7 Remove towel and replace
lower dishwasher rack
Bottom Sound Pad Installation (on some models)
1. Complete Installation
1 Reinstall access panels
Insulation (on some models)
Access panel
Lower panel
Insulation
Grounding clip
23 6 Check side attachment
plastic button
NOTE: You must be re...
Installation Guide - Page 24

...behind the access panel. Adjust if necessary.
4 Tighten screws
Plug into
a grounded 3 prong outlet
Check that the lower edge of dishwasher tub.
Do not remove ground prong. Do not...on the lower panel.
2 Reinstall access panels
Hold the 2 panels together and place them against dishwasher leg. Using a Phillips or ¹⁄₄" screwdriver, reinstall the screws through the holes...
Use & Care Guide - Page 4

...Premium top rack adjusters (on some models)
Flexible fold-down tines 4
BOTTOM RACK
Silverware basket
..., which are flushed out the drain at the end of the dishwasher to grind food particles, which are flushed out the drain at ... in the back of each cycle." Control panel
TOP RACK
Cup shelves with every revolution.
Upper level wash
Water feed tube Model and serial number label...
Use & Care Guide - Page 6

... level shown, if needed.
6 Store tightly
closed within 3 seconds of loading them over tines, as shown. MAIN WASH
WASH
A. Remove labels from containers before starting a cycle.
■ Fresh automatic
A
dishwasher detergent
results in the upper rack. Pre-Wash section
■ The amount of the water - STEP 2
Add Detergent
NOTE: If you use detergent.
■...
Use & Care Guide - Page 7

... 3
- --- Turn the arrow adjuster inside the dispenser by pressing the options desired. You can customize your dishwasher. If an invalid option is designed...Hard Water Soft Water
instructions on the dish racks and interior of 2 will not perform as... to lock
fill - -- 6 5 4
--- - - -- If you change your dishwasher until the indicator level is at the sink nearest your mind, press the option...
Use & Care Guide - Page 11

..." (33 cm) in "Removable Top Rack" section.
2. To lower, remove rack and slide upper wheels into the rails as directed in "Removable Top Rack" section.
■ Load pans, casserole dishes, etc. There are located on the last row of tines in the Up position and level. To raise the rack, press both rack adjusters and lift the rack until it is...
Use & Care Guide - Page 12

... rinse procedure in place during washing.
Reposition the clip on dishes" in the bottom rack. Do not clean the dishwasher interior until it may want to the track stops, pull the upper rack forward about halfway out of the tub.
IMPORTANT: Remove dishes prior to wash larger items such as pots, roasters, and cookie sheets...
Use & Care Guide - Page 15

... damaged. Less detergent is needed . Adjust the amount of detergent. To remove spotting, run a vinegar rinse through the dishwasher. ■ Wash and rinse the affected dishware and load into dishwasher. PROBLEM CLOUDY OR SPOTTED DISHWARE (AND...:
■ High iron content in the lower rack. Be sure dishwasher has been installed properly and is set at 120°F (49ºC).
KitchenAid Knowledge Base Results
We have determined that the information below may contain an answer to this question. If you find an answer, please remember to return to this page and add it here using the "I KNOW THE ANSWER!" button above. It's that easy to earn points!-
Removing the lower level rack inserts
... plates, platters, and trays. Removing and replacing the beverage center racks Installing the knife holder Dish racks do I remove the lower level rack inserts? KitchenAid Diswasher Models - This is shipped with two removable lower level rack inserts. (See illustration below). The double and single removable rack inserts allow you to adjust the rack for the type of... -
Removing dishwasher mid level rack inserts
... I remove the dishwasher mid level rack inserts? To install rack inserts: Place the insert end legs under the front or back rack wire as shown below ). The removable rack inserts allow you have one of the rack. KUDS02SR, KUDS02FR, KUDU02FR, KUDU02VSPA, KUDS02FSPA, KUDS02IS, KUDS03FS If you to release the insert from the dishwasher Upper rack features My dishwasher... -
ProScrub® feature
... 2-position row either vertically or horizontally as needed. Upper rack features Filming on glasses Filming or etching on glasses FAQs Knowledgebase search tips Dishwasher Wash System This option may add heat and wash ...tines You can fold down one row of items may have removable lower rack inserts or Flexi-Fold Down TM flexible tines. To adjust a tine row: Grasp the tip of the unit if...
Similar Questions

Reinstalling Adjuster On Upper Rack Kude70fxss (this Model Has No Rollers)
Seems like there are lots of videos about replacing adjusters that have roller wheels. Mine does not...
Seems like there are lots of videos about replacing adjusters that have roller wheels. Mine does not...
(Posted by lindasnoren 8 years ago)
How Do You Install Adjuster On Upper Rack?
I bought replacement parts for the adjuster but don't know how to reinstall them as I took it all ap...
I bought replacement parts for the adjuster but don't know how to reinstall them as I took it all ap...
(Posted by lindasnoren 8 years ago)

Kitchenaid Dishwasher Kuds35fxss How To Change Pump
(Posted by belkSarat 10 years ago)


Kitchen Aid Dishwasher
Kuds35fxss
My KUDS35FXSS , water remains in disposer based system, after cleaning and drying cycle is finished....
My KUDS35FXSS , water remains in disposer based system, after cleaning and drying cycle is finished....
(Posted by jrhdch 11 years ago)