Lexmark T650 Support Question
Lexmark T650 Support Question
Find answers below for this question about Lexmark T650.Need a Lexmark T650 manual? We have 9 online manuals for this item!
Question posted by Hamswinn on August 11th, 2014
How To Remove An Admin Pin On A Lexmark T650n
The person who posted this question about this Lexmark product did not include a detailed explanation. Please use the "Request More Information" button to the right if more details would help you to answer this question.
Current Answers
Related Lexmark T650 Manual Pages
Embedded Web Server Administrator's Guide - Page 8

...first make a list of all users, and then determine which device functions -such as the Administrator PIN. Note: If an activity is helpful to 128 UTF-8
characters.
• User ID-Type an ...belongs.
You can configure one internal account building block per supported device. 6 Select Admin PIN if the PIN will be used by certain users.
Hold down the Ctrl key to provide both authentication...
Clearing Jams Guide - Page 2

... cover. 8 Close the multipurpose feeder door. 9 Press .
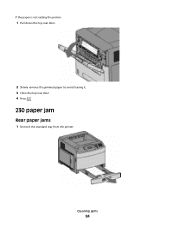
202 and 203 paper jams
If the paper is not exiting the printer: 1 Pull down the top rear door.
230 paper jam
Rear paper jams
1 Remove the standard tray from a hot component, allow the surface to avoid tearing it. 3 Close the top rear door. 4 Press...
Clearing Jams Guide - Page 3

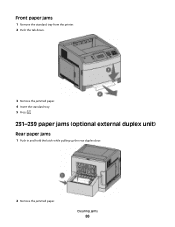
Front paper jams
1 Remove the standard tray from the printer. 2 Remove the duplex jam access tray.
3 Remove the jammed paper. 4 Insert the standard tray. 5 Press .
2 Remove the jammed paper. 3 Close the rear duplex door. 4 Press .
3
Front paper jams
1 Remove the standard tray from the printer. 2 Push the tab down.
231-239 paper jams (optional external duplex unit)
Rear...
User's Guide - Page 26

Set the printer hard disk aside.
4 Remove the metal cover from the ISP opening. d Remove the thumbscrews that attach the printer hard disk mounting bracket to the printer hard disk, and
then remove the bracket. Additional printer setup
26
User's Guide - Page 31

... until the standoffs have seated into place. Note: If an optional ISP is currently installed, then the printer hard disk must be installed onto the ISP. To install a printer hard disk onto the ISP:
a Using a flathead screwdriver to loosen the screws, remove the thumbscrews that attach the printer hard disk
mounting bracket to the...
User's Guide - Page 66

...16 lb) • Multiple part forms or documents
For more information about Lexmark, visit www.lexmark.com. Inks that are specifically designed for electrophotographic printing. For detailed information... 67.
General sustainability-related information can be found at risk for use with laser printers:
• Chemically treated papers used to successfully print on these guidelines when ...
User's Guide - Page 72

..., and job cancelation. Printing a document
1 From the printer control panel Paper menu, set the Paper Type and Paper Size ..., click File ª Print. Printing on specialty media
Tips on using letterhead
• Use letterhead designed specifically for laser printers. • Print samples on the letterhead being considered for use before buying large quantities. • Before loading letterhead,...
User's Guide - Page 73

...Feed envelopes from sticking together. • We recommend Lexmark part number 12A5010 for A4-size transparencies and Lexmark part number 70X7240
for use before buying large quantities. ... 550-sheet tray, or the multipurpose feeder. • Use transparencies designed specifically for laser printers. Have an interlocking design -
Note: A combination of the envelopes. - Check with ...
User's Guide - Page 74

...supported. • Printing labels requires a special label fuser cleaner which is not possible, remove a 1.6-mm (0.06-in.) strip on the leading and driver edge,
and use ...laser printers. Tips on page 167. Print samples on the card stock being considered for use before buying large quantities. Printing
74 For more information, see the Card Stock & Label Guide available on the Lexmark...
User's Guide - Page 77

...• You cannot print files for which you do not have printing permissions.
Note: Do not remove the flash drive from a flash drive:
1 Make sure the printer is printing other file system are not supported.
• Flash drives must support the full-speed ...3 Press the down arrow button until the document has finished printing.
For more information, visit the Lexmark Web site at www...
User's Guide - Page 84
If the paper is not exiting the printer:
1 Pull down the top rear door.
2 Slowly remove the jammed paper to avoid tearing it. 3 Close the top rear door. 4 Press .
230 paper jam
Rear paper jams
1 Remove the standard tray from the printer. Clearing jams
84
User's Guide - Page 86
Clearing jams
86
Front paper jams
1 Remove the standard tray from the printer. 2 Push the tab down.
3 Remove the jammed paper. 4 Insert the standard tray. 5 Press .
231-239 paper jams (optional external duplex unit)
Rear paper jams
1 Push in and hold the latch while pulling up the rear duplex door.
2 Remove the jammed paper.
User's Guide - Page 87

Clearing jams
87
Front paper jams
1 Remove the standard tray from the printer. 2 Remove the duplex jam access tray.
3 Raise the recessed duplex bar.
4 Remove the jammed paper. 5 Replace the duplex jam access tray.
3 Close the rear duplex door. 4 Press .
User's Guide - Page 122
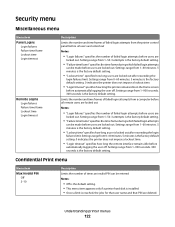
... jobs for that user name and that PIN are deleted. Confidential Print menu
Menu item
Max Invalid PIN Off 2-10
Description Limits the number of times an invalid PIN can be entered Notes:
• Off is the default setting. • This menu item appears only if a printer hard disk is installed. • Once a limit...
User's Guide - Page 165

To fix this, download the correct download emulator version from the Lexmark Web site at www.lexmark.com. 1565 Emulation error, load emulation option
The printer automatically clears the message in 30 seconds and then disables the download emulator on the firmware card.
Understanding printer messages
165
Quick Reference - Page 5

...permissions. Note: Do not remove the flash drive from the printer control panel.
• You... cannot print files for example, .jpg).
4 Press to print one copy, or enter the number of copies you want to see more information, visit the Lexmark Web site at www.lexmark... PIN. 4 Click OK or Print, and then go to the printer to release the job. 6 From the printer ...
Service Manual - Page 25

... attach to personal computers and to verify the repair. General information 1-1 General information
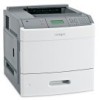
The Lexmark™ laser printers are available in the following models:
Machine type 4062-01A 4062-21A 4062-23A 4062-41A 4062-43A 4062-630
Model T650n T652n T652dn T654n T654dn T656dne
Configuration Network Network Network Network Network Network
Maintenance approach...
Service Manual - Page 29

... Optional external duplex unit for the T650 model. You must have a printer stand or printer base.
Certain other models are supported.
3 The printer supports up to two 5-bin mailbox...tray (Tray 2)
250- More information is available at our Lexmark Web site at www.lexmark.com/ multifunction printers. CAUTION: Floor-mounted configurations require furniture for stability.
General information ...
Service Manual - Page 310

Pull down the bottom rear door.
3-98 Service Manual Remove the standard tray from the printer.
2. 4062-XXX
230 paper jam
Rear paper jams
1.
Service Manual - Page 371

... replacing a second component listed above as a method of troubleshooting components. If this procedure is not followed, the printer will be rendered inoperable. Never install and remove components listed above . Remove the counter balance springs (A) on both sides. 3. Remove the laser cover. See "Laser cover removal (models X651, X652, X654, and X656)" on both sides securing the links...
Similar Questions


My Lexmark C534dn Color Laser Printer Has Red And Yellow Smudge Down Each Side
My Lexmark C534dn color laser printer has red and yellow smudge down each side of the page. On the l...
My Lexmark C534dn color laser printer has red and yellow smudge down each side of the page. On the l...
(Posted by amjohau 12 years ago)