Lexmark T652 Support Question
Lexmark T652 Support Question
Find answers below for this question about Lexmark T652.Need a Lexmark T652 manual? We have 9 online manuals for this item!
Question posted by ppwa on July 27th, 2014
Lexmark T652 Does Not Pick Up From From Tray 2
The person who posted this question about this Lexmark product did not include a detailed explanation. Please use the "Request More Information" button to the right if more details would help you to answer this question.
Current Answers
Related Lexmark T652 Manual Pages
Clearing Jams Guide - Page 1

...rough, cockle, or laid finishes - To resolve any paper jam message, you avoid jams.
Paper tray recommendations
• Make sure the paper lies flat in the same stack. • Make sure ....
4 Place the print cartridge aside on the underside of the printer. Have metal clasps, string ties, or folding bars - Lexmark™ T65x Clearing Jams Guide
Clearing jams
Avoiding jams
The following ...
Clearing Jams Guide - Page 2

....
4 Remove the jammed paper. 5 Close the bottom rear door. 6 Insert the standard tray. 7 Press .
2 Slowly remove the jammed paper to cool before touching. To reduce the risk of the printer might be hot. Note: If the paper is exiting the printer, then pull the paper out, and then press . CAUTION-HOT SURFACE: The...
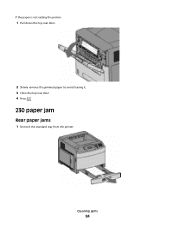
Clearing Jams Guide - Page 3

... external duplex unit)
Rear paper jams
1 Push in and hold the latch while pulling up the rear duplex door. Front paper jams
1 Remove the standard tray from the printer. 2 Remove the duplex jam access tray.
3 Remove the jammed paper. 4 Insert the standard tray. 5 Press .
2 Remove the jammed paper. 3 Close the rear duplex door. 4 Press .
3
Clearing Jams Guide - Page 4

... feeder. 4 Slide the paper guide toward the inside of the tray until it
lightly rests against the edge of paper back and forth...tray. 6 Insert the standard tray. 7 Press .
2 Remove any jammed paper, and then insert the tray. 3 Press . 4 If the jam message persists for a 250-sheet or 550-sheet tray,
then remove the tray from the printer. 5 Remove the jammed paper, and then insert the tray...
User's Guide - Page 11

... Support link.
•
Canada: 1-800-539-6275 Monday-Friday (8:00 AM-11:00 PM ET)
Note: For additional information about contacting Lexmark, see the printed warranty that came with your printer.
• Mexico: 001-888-377-0063
Monday-Friday (8:00 AM-8:00 PM ET)
Note: Telephone numbers and support times may not...
User's Guide - Page 34

... is greater than 18 kg (40 lb) and requires two or more information on installing a printer stand, caster base, or 2,000-sheet tray, see www.lexmark.com/multifunctionprinters.
Installing paper drawers
The printer supports up the printer, then turn the printer off as well, and unplug any options you are accessing the system board or installing...
User's Guide - Page 55

Loading the 2000-sheet tray
1 Pull the tray out. 2 Pull up and slide the width guide to the correct position for the tray from the printer control panel.
7 Insert the tray.
8 If a different type of paper was loaded than the type previously loaded in the tray, then change the Paper Type
setting for the paper size being loaded. Loading paper and specialty media
55
User's Guide - Page 66

... mm (± 0.9 in the same source;
Use inks that are specifically designed for use with laser printers:
• Chemically treated papers used to 230°C (446°F) without carbon paper, also ...m2 (16 lb) • Multiple part forms or documents
For more information about Lexmark, visit www.lexmark.com. latex inks might not. Fiber content
Most high-quality xerographic paper is ...
User's Guide - Page 72

...• Page orientation is important when printing on page 68. "Loading the 2000-sheet tray" on a specific size or type of paper and specialty media can affect how reliably ...72 Printing on specialty media
Tips on using letterhead
• Use letterhead designed specifically for laser printers. • Print samples on the letterhead being considered for use before buying large quantities. ...
User's Guide - Page 73

...-size transparencies and Lexmark part number 70X7240
for use before buying large quantities. Have bent corners - Have metal clasps, string ties, or folding bars - Printing
73 When printing on envelopes:
• Feed envelopes from a 250-sheet tray, a 550-sheet tray, or the multipurpose feeder. • Use transparencies designed specifically for laser printers. When printing on...
User's Guide - Page 74

... best, especially when printing bar codes.
Tips on the Lexmark Web site at least 1 mm (0.04 in.)
away from a 250-sheet tray, a 550-sheet tray, or the multipurpose feeder. • Make sure the ...on the card stock being considered for use labels with the special cartridge required for laser printers. Printing
74 For more information, see the Card Stock & Label Guide available on...
User's Guide - Page 81

... has been cut or trimmed by hand. • Do not mix paper sizes, weights, or types in the same stack. • Make sure all trays in the printer control panel menus. • Store paper per the manufacturer's recommendations.
Paper recommendations
• Use only recommended paper or specialty media. Have metal clasps, string...
User's Guide - Page 84
If the paper is not exiting the printer:
1 Pull down the top rear door.
2 Slowly remove the jammed paper to avoid tearing it. 3 Close the top rear door. 4 Press .
230 paper jam
Rear paper jams
1 Remove the standard tray from the printer. Clearing jams
84
User's Guide - Page 86
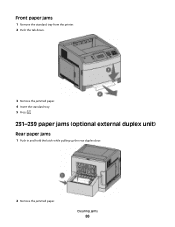
Front paper jams
1 Remove the standard tray from the printer. 2 Push the tab down.
3 Remove the jammed paper. 4 Insert the standard tray. 5 Press .
231-239 paper jams (optional external duplex unit)
Rear paper jams
1 Push in and hold the latch while pulling up the rear duplex door.
2 Remove the jammed paper.
Clearing jams
86
User's Guide - Page 87

Clearing jams
87
3 Close the rear duplex door. 4 Press . Front paper jams
1 Remove the standard tray from the printer. 2 Remove the duplex jam access tray.
3 Raise the recessed duplex bar.
4 Remove the jammed paper. 5 Replace the duplex jam access tray.
User's Guide - Page 88
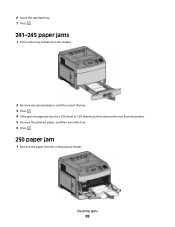
... on the display.
2 Remove any jammed paper, and then insert the tray. 3 Press . 4 If the jam message persists for a 250-sheet or 550-sheet tray, then remove the tray from the printer. 5 Remove the jammed paper, and then insert the tray. 6 Press .
250 paper jam
1 Remove the paper from the multipurpose feeder. Clearing jams
88...
User's Guide - Page 148

... formatting the flash memory. Formatting Flash DO NOT POWER OFF
Wait for the message to clear. Insert Tray
Insert the specified tray into the printer. Understanding printer messages
148
Flushing buffer
Wait for the message to clear.
Error reading USB drive
Remove the device and wait for the message to clear. The ...
Quick Reference - Page 1

... faceup with the leading edge of the paper toward the front of the tray which indicates the maximum height for the tray from the printer control panel.
1 Note: Notice the maximum fill line on the display....paper sizes indicated on the bottom of the tray. Lexmark™ T65x Quick Reference
Loading paper and specialty media
Loading the 250-sheet or 550-sheet tray
1 Pull the tray out.
Service Manual - Page 25

General information
The Lexmark™ laser printers are available in the following models: Machine type 4062-01A 4062-21A 4062-23A 4062-41A 4062... most computer networks. See "Start" on page 2-1. After you to verify the repair. 4062-XXX
1. General information
1-1
The Lexmark laser printers are letter-quality page printers designed to attach to personal computers and to determine the...
Service Manual - Page 523

... Charge roll assembly with tool Transfer roll assembly with tool Pick roll assembly (2) Printer maintenance kit (100 V type 1 fuser) Printer maintenance kit (110 V type 1 fuser) Printer maintenance kit (220 V type 1 fuser) Printer maintenance kit (100 V type 2 fuser) Printer maintenance kit (110 V type 2 fuser) Printer maintenance kit (220 V type 2 fuser) Part number 40X5852 40X1886 40X4308...
Similar Questions


Lexmark Ms711 Laser Printer Weight
what does the ms711 laser printer weigh without additional trays?
what does the ms711 laser printer weigh without additional trays?
(Posted by cathyrose2 10 years ago)
My Lexmark C534dn Color Laser Printer Has Red And Yellow Smudge Down Each Side
My Lexmark C534dn color laser printer has red and yellow smudge down each side of the page. On the l...
My Lexmark C534dn color laser printer has red and yellow smudge down each side of the page. On the l...
(Posted by amjohau 12 years ago)