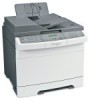
Lexmark X544 Support Question
Lexmark X544 Support Question
Find answers below for this question about Lexmark X544.Need a Lexmark X544 manual? We have 8 online manuals for this item!
Question posted by randyasouvi on December 15th, 2013
How To Remove X544 Fuser Photo'
The person who posted this question about this Lexmark product did not include a detailed explanation. Please use the "Request More Information" button to the right if more details would help you to answer this question.
Current Answers
Related Lexmark X544 Manual Pages
Wireless Setup Guide - Page 21

... with the wireless signal, including baby monitors, motors, cordless phones, security system cameras, other wireless networks, and some Bluetooth devices.
• The printer driver is installed on the Software and Documentation CD. Remove any large metal objects between the access point and the printer. Printing a network setup page
A network setup page lists...
User's Guide - Page 11

...Ethernet and telephone system connections) are accessing the system board or installing optional hardware or memory devices sometime after setting up the printer, then turn them off the optional drawer. If the ... unplug the power cord from the wall outlet before continuing. Remove the power cord from a hot component, allow the surface to the public switched telephone network. Safety information...
User's Guide - Page 71

... USB
Low-speed capabilities are not supported. Devices formatted with your camera.
2 Insert the other file system are ...the PictBridge connection is successful, then a confirmation message appears on the printer display. 3 Follow the instructions on the camera to select and print photos.
1 Insert one end of the printer. File type
Documents:
• .pdf • .pcx • .xps • .dcx...
User's Guide - Page 93

Use this adapter to connect an answering machine, telephone, or other telecommunications devices in the box. If you have a serial phone system or wish to connect a phone or answering machine to the adapter. Note: Do not remove the plug if you remove it, then other telecommunications equipment to the printer.
This plug is a plug...
User's Guide - Page 96

... for the proper functioning of the fax function and the proper operation of the printer. If you remove it, then other end of the telephone cable to the adapter, and then connect the adapter to... LINE port on the back of the
printer.
2 Connect the other telecommunications devices in your location.
Note: Do not remove the plug. It will fit the telephone jack used in the bottom EXT port of ...
User's Guide - Page 110

...scanned output file. 6 Enter a profile name.
Scanning to a computer or USB flash memory device
ADF
Scanner glass
Use the ADF for multiple-page documents. The computer does not have to... items (such as postcards or photos), transparencies, photo paper, or thin media (such as magazine clippings). Scanning to a computer or a USB flash memory device. Scanning to a computer or USB flash ...
User's Guide - Page 115
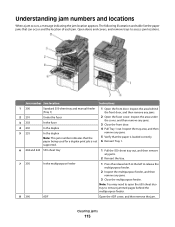
... behind the multipurpose feeder.
8 290
ADF
Open the ADF cover, and then remove the jam.
Note: You may need to open the 650-sheet duo tray to remove jammed pages behind
the front door, and then remove any jams.
2 Open the fuser cover.
Jam number Jam location
Instructions
1 200
2 201 3 202 4 230 5 235
Standard...
User's Guide - Page 118
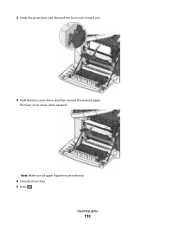
Note: Make sure all paper fragments are removed.
4 Close the front door. 5 Press . 2 Grasp the green lever, and then pull the fuser cover toward you.
3 Hold the fuser cover down, and then remove the jammed paper.
Clearing jams
118 The fuser cover closes when released.
User's Guide - Page 150

... visible on a scanned image Note: 0 is the factory default setting. Menu item JPEG Quality Text or Text/ Photo
5-90
Photo JPEG Quality 5-90
Use Multi-Page TIFF On Off
Scan bit Depth 8 bit 1 bit
Background Removal -4 to +4
Contrast 0-5 Best for content
Shadow Detail -4 to +4
Scan edge to edge On Off
Sharpness 1-5
Print Settings...
User's Guide - Page 172

... message and continue printing.
201.yy Paper jam
1 Clear the paper path. 2 Remove the jammed paper below the fuser. 3 Press to clear the message and continue printing.
202.yy Paper jam
1 Clear the paper path. 2 Remove the jammed paper from the fuser. 3 Press to clear the message and continue printing.
230.yy Paper jam...
User's Guide - Page 173

...Open the front door, and then remove the jammed paper. 3 Hold the fuser cover down, and then remove the jammed paper from the ADF. If all pages from inside the fuser. 4 Close the fuser cover, and then close the front....02 Flatbed Cover Open
Close the scanner cover.
Note: The message clears when the pages are removed from the ADF.
2 Flex and fan the pages. 3 Place the pages in the ADF.
24x ...
User's Guide - Page 177

... Program Toner Cartridge
Part number C540A1KG C540A1CG C540A1MG C540A1YG C540H1KG C540H1CG C540H1MG C540H1YG C540H2KG C540H2CG C540H2MG C540H2YG C544X1KG C544X1CG
C540, C543, and X543 series
C544, X544, and X546 series
Not supported Not supported
Maintaining the printer
177 Ordering toner cartridges
When 88 Cyan Cartridge Low, 88 Magenta Cartridge Low, 88 Yellow...
User's Guide - Page 178

... Cartridge Black Extra High Yield Toner Cartridge
Part number C544X1MG
C544X1YG
C544X2KG C544X2CG C544X2MG C544X2YG C546U1KG C546U2KG
C540, C543, and X543 series
Not supported
C544, X544, and X546 series
Not supported
Not supported Not supported Not supported Not supported Not supported Not supported
Ordering imaging kits
When Replace black and color...
User's Guide - Page 210

... corner. UNWANTED TONER IS IN THE BACKGROUND
• Adjust the darkness to a lighter setting. • Change the Background Removal setting in print
These are possible solutions.
THE TONER MAY BE LOW
When 88 Cartridge low appears or when the print becomes...characters • White lines in the Copy Settings menu. CHECK THE DOCUMENT PLACEMENT
Make sure the document or photo is satisfactory.
User's Guide - Page 234

..., except those expressly designated by mail:
Lexmark International, Inc. If you don't have access to the Internet, you . Notices
Product information
Product name: Lexmark X543, X544, X544n, X544dn, X544dw, X544dtn, X546dtn Machine type: 7525, 4989 Model(s): 131, 133, 138, 332, 333, 336, 337, 352, 356, 382, 383, 386, 387, 392, 393...
User's Guide - Page 245

... este este produto está conforme com os requisitos essenciais e outras disposições da Diretiva 1999/5/CE.
Statement of Limited Warranty
Lexmark X543, X544, X544n, X544dn, X544dw, X544dtn, X546dtn
Lexmark International, Inc., Lexington, KY
This limited warranty applies to the countryspecific warranty information that came with your use, and...
User's Guide - Page 256

... 167 Tray Low 167 Tray Missing 168 Unsupported Mode 168 Unsupported USB device, please
remove 168 Unsupported USB hub, please
remove 168 USB drive disabled 168 Use camera controls to print 168 Waiting 168... 65 from Windows 65 installing printer software 34 menu settings pages 34 network setup page 34 photos 71 print quality test pages 72 Printing error 166 Programming Code 166
Q
Quality menu 153 ...
User's Guide - Page 258

...218 option not working 217
troubleshooting, scan cannot scan from a computer 213 partial document or photo scans 213 scan was not successful 212 scanner unit does not close 209 scanning takes too...49
Universal Setup menu 131 unlinking trays 48 Unsupported Mode 168 Unsupported USB device, please remove 168 Unsupported USB hub, please remove 168 USB drive disabled 168 USB menu 135 USB port 32
Use ...
Maintenance Manual - Page 4

... Program Toner Cartridge
Part number C540A1KG C540A1CG C540A1MG C540A1YG C540H1KG C540H1CG C540H1MG C540H1YG C540H2KG C540H2CG C540H2MG C540H2YG C544X1KG C544X1CG
C540, C543, and X543 series C544, X544, and X546 series
Not supported Not supported
Maintaining the printer
4 Note: All life estimates for information about Lexmark authorized supplies dealers in the U.S., contact Lexmark...
Maintenance Manual - Page 5

... Program Toner Cartridge Black Extra High Yield Toner Cartridge
Part number C544X1MG
C544X1YG
C544X2KG C544X2CG C544X2MG C544X2YG C546U1KG C546U2KG
C540, C543, and X543 series C544, X544, and X546 series Not supported
Not supported
Not supported Not supported Not supported Not supported Not supported Not supported
Ordering imaging kits
When Replace black...
Similar Questions

How To Remove The Fuser
Unable to close the rear door as the fuser is lodged halfway out. How do I remove the fuser in order...
Unable to close the rear door as the fuser is lodged halfway out. How do I remove the fuser in order...
(Posted by richardchin3 10 years ago)


Pictures Of How To Remove X544 Fuser
(Posted by rickyparkersr 12 years ago)