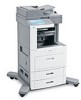
Lexmark X658DE Support Question
Lexmark X658DE Support Question
Find answers below for this question about Lexmark X658DE - Mfp Laser 55PPM P/s/c/f Duplex Adf.Need a Lexmark X658DE manual? We have 8 online manuals for this item!
Question posted by richardchin3 on October 11th, 2013
How To Remove The Fuser
Unable to close the rear door as the fuser is lodged halfway out. How do I remove the fuser in order to reset..??
Current Answers
Related Lexmark X658DE Manual Pages
Clearing Jams Guide - Page 2

... the location of the printer. 3 Push the release latch, and then open the rear door and remove the paper from there. 7 Align and reinstall the print cartridge. 8 Close the front cover. 9 Close the multipurpose feeder door. 10 Touch Continue.
2
2 Remove the jammed paper. 3 Close the top rear door. 4 Touch Continue.
230-239 paper jams
1 Touch Status/Supplies to identify the...
Clearing Jams Guide - Page 3

3 Pull down the bottom rear door.
4 Push the tab down.
5 Remove the jammed paper. 6 Close the bottom rear door. 7 Insert the standard tray. 8 Touch Continue.
240-249 paper jams
1 Touch Status/Supplies to identify the location of the jam. 2 Pull the standard tray out.
...
Help Menu Pages - Page 17

... contains all the items necessary to replace the ADF pick mechanism and the ADF separator roller. The charge roll, fuser, pick
rollers, and transfer roller can also be individually ordered and replaced as necessary.
• To check the fuser type (T1 or T2) installed in the printer, remove the print cartridge to replace the pick rollers...
User Manual - Page 13

...accessing the system board or installing optional hardware or memory devices sometime after setting up the printer, then turn the... components. CAUTION-POTENTIAL INJURY: This product uses a laser.
Safety information
13
Inspect the power cord regularly for ...cord to the manufacturer's instructions and local regulations.
Remove the power cord from the printer before inspecting it...
User Manual - Page 128

... contain text or fine line art. Use Photo mode when scanning photos printed on a laser printer or taken from a form, enabling improved OCR capabilities.
• Color Dropout Threshold...
Question
Tip
When should I use Photo mode?
Advanced Imaging
This option lets you adjust Background Removal, Contrast, Shadow Detail, Sharpness, and Color Dropout before you Scan edge to scan your file...
User Manual - Page 131

...characteristics, and design, see "Ordering supplies" on page 256.... .) strip on using the duplex unit, specially-designed, integrated,...• Make sure the Paper Type is not possible, remove a 1.6-mm (0.06-in .)
away from a 250...; Printing labels requires a special label fuser cleaner which is heavy, single-ply specialty...the special cartridge required for laser printers. Many of the adhesive...
User Manual - Page 141
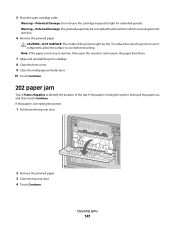
...: Do not leave the cartridge exposed to identify the location of the jam. If the paper is not exiting the printer:
1 Pull down the top rear door.
2 Remove the jammed paper. 3 Close the top rear door. 4 Touch Continue. Clearing jams
141
User Manual - Page 142
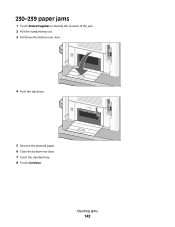
230-239 paper jams
1 Touch Status/Supplies to identify the location of the jam. 2 Pull the standard tray out. 3 Pull down the bottom rear door.
4 Push the tab down.
5 Remove the jammed paper. 6 Close the bottom rear door. 7 Insert the standard tray. 8 Touch Continue.
Clearing jams
142
User Manual - Page 235

...on the screen, only the word Dialing appears.
If the number is missing or not installed correctly. 3 Remove the tray. 4 Contact Customer Support. • Touch Continue to clear. Wait for the message to clear... printer messages
235 The hard disk must be sent. Disk Full -
Close door or insert cartridge
The cartridge is too long to clear. Note: Reformatting the disk deletes all...
User Manual - Page 241
... to restore all held jobs stored on , the message appears again. Replace wiper
Replace the fuser wiper, or try one or more of the following :
• Touch Cancel Job if ...scan job. The message clears. Understanding printer messages
241 Scanning resumes from all bins
Remove the paper from the
ADF immediately after the last successfully scanned page.
• Touch Finish job without further...
User Manual - Page 257

... V T1 fuser) 40X4724 (110 V T1 fuser) 40X4765 (220 V T1 fuser) 40X4766 (100 V T2 fuser) 40X4767 (110 V T2 fuser) 40X4768 (220 V T2 fuser)
Maintaining the printer
257 The charge roll,
fuser, pick rollers, and transfer roller can also be individually ordered and replaced as necessary.
• To check the fuser type (T1 or T2) installed in the printer, remove the print...
User Manual - Page 258

... fog or background shading appears on the front or back of printed pages, order a replacement transfer roller.
See the following table for the maintenance kit part number for your specific printer. Ordering a fuser
To check the fuser type (T1 or T2) installed in the printer, remove the print cartridge to view the label on the...
User Manual - Page 313

... FTP quality, improving 124 FTP screen advanced options 123 options 122, 123 FTP Settings menu 212 fuser ordering 258
G
guidelines card stock 131 envelopes 130 labels 131 letterhead 129 transparencies 130
H
hard disk ..., network changing port settings 56
Invalid PIN 237 IPv6 menu 170
J
jams avoiding 138 locating doors and trays 139 locations 139 numbers 139
jams, clearing 200 139 201 139 202 141 230...
IPDS Emulation User's Guide - Page 4

...45 3.8.2 Resources Captured ...46 3.8.3 Remove Resources...46
4
Duplex Printing Using Preprinted Media 47
5
...Finishing Support...48
5.1 Offset Stacking...50 5.1.1 AS/400 and iSeries Offset Stacking 50 5.1.2 Mainframe Offset Stacking...51 5.2 Stapling ...52 5.2.1 AS/400 and iSeries Stapling 52 5.2.1.1 Lexmark T650, T652, T654 and X658de MFP...
IPDS Emulation User's Guide - Page 5

...T652, T654, T656dne and X658de Optional Finisher 58 5.2.2.2 Lexmark W850, X860de, X862de and X864de Optional Standard Finisher 59 5.2.2.3 Lexmark X860de, X862de and X864de MFPs Optional Advanced Finisher Functions ........6.3 How to Cancel a Job Using the MFP Touch Screen 64
7
Working with Captured Resources 65
7.1 Capture Resource and Remove Resources 65 7.2 Preparing Fonts for Capture ...65...
IPDS Emulation User's Guide - Page 18

Settings are displayed on MFP products
** On MFPs the selectable codepages are combined in one list
*** Only displayed when a disk and user flash is installed
Note: Only those menu items that are supported by the product are displayed. ADJ
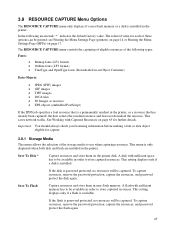
RESOURCE CAPTURE
Storage Media *** Resources Captured Remove Resources
*
Available only on the printer under the...
IPDS Emulation User's Guide - Page 45
... is a permanently resident in order to store captured resources. If the disk is password protected, no resources will be captured.
To capture resources, remove the password protection, capture the...Printing the Menu Settings Page (printers) on page 14 or Printing the Menu Settings Page (MFPs) on the printer disk. Important: You should always check your licensing information before making ...
IPDS Emulation User's Guide - Page 115

...or touch screen (MFPs) Coordinated Font Set ... 7 error messages 73 34 Incorrect Media 30, 32 Incorrect Media 30, 32 Remove Resources function 46 Exception Control (IPDS MENU > EMULATION 25 exception messages 0411 bar... settings
how to print from operator panel 14 how to print from touch screen 17 duplex printing using preprinted media 47 Dutch KIX Postal Bar Code 103
E
EAN (bar code...
Technical Reference - Page 73
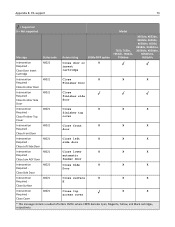
...MFP option
T650, T650n, T652dn, T654dn,
T656dne
X651de, X652de, X654de, X656de, X656dte, X658d, X658de, X658dme, X658dfe, X658dte,
X658dtme, X658dtfe
Intervention
40021
Close door or
X
Required -
H
Close Surface
Intervention Required - Close Finisher Side Door
40021
Close finisher side door
Intervention
40021
Close
X
X
X
Required -
automatic
Close Low ADF Door
feeder door...
Technical Reference - Page 74
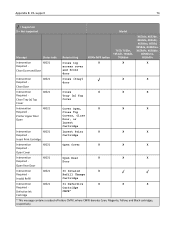
... string
6500e MFP option
T650, T650n, T652dn, T654dn,
T656dne
X651de, X652de, X654de, X656de, X656dte, X658d, X658de, X658dme, X658dfe, X658dte,
X658dtme, X658dtfe
Intervention
40021
Close top
X
X
X
Required -
Tray [x] Top
Close Tray [x] Top Cover
Cover
Intervention
40021
Cover Open,
X
X
X
Required -
Close Door
40021
Close [tray] door
X
X
Intervention
40021...
Similar Questions


How To Remove Fuser Lexmark X658de
(Posted by john6jef 10 years ago)

How Do I Remove Email Shortcuts From A Lexmark X658de
(Posted by scottguetzko 10 years ago)

What Fuser Goes In A Lexmark X658de Printer
(Posted by psinit 10 years ago)
