
LiftMaster 1355 Support Question
LiftMaster 1355 Support Question
Find answers below for this question about LiftMaster 1355.Need a LiftMaster 1355 manual? We have 1 online manual for this item!
Question posted by hjyockey on February 23rd, 2016
Keypad Programming, No Enter Key
I am trying to re-program the keypad which does not include an enter button, just the asterisk and pound symbols. Advice? Is this not the factory key pad?
Current Answers
Answer #1: Posted by jdfitchett on February 23rd, 2016 6:28 PM
jdfitchett

Member since:
December 13th, 2012 Points: 477,680

Member since:
December 13th, 2012 Points: 477,680
that is not the original keypad for that model, the orginal does have a enter button, i think that the pound sign might be the "enter" button, but i am not 100% sure about that. if that dont work, see if there is a brand printed on it and look it up on line.
Please let me know if was helpful
Related LiftMaster 1355 Manual Pages
1355 Manual - Page 1

The Chamberlain Group, Inc. 845 Larch Avenue Elmhurst, Illinois 60126-1196 www.liftmaster.com
®
GARAGE DOOR OPENER Model Series 1300
For Residential Use Only
Model 1356 - 1/2HP Model 1346 - 1/3HP
Model 1355 - 1/2HP Model 1345 - 1/3HP
Owner's Manual
■ Please read this manual and the enclosed safety materials carefully! ■ Fasten the manual near...
1355 Manual - Page 2

.... WARNING
When you see these Safety Symbols and Signal
Words on the following pages, they will alert you to the possibility of damage to
WARNING your garage door opener 33
Having a problem 34
Programming
35-36
To add or reprogram a hand-held remote control .....35
To erase all codes 35
3-Button remotes 35
To add, reprogram...
1355 Manual - Page 3

... to
WARNING garage door BEFORE installing and operating garage
door opener to
avoid malfunction and damage. Preparing your garage door
Before you begin: • Disable locks. • Remove any binding or sticking.
Lift the door about halfway as illustrated below. An unbalanced garage door may not reverse when required. • NEVER try to loosen, move or adjust garage door, door
springs...
1355 Manual - Page 6

... on the next page. Carton Inventory
Your garage door opener is packaged in
the foam. Parts may be stuck in two cartons which contain the motor unit and all parts illustrated below. If anything is complete. Model 1355 & 1345 ONLY
Lighted Door Control Button w/6ABx1-1/2" screws
SECURITY✚® Single-Button Remote Control (1)
Sprocket Cover
Remote Control...
1355 Manual - Page 8

... Slot
Mounting Plate
8 Use only these bolts! WARNING
CAUTION
To avoid SERIOUS damage to garage door opener, use ONLY those bolts/fasteners mounted in the slot on the trolley to obtain more ...Hole
Styrofoam
ASSEMBLY STEP 2
Attach the Chain to the Sprocket and Install the Sprocket Cover
MODELS 1355 AND 1345 ONLY
• Position chain over sprocket. Proceed to Assembly Step 5. If necessary,...
1355 Manual - Page 9

...(away from rail, chain and styrofoam.
Tighten securely. Use of any other bolts will cause serious damage to door opener.
WARNING
CAUTION
To avoid SERIOUS damage to garage door opener, use ONLY those bolts/fasteners mounted in top of motor unit.
• Align rail and styrofoam over sprocket...MODELS 1356 AND 1346 ONLY
• Remove the two washered bolts mounted in the top of the opener.
1355 Manual - Page 10

...; Line up the holes in the chain spreader with the hardware provided.
• Remove the trolley threaded shaft from
CAUTION moving garage door opener:
• ALWAYS keep hand clear of sprocket while operating opener.
• Securely attach sprocket cover BEFORE operating. Proceed to the trolley threaded shaft. WARNING
To avoid possible SERIOUS INJURY to...
1355 Manual - Page 11

... installation, test safety reversal system. Install garage door opener ONLY on wall next to secure the adjustment. Install wall-mounted garage door control: • within sight of the garage door. • out of reach of children at its midpoint, re-tighten
Chain
the inner nut to garage door control.
11.
NEVER connect garage door opener to power source until instructed to...
1355 Manual - Page 16

... be level with the top of the motor unit. WARNING
CAUTION
To prevent damage to garage door, rest garage door opener rail on 2x4 placed on the trolley release arm to disconnect inner and outer sections. Do not position the opener more than 2" (5 cm) above this point. Slide the outer trolley toward the motor unit. The...
1355 Manual - Page 17

Measure the distance from a falling
CAUTION garage door opener, fasten it SECURELY to make sure the rail is not centered above the door). 7. Yours may be used if installing any brackets into masonry. Grease the top and underside of the motor unit to a support with the header bracket ...
1355 Manual - Page 19
... panel. • Position lens against panel with an overhand knot.
Then the light will turn OFF. • Use standard neck Garage Door Opener bulbs for approximately 4-1/2 minutes when power is connected. Use ONLY incandescent.
The light will turn ON and remain lit for replacement
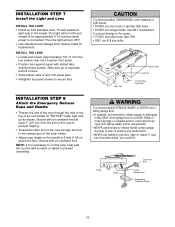
INSTALL THE LENS • ...
1355 Manual - Page 20

... be in compliance with a third grounding pin. To avoid installation difficulties, do not run the opener at this time. If the plug doesn't fit into a grounding type outlet. Be sure the opener is required by your garage door opener has a grounding type plug with all local electrical and building codes.
• NEVER use an extension...
1355 Manual - Page 21

... must be connected and aligned correctly before the garage door opener will detect an obstacle in masonry if repositioning is closing , the door will stop and reverse to mount the units on the left or right of the garage door (or door tracks, springs, hinges, rollers or other across the door, no more than 6" (15 cm) above floor...
1355 Manual - Page 30

... STEP 4
Test the Protector System®
• Press the remote control push button to open , place a 1-1/2" (3.8 cm)
board (or a 2x4 laid flat) on the floor, centered under the garage door. • Operate the door in the down direction. If the opener closes the door when the safety reversing sensor is not
traveling far enough in the down...
1355 Manual - Page 31

... 3). ALWAYS disconnect electric power to garage door opener BEFORE making any remote, follow the instructions in a partially open position, it must be tested.
11. Using Your Garage Door Opener
Your Security✚® opener and hand-held remote control have been factory-set to move . • The wall-mounted Door Control: Hold the push
button or bar down travel is broken...
1355 Manual - Page 33

...; Repeated operation may cause
some minor changes in your model has the Lock feature, make sure it is off.
• Program the opener to match the remote control code. (Refer to a metal door, foil backed insulation, or metal garage siding.
5. Opener noise is required.
Adjust if necessary (see page 11). Tested to Comply with all...
1355 Manual - Page 34

... entirely by itself:
• Be sure that all remote controls.
7. The garage door opens and closes by its springs. Close the door and use on the wire between the door control and the motor unit.
• Clear memory and re-program all remote control push buttons are needed to droop slightly in good working order but won...
1355 Manual - Page 35

...2.
Below are now erased. Release the button when the motor unit lights blink. Your garage door opener has already been programmed at the factory to operate with your opener to operate with a non-rolling code transmitter, the technical measure in the garage door opener does not authorize the purchaser or supplier of the garage door opener, which provides security against code-theft devices...
1355 Manual - Page 36

... present PIN, then press and hold the ENTER button. The door should move .
1. It has learned the code.
The keypad will be programmed to 255), then press #. Release the # button.
2. Press the new 4-digit PIN you have chosen, then press Enter.
Within 30 seconds, enter a four digit personal identification number (PIN) of openings, remember that the test has used...
1355 Manual - Page 39

... which prevents operation of your garage door is open fully.
370LM
3-Button Mini-Remote Control with up to 4 garage OPEN doors by disengaging trolley.
8 Foot (2.4 m) Complete Rail: To allow an 8 foot (2.4 m) door to open fully.
371LM 373LM
1-Button Security✚® Remote Control: Includes visor clip.
3-Button Security✚® Remote Control: Includes visor clip.
1710LM
10...
Similar Questions

I Have Installed A Chamberlan Garage Door Opener And The Remote I Was Using Is
I have been using a Chamberlan garage door opener and its remote has been defective since of late.Pl...
I have been using a Chamberlan garage door opener and its remote has been defective since of late.Pl...
(Posted by donweera42 9 months ago)

I Need A Replacement Lens Cover For Garage Door Opener Liftmaster Model #1355- 1
I need a replacement Lens Cover for a garage door opener Model # 1355M- 1/2 HP Liftmaste
I need a replacement Lens Cover for a garage door opener Model # 1355M- 1/2 HP Liftmaste
(Posted by nskanson 1 year ago)
Garage Door Opens After Shutting.
My Lift master 8550 inside keypad is Inside wall pad is model #880LM. outside keypad Model # is 877M...
My Lift master 8550 inside keypad is Inside wall pad is model #880LM. outside keypad Model # is 877M...
(Posted by BONNIECA92 2 years ago)

Garage Door Remote Doesn't Work When Motor Light Is On
(Posted by conbdgo 10 years ago)

Garage Door Opener Light
We just purchased our house and the light was out in the door opener. When we replaced the bulb the ...
We just purchased our house and the light was out in the door opener. When we replaced the bulb the ...
(Posted by smokiesgirl 12 years ago)