
LiftMaster 3265 Support Question
LiftMaster 3265 Support Question
Find answers below for this question about LiftMaster 3265.Need a LiftMaster 3265 manual? We have 1 online manual for this item!
Question posted by keanc on June 29th, 2014
Changing Battery On Keypad
how do you change the battery on the keypad remote
Current Answers
Answer #1: Posted by stephy0 on June 30th, 2014 1:49 AM
stephy0

Member since:
June 14th, 2014 Points: 130,400

Member since:
June 14th, 2014 Points: 130,400
This user manual page will tell you how to change the remote battery.
If my answer has helped you, please select the acceptable solution and/or the helpful button.
Did my answer help you? Let me know by selecting either the "Acceptable Solution" or the "Helpful" buttons.
Related LiftMaster 3265 Manual Pages
3265M Manual - Page 1
...
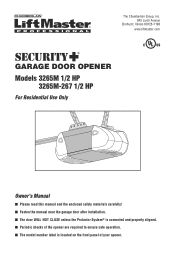
Elmhurst, Illinois 60126-1196 www.liftmaster.com
®
GARAGE DOOR OPENER Models 3265M 1/2 HP
3265M-267 1/2 HP
For Residential Use Only
Owner's Manual
■ Please read this manual and the enclosed safety materials carefully! ■ Fasten the manual near the garage door after installation. ■ The door WILL NOT CLOSE unless the Protector System® is...
3265M Manual - Page 2

..., they will alert you to the possibility of damage to your garage door opener 28 Having a problem 29 Diagnostic chart 30
Programming
31-32
To add or reprogram a hand-held remote control 31 To erase all codes 31 3-Button remotes 31 To add, reprogram or change a Keyless Entry PIN . . . . . 32
Repair Parts
33-34
Rail assembly...
3265M Manual - Page 3
... SERIOUS INJURY or DEATH:
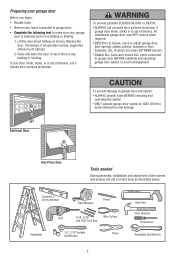
• ALWAYS call a trained door systems technician. Raise and lower the door to see if there is not sticking or binding:
1. Sectional Door
To prevent damage to garage door and opener:
• ALWAYS disable locks BEFORE installing and operating the opener.
• ONLY operate garage door opener at 120V, 60 Hz to avoid entanglement. One-Piece...
3265M Manual - Page 5
.... LOCK LIGHT
Multi-Function Door Control Panel
SECURITY✚® Keyless Entry Model 3265M-267 Only
SECURITY✚® 3-Button Remote Control Model 3265M (1) Model... Door Arm Section
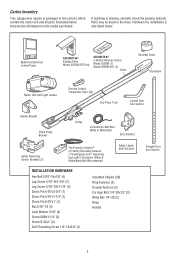
5 Parts may be stuck in two cartons which contain the motor unit and all parts illustrated below . Accessories will depend on the model purchased.
Carton Inventory
Your garage door opener ...
3265M Manual - Page 6

....
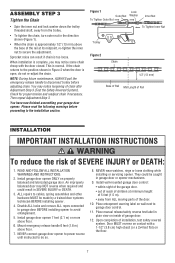
• Insert the second washered bolt. ASSEMBLY STEP 1
Attach the Rail to the Motor Unit
To avoid installation difficulties, do not run the garage door opener until instructed to do so. • Remove the two washered bolts mounted in top of
motor unit. • Position rail at a 45˚ angle to...
3265M Manual - Page 7
... NOT reverse when required and could be made by a trained door systems technician BEFORE installing opener.
4. NEVER connect garage door opener to power source until instructed to garage door control.
11. Install wall-mounted garage door control:
• within sight of the garage door.
• out of reach of children at its midpoint, re-tighten the inner nut to cables, spring...
3265M Manual - Page 10

...
Ring Fastener
Clevis Pin
5/16"x2-3/4"
Rail
Chain Pulley
Bracket
Rail
Garage Door
Clevis Pin 5/16"x2-3/4"
Temporary Support
INSTALLATION STEP 4
Position the Opener
Follow instructions which apply to secure.
NOTE: If the door spring is convenient for setting an ideal door-to garage door, rest garage door opener rail on 2x4 placed on the trolley release arm to -rail...
3265M Manual - Page 11
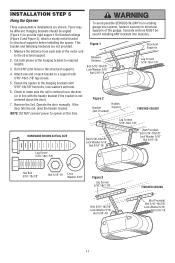
Measure the distance from a falling garage door opener, fasten it securely to the structural support.
2. Operate the door manually.
On finished ceilings (Figure 2 and Figure 3), attach a sturdy metal bracket to the hanging brackets with the header bracket if the bracket is centered over the door (or in the structural supports.
4. Drill 3/16" pilot holes in...
3265M Manual - Page 13

... the lens hinge is necessary to cut the rope, heat seal the cut end with a match or lighter to vibration, replace with a Garage Door Opener bulb.
• Use A19, standard neck garage door opener bulbs for approximately 4-1/2 minutes when power is 6 feet (1.83 m) above the floor. Then the lights will turn OFF.
• Reverse the...
3265M Manual - Page 14

...
To avoid installation difficulties, do not run the opener at this time.
14 Be sure the opener is required by your garage door opener has a grounding type plug with ALL local electrical and building codes.
• NEVER use an extension cord, 2-wire adapter, or change plug in
Green
the top of electric shock, your...
3265M Manual - Page 15

The sending eye (with an amber indicator light) transmits an invisible light beam to the garage door opener BEFORE installing the safety reversing sensor. Either can be installed on the wall, the brackets ... System®
The safety reversing sensor must be connected and aligned correctly before the garage door opener will detect an obstacle in masonry if repositioning is necessary.
3265M Manual - Page 17

...:
• Run the bell wire from each other across the door.
Use wing nuts to fasten sensors to the garage door opener. Choose two of the pre-installed wires and strip 7/16 inch... both sensors to brackets, with lenses pointing toward each end. Pre-Wired Installation:
If your garage already has wires installed for each sensor. MOUNTING AND WIRING THE SAFETY REVERSING SENSORS
Mounting:
&#...
3265M Manual - Page 18

... the sending eye indicator light glows steadily but the receiving eye indicator light doesn't:
• Check alignment.
• Check for :
• Electric power to garage door opener:
• Strip 7/16" (11 mm) of insulation from each set of alignment or obstruction. Insert wires into quick-connect holes: white to white and white/...
3265M Manual - Page 25

...opener through 3 or 4 complete travel limits) is misaligned or obstructed). The garage door opener will flash. Safety Reversing Sensor 25
Safety Reversing Sensor NOTE: On a sectional door, make sure limit adjustments do not force the door...8226; Press the remote control push button to open the door.
• Place the opener carton in the path of the opener. The door must reverse on the...
3265M Manual - Page 26

... the garage door opener properly may be turned
2. The opener lights will open or
INSTRUCTIONS.
off as follows: With the opener lights off again. If the door has been stopped in ; Failure to deactivate any of the following conditions: when the opener is clear of SEVERE INJURY or DEATH:
1. ALWAYS keep remote controls out of reach of which changes with...
3265M Manual - Page 28
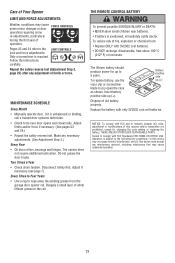
... for changing the code setting or replacing the battery.
Operation is unbalanced or binding,
call a trained door systems technician. • Check to the following two conditions: (1) this device may not cause harmful interference, and (2) this receiver and/or transmitter are prohibited, except for up to wipe away the existing grease from the garage door opener rail...
3265M Manual - Page 29

... the UP Travel adjustment screw 2 full turns away from the opener by pulling the Emergency Release Rope.
• Manually bring the door to Diagnostic Chart on when the safety sensor beam has been obstructed. My remotes will not turn off when door is open:
• The garage door opener is against the stop . My motor unit hums brie...
3265M Manual - Page 30

... or Diagnostic LED
"Learn" Button
Installed Safety Reversing
Sensor
Your garage door opener is not lit on door control.
• Inspect door control/wires for a short (staple in wire), correct wiring ...; If it has found a potential issue. Diagnostic Chart 1 FLASH
Safety reversing sensors wire open (broken or disconnected). The "Learn" button/diagnostic LED will not operate replace logic board...
3265M Manual - Page 31

... when the motor unit lights blink. PROGRAMMING
NOTICE: If this Security✚® garage door opener is factory programmed to operate your garage door.
2. Below are instructions for 30 seconds.
1. Continue holding the remote button, press and hold the button on the hand-held remote* that technical measure. Press and hold the "learn" button on the motor...
3265M Manual - Page 32

... deactivated.
32 LOCK
LIGHT
3. Release the button when the motor unit lights blink. To change an existing, known PIN
3. Release the # button. 2. Test by pressing the four ...ladder. 1. The keypad will be heard. Enter a four digit personal identification number (PIN) of openings, remember that the test has used to a certain number of your garage door opener. Continue holding ...
Similar Questions

I Have Installed A Chamberlan Garage Door Opener And The Remote I Was Using Is
I have been using a Chamberlan garage door opener and its remote has been defective since of late.Pl...
I have been using a Chamberlan garage door opener and its remote has been defective since of late.Pl...
(Posted by donweera42 9 months ago)
Garage Door Opens After Shutting.
My Lift master 8550 inside keypad is Inside wall pad is model #880LM. outside keypad Model # is 877M...
My Lift master 8550 inside keypad is Inside wall pad is model #880LM. outside keypad Model # is 877M...
(Posted by BONNIECA92 2 years ago)

How To Change Battery On Liftmaster Elite Series Garage Door Opener
(Posted by Parissil 10 years ago)

Noise From Garage Door Opener
I have a liftmaster garage door opener. It makes a loud screeching noise when the door is lowered....
I have a liftmaster garage door opener. It makes a loud screeching noise when the door is lowered....
(Posted by tom19097 11 years ago)

Chamberlin Liftmaster Garage Door Opener Model # 3265-267
Where do I put the trolley before I attach the chain to the sprocket?
Where do I put the trolley before I attach the chain to the sprocket?
(Posted by garretmegan 11 years ago)