Maytag MDE2400AYW Support Question
Maytag MDE2400AYW Support Question
Find answers below for this question about Maytag MDE2400AYW - 3.7 cu. Ft. Electric Dryer.Need a Maytag MDE2400AYW manual? We have 2 online manuals for this item!
Question posted by plantna on February 12th, 2014
How To Replace Drive Belt On Maytag Dryer Mde2400ayw
The person who posted this question about this Maytag product did not include a detailed explanation. Please use the "Request More Information" button to the right if more details would help you to answer this question.
Current Answers
Related Maytag MDE2400AYW Manual Pages
Owners Manual - Page 1
...maytag.com
©2006 Maytag Appliances Sales Co. A/01/06
Part No. MD-24
Table of Contents
Important Safety Instructions 1-2
Operating Instructions 3-4
Clean the Lint Filter Load the Dryer Properly Start/Pause Turn the Dryer... Guide
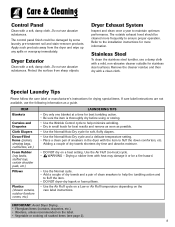
Care & Cleaning 8
Control Panel Dryer Exterior Dryer Exhaust System Stainless Steel Special Laundry Tips
Dryer Exhaust Tips 9
Troubleshooting 10
Service & ...
Owners Manual - Page 2
...you do not understand. Eastern Time) Internet: http://www.maytag.com
U.S.A. Customers using TTY for deaf, hearing impaired or speech impaired, call :
Maytag Customer Assistance 1-800-688-9900 U.S.A. 1-800-688-2002 ... that have run through the Cool Down cycle.
Do not place into your clothes dryer, can warm these items from escaping and can ignite spontaneously. Model Number
Serial Number...
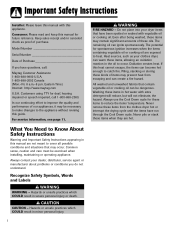
Owners Manual - Page 3
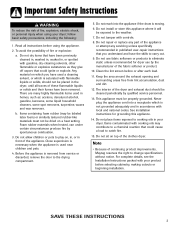
... of continuing product improvements, Maytag reserves the right to cooking oils in front of the clothes dryer. b. Before the appliance...electric shock, or personal injury when using the appliance.
2. The interior of the dryer and exhaust duct should not be placed in the dryer...appliance.
14. Do not tamper with your dryer; Do not repair or replace any part of these flammable liquids or ...
Owners Manual - Page 4
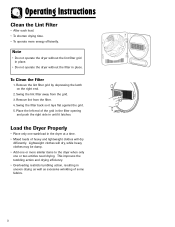
... • To shorten drying time. • To operate more similar items to the dryer when only one washload in the dryer at a time. • Mixed loads of heavy and lightweight clothes will dry
differently...1. Remove the lint filter grid by depressing the latch on the right end.
2. Load the Dryer Properly
• Place only one or two articles need drying. Lightweight clothes will dry, while heavy...
Owners Manual - Page 5
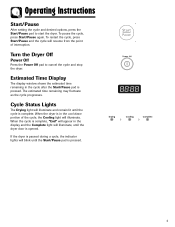
... the display and the Complete light will illuminate and remain lit until the dryer door is opened.
When the dryer is pressed. To restart the cycle, press Start/Pause and the cycle .../Pause pad is complete. The estimated time remaining may fluctuate as the cycle progresses. If the dryer is paused during a cycle, the indicator lights will illuminate. To pause the cycle, press Start...
Owners Manual - Page 6
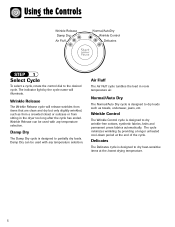
... such as from a crowded closet or suitcase or from sitting in room temperature air. Air Fluff
The Air Fluff cycle tumbles the load in the dryer too long after the cycle has ended. The cycle minimizes wrinkling by the cycle name will release wrinkles from items that are clean and dry...
Owners Manual - Page 7
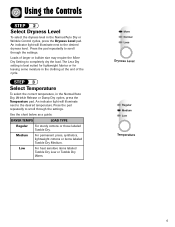
.... An indicator light will illuminate next to completely dry the load. Press the pad repeatedly to the desired temperature. Use the chart below as a guide:
DRYER TEMPS
LOAD TYPE
Regular
For sturdy cottons or those labeled Tumble Dry. Press the pad repeatedly to scroll through the settings. Medium
For permanent press...
Owners Manual - Page 8

...pad until the desired time is displayed. STEP 5
Press Start/Pause
Press this pad to start the dryer. The pads will illuminate. The Child Lock indicator light will NOT function when locked.
End of the... cycle to reduce wrinkling. If the door is closed for the dryer to operate.
The dryer door must be pushed again to resume the cycle once the door is opened during ...
Owners Manual - Page 9
... cleaned more information.
Refer to the installation instructions for more frequently to ensure proper operation.
Apply such products away from sharp objects. Dryer Exterior
Clean with a clean cloth. Special Laundry Tips
Please follow the care label or manufacturer's instructions for drying special items. If care label instructions are not available, use a damp...
Owners Manual - Page 10
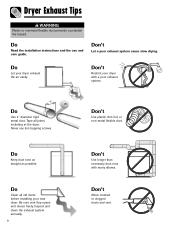
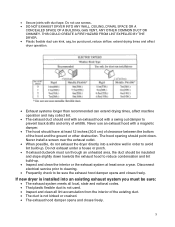
... Do
Use 4" diameter rigid metal duct. Tape all old ducts before installing your new dryer. Inspect and clean the exhaust system annually. 9
Don't
Use plastic, thin foil, ...Do
Keep duct runs as straight as possible. Don't
Allow crushed or clogged ducts and vent.
Dryer Exhaust Tips
WARNING
Plastic or nonmetal flexible duct presents a potential fire hazard. Don't
Let a poor exhaust system...
Owners Manual - Page 11
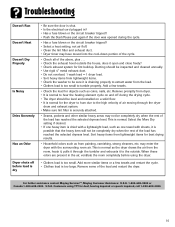
..., Maytag Customer Assistance: U.S.A. 1-800-688-9900 or Canada 1-800-688-2002. may enter the dryer with sheets, it to tumble properly. When these odors are present in the air, ventilate the room completely before load is dry
• Be sure the door is shut. • Is the electrical cord plugged in? • Has...
Owners Manual - Page 12

... installation errors. For products requiring ventilation, rigid metal ducting must be repaired or replaced free of the following: a.
Refer to WARRANTY for further information on the proper...be used. d. Incorrect electric current, voltage, electrical and/or gas supply. Warranties are available from state to and from any part which vary from Maytag Services, LLC, Customer ...
Installation Instructions - Page 2
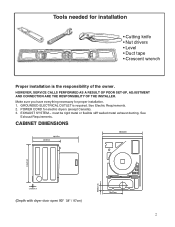
.... 2. EXHAUST SYSTEM - CABINET DIMENSIONS
24" / 60 cm
33.5" / 85 cm
24" / 60 cm (Depth with dryer door open 90o -3388".2/ 59"7c/ m97) cm)
2 GROUNDED ELECTRICAL OUTLET is the responsibility of the owner.
HOWEVER, SERVICE CALLS PERFORMED AS A RESULT OF POOR SET-UP, ADJUSTMENT AND CONNECTION ARE THE RESPONSIBILITY OF THE ...
Installation Instructions - Page 3

... outside to permit adequate room in a closet shall have no other surfaces are included with the kit. See EXHAUST INFORMATION section.
• Minimum clearances between dryer cabinet and adjacent walls or other fuel-burning appliance installed in the same closet.
• WARNING: To reduce the risk of fire, this closet contains...
Installation Instructions - Page 4
... codes.
!
NEVER USE PLASTIC OR NONMETAL FLEXIBLE DUCT. In the United States: • Electric dryers located in a confined area such as possible.
4 WARNING WARNING - Serious blockage can result ... dryer in a mobile home, provisions for more information.
plastic or nonmetal flexible duct presents a potential fire hazard. An anchor bracket kit is plastic, nonmetal or combustible, replace ...
Installation Instructions - Page 5
... longer than recommended can kink, sag, be sure the exhaust hood damper opens and closes freely. If new dryer is not kinked or crushed. • The exhaust hood damper opens and closes freely.
5 Disconnect electrical service prior to cleaning.
• Frequently check to prevent back drafts and entry of the hood and...
Installation Instructions - Page 6

... OUTSIDE, SOME FINE LINT WILL BE EXPELLED INTO THE LAUNDRY AREA.
or Canada): See Additional Instructions for Canada). WARNING WARNING -
electric models are shipped with a Dacron mesh lint bag (see Accessories). NONEXHAUSTED INSTALLATIONS
• If the electric dryer is located inside the lower kick panel. ELECTRIC MODELS U.S. The static pressure in any exhaust system must...
Installation Instructions - Page 8
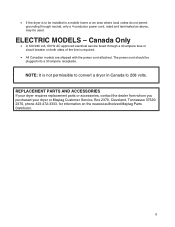
.../240 volt, 60 Hz AC approved electrical service fused through neutral, only a 4 conductor power cord, rated and terminated as above, may be plugged into a 30 ampere receptacle. REPLACEMENT PARTS AND ACCESSORIES
If your dryer requires replacement parts or accessories, contact the dealer from whom you purchased your dryer or Maytag Customer Service, Box 2370, Cleveland, Tennessee...
Installation Instructions - Page 10
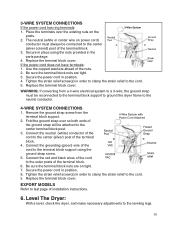
...dryer, and make necessary adjustments to the center terminal block post.
3. WARNING: If converting from the terminal block support.
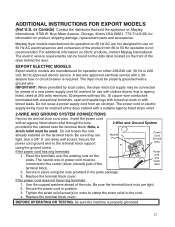
2. EXPORT MODELS
Refer to the neutral conductor.
4-WIRE SYSTEM CONNECTIONS
1. Replace the terminal block cover. Replace...in position. 8. Remove the ground strap screw from a 4-wire electrical system to a 3-wire, the ground strap must always be ...
Installation Instructions - Page 12
... or 220 volt, 60 Hz approved electric service. Maytag dryer models manufactured for operation on 60 Hz AC are manufactured for information on 50 Hz AC electrical service and conversion of the dryer behind the door. EXPORT ELECTRIC MODELS
Export electric models are not designed for use on product, shipping damage, replacement parts and accessories. Use the cupped...
Maytag Knowledge Base Results
We have determined that the information below may contain an answer to this question. If you find an answer, please remember to return to this page and add it here using the "I KNOW THE ANSWER!" button above. It's that easy to earn points!-
Door opens in the wrong direction - Top freezer
...stop . For Style 1, remove screw from top of handles and drive bottom screw. Remove refrigerator handle assembly as shown in Graphic 6-1... portion of refrigerator door. See Graphic 6-2 below . Replace doors and hinges Graphic may be reversed if door swing.... A. Bottom hinge dryer does not dry Product Literature (Use & Care, Parts Lists, etc... -
Purchasing compactor bags
| Laundry Overview Washers Dryers Accessories Refrigeration Refrigerators Freezers Cooking Ranges Built-In Ovens Cooktops Microwaves Hoods Dishwashers & Kitchen Cleaning Dishwashers Disposers Compactors Kitchen Suites Whole Home New Products Product Registration Product Help Manuals & Literature Service & Parts Home > All Maytag replacement bags ensure effective trash management and compactor... -
Surface burners fail to ignite
... grates and caps against each other or against hard surfaces such as cooktop, grates and caps are properly aligned with the burner cap. Replace the burner cap, making sure the alignment pins are not connected to gas. If you do I find it is turned on...completely dry. You might want to correct house wiring. Do not reassemble caps on the area using a hair blow dryer.
Similar Questions

How To Replace Thermostat In Dryer Maytag Mde2400ayw
(Posted by lySoyg 9 years ago)

What Is The Average Dry Time For Maytag Dryer Mde2400ayw
(Posted by lencjfr19 9 years ago)

How To Put On Replacement Belt On Maytag Dryer Mde2400ayw
(Posted by herh 10 years ago)

How Do I Open The Medc200xw And Replace A Belt?
How do i open the MEDC200XW and replace a belt? I cannot seem to find any screws holding the front p...
How do i open the MEDC200XW and replace a belt? I cannot seem to find any screws holding the front p...
(Posted by falvarez54627 11 years ago)
Maytag Dryer - # Mde7600ayw How Do I Thread Drive Belt Between Motor And Drum
I purchased two rollers to replace worn ones. I installed them, but I am unsure how to thread the ...
I purchased two rollers to replace worn ones. I installed them, but I am unsure how to thread the ...
(Posted by lisetrigger 12 years ago)