Maytag MED7500YW Support Question
Maytag MED7500YW Support Question
Find answers below for this question about Maytag MED7500YW.Need a Maytag MED7500YW manual? We have 3 online manuals for this item!
Question posted by Yevkrin2 on December 29th, 2020
Door Latch Does Not Close.
The door latch does not catch when I try to close the door
Current Answers
Answer #1: Posted by waelsaidani1 on December 30th, 2020 5:09 AM
waelsaidani1

Member since:
May 12th, 2013 Points: 19,501,777

Member since:
May 12th, 2013 Points: 19,501,777
Check both racks for items that may be stuck and protruding. Remove any item that is protruding outside the rack. Check for large food particles around the door seal. Large items could cause the door to not shut or seal properly.
Check the door spring tension prior to installing the dishwasher.
Make sure the dishwasher is level. The dishwasher must be supported by the leveling legs and rear wheels and must be flat on the floor.
Related Maytag MED7500YW Manual Pages
Use & Care Guide - Page 2

...DRYER
TABLE OF CONTENTS
DRYER SAFETY 2 OPERATING INSTRUCTIONS 4
CONTROL PANEL AND FEATURES 4 CYCLE GUIDE 5 USING YOUR DRYER 6 DRYER CARE 7 INSTALLATION INSTRUCTIONS 9 INSTALLATION REQUIREMENTS 9 LOCATION REQUIREMENTS 10 ELECTRICAL REQUIREMENTS 12 ELECTRIC INSTALLATION 13 VENTING 18 CONNECT VENT 20 LEVEL DRYER 21 TROUBLESHOOTING 22 WARRANTY 27 ASSISTANCE OR SERVICE Back Cover
DRYER...
Use & Care Guide - Page 4

...are drying permanent press, synthetics, and other items that should be turned off .
END OF CYCLE SIGNAL
The dryer sounds a signal to indicate the cycle has started.
2 TEMPERATURE BUTTON The Temperature Control button lets you know... This light flashes when the power is on your laundry load.
If the Temperature Control button is not pressed in , the temperature setting is for your...
Use & Care Guide - Page 5

... load, and dryness setting. Sensor dry cycles give the best drying results in the clothes, the dryer will continue to run. n If a load is drier than you dry a similar load. As... using the GentleBreeze™ Drying System with IntelliDry® Sensor, two metal strips located on the dryer determine the dryness of the cycle. After drying a load, check the dryness. n Lightweight items,...
Use & Care Guide - Page 6

... POWER button to wet load, if desired. Add a static reducing sheet to turn on the dryer. Place laundry in the dryer. Close the door. Tightly packing the load can lead to indicate that the power is hard to remove lint. Close lint screen. The indicator light will flash to poor drying performance and may increase wrinkling...
Use & Care Guide - Page 7

... (if desired). 3. Rinse well with a soft cloth. 2. Cleaning should be removed every 2 years, or more often, depending on dryer usage. Select the desired cycle for more often, depending on the control panel.
Close the door. 2. After the beep sounds, press the START button. Turn the cycle knob to begin the cycle. CLEANING THE...
Use & Care Guide - Page 8

... Do not rinse or wash screen to locate, level, and connect the dryer.
4. Close lint screen. Doing so can cause overheating and damage to stop before each... clogged due to secure dryer door. See "Cleaning the Lint Screen." As needed cleaning Laundry detergent and fabric softener residue can cause longer drying times for an extended period of the dryer. Use masking tape to...
Use & Care Guide - Page 9

... using a power supply cord: Use a UL listed power supply cord kit marked for this dryer. Parts supplied:
Parts package is located in ring terminals or spade terminals with MHWC. Read ... (direct wire installations)
Tin snips (new vent installations)
Parts needed: (Not supplied with clothes dryers. The wires that connect to 1" (25 mm) or hex-head socket wrench
Level
Caulking gun...
Use & Care Guide - Page 10

... clearances for ease of 115 lbs. (52 kg).
Installation Clearances
For each arrangement, consider allowing more space for walls, doors, and floor moldings. Some codes limit, or do not permit, installation of dryer. n The dryer must be exposed to fully open. Contact your local building inspector. Side view:
39" (991 mm)
231/4" (603...
Use & Care Guide - Page 11

... twice as large as a nearby window) should be considered on all sides of the
dryer to reduce noise transfer. n Companion appliance spacing should be considered for wall, door, floor
moldings, and dryer venting. n Additional clearances might be considered. Louvered doors with a door, minimum ventilation
openings in the top and bottom of
installation and servicing. n Special...
Use & Care Guide - Page 12

...three 10-gauge copper wires and match a 3-wire receptacle of the line.
If your dryer, you must end in conformance with ring or spade terminals and UL listed strain relief....:
n Flexible armored cable or nonmetallic sheathed copper cable (with ground wire), covered with clothes dryers.
latest edition and all mobile home installations. If your responsibility:
n To contact a qualified ...
Use & Care Guide - Page 14

... wire
B D A E
Connect ground wire (E) (green or bare) of power supply cord to strain relief
4-Wire Power Supply Cord Connection
IMPORTANT: A 4-wire connection is inside the dryer cabinet, behind the external ground conductor screw (A).
2. Unscrew the strain relief nut (B) from the terminal block cover. A
B
C Unscrew the strain relief (A) from the strain relief...
Use & Care Guide - Page 15

... Requirements." Remove center terminal block screw (B).
2. Tighten strain relief nut. Replace the terminal block cover on the back of dryer rear panel.
D
3-wire receptacle (NEMA type 10-30R)
3-prong plug
Spade terminals with upturned ends
Ring terminals
Connect neutral...15
Tighten strain relief nut. Finally, reinsert tab of terminal block cover into slot of the dryer.
Use & Care Guide - Page 16

... needed. If your wiring looks like this page. Squeeze hooked end together. Remove neutral ground wire
F
Place hooked ends of the dryer.
B
A
Remove the neutral ground wire (white) (F) located inside the dryer cabinet, behind the external ground conductor screw (A).
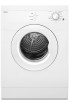
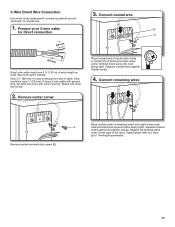
16 Direct Wire Connection
If your wiring looks like this: 3-wire direct connection...
Use & Care Guide - Page 17
...Requirements."
17 Strip 31/2" (89 mm) of outer covering from end of extra length so dryer may be moved if needed. Place hooked ends of remaining direct wire cable wires under center ....
2. Remove center screw
Place hooked end of neutral wire (white or center) (D) of the dryer. Connect remaining wires
Remove center terminal block screw (B). Strip insulation back 1" (25 mm). Squeeze ...
Use & Care Guide - Page 18

... exhaust vent
n Only a 4" (102 mm) heavy metal exhaust vent and clamps may result in final dryer location.
VENTING Venting Requirements
Exhaust hoods: n An exhaust hood should not exceed 73/4 ft. (2.4 m)...., bushes, or snow). Recommended Styles:
WARNING: To reduce the risk of duct and catch lint. n Do not install in the "Vent System Chart." Only rigid or flexible... a magnetic latch.
Use & Care Guide - Page 19

... must be securely fastened to avoid kinking. Dryer B. Wall D.
n When using elbows or making turns, allow as much room
as....3 m)
2
Rigid metal 70 ft. (21.3 m) 60 ft. (18.3 m)
19 Select the type best for close clearance alternate installation is shown below. Plan Vent System
Choose your installation. Exhaust outlet
Alternate installations for your exhaust installation type...
Use & Care Guide - Page 21

... breaker
has not tripped. • Dryer door is plugged into a grounded
outlet. q Set the dryer on console and any dust. If dryer is an extra part, go away.
See "Level Dryer". This odor is common when heating element..." position. • Start button has been pushed firmly. • Dryer is closed. q Check that you have all of /recycle all parts are snug against the floor and...
Use & Care Guide - Page 22

...See "Level Dryer." Incorrect power supply. Electric dryers require 240-volt power supply.
Dryer will not run
Door not closed completely.
Replace the fuses or reset the circuit breaker. Electric dryers require 240-... A small object caught between the edges of the drum for the dryer. TROUBLESHOOTING
First try the solutions suggested here or visit our website at www.maytag.com/help for ...
Use & Care Guide - Page 23

... with lint, restricting air movement.
Lint on Sensor Cycles. TROUBLESHOOTING
First try the solutions suggested here or visit our website at the top and bottom of the door. Separate the load to dry quickly. The dryer is clogged with lint.
See "Level Dryer." Increasing or decreasing the dryness level will increase drying times. If...
Dimension Guide - Page 1

... and servicing. Stacked with equivalent ventilation openings are required. n Additional clearances might be considered on all sides of the door are acceptable.
n Additional spacing should be required for wall, door, floor moldings, and dryer venting.
W10445417B 02/2012 See "Venting Requirements."
18"9m" in ((425279 mmmm))
3" (76 mm)
48 in.2 (310 cm2)
Custom...
Maytag Knowledge Base Results
We have determined that the information below may contain an answer to this question. If you find an answer, please remember to return to this page and add it here using the "I KNOW THE ANSWER!" button above. It's that easy to earn points!-
My dishwasher will not start
...(button with a dual-digit display, the control displays "- -" during a cycle if the door is not latched. Check for three seconds and the light should click when you to open or unlatched...The serial label is located on top of the tub just in . Make sure the door is completely closed and latched. On models with lock icon) for obstructions (spoons or utensils), that may need ... -
Dispenser won't dispense ice. French Door with Ice bin in door.
...for Water Supply Hookup Check that the ice bin is fully closed and latched. Ice Chute Ice dispenser not working No or low ice production - French door refrigerator Turn on ice maker using the options icon on ... there is not an ice cube jammed in the LCD display that the left side refrigerator door is fully closed for a few seconds. Switch back to see if there is ice in the ice bin... -
Display shows F22 or FdL - Front-load washer
... washer to allow the clothes to operate. The door may not be completely closed , but it . Were you close it may look as if it's closed for laundry items sticking out beyond the door opening. Reduce your load size if needed. Front-load washer The door must be latched. Display shows F25 or F06 - To remove the...
Similar Questions

Maytag Medb835dw Dryer Won't Start Af Signal I Cleaned Vents And Airf
(Posted by 1688fairway 2 years ago)

Remove Lint Filter Holder
I need to remove the lint filter holder to get all the lint from the dryer. I have found 4 screws, 2...
I need to remove the lint filter holder to get all the lint from the dryer. I have found 4 screws, 2...
(Posted by davehard 2 years ago)

Maytag Med7500yw. What Is The Part Number For Heating Element
Whats the part number for the heating element for model med7500yw
Whats the part number for the heating element for model med7500yw
(Posted by fitzpatrickfrancis668 3 years ago)

Check Lint Light Comes On
My Maytag MGDB725BW0 is not working properly. When ready to start the dryer the led reads 40 minutes...
My Maytag MGDB725BW0 is not working properly. When ready to start the dryer the led reads 40 minutes...
(Posted by eid00 4 years ago)

Gas Dryer Not Drying Clothes.
What Can I Try To Trouble Shoot The Problem
(Posted by Anonymous-71161 11 years ago)