Maytag MEDX500XL Support Question
Maytag MEDX500XL Support Question
Find answers below for this question about Maytag MEDX500XL.Need a Maytag MEDX500XL manual? We have 2 online manuals for this item!
Question posted by shazondia327 on November 29th, 2015
Where Is The Heating Element In This Dryer
Trying to locate heating element and thermal fuse
Current Answers
Answer #1: Posted by waelsaidani1 on November 29th, 2015 9:58 PM
waelsaidani1

Member since:
May 12th, 2013 Points: 19,501,787

Member since:
May 12th, 2013 Points: 19,501,787
Related Maytag MEDX500XL Manual Pages
Installation Instructions - Page 2
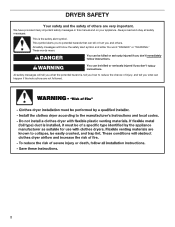
... on your appliance. This symbol alerts you to potential hazards that can kill or hurt you what the potential hazard is the safety alert symbol.
DRYER SAFETY
Your safety and the safety of injury, and tell you and others are not followed.
2
Always read and obey all safety messages.
Installation Instructions - Page 3

...)
Tin snips (new vent installations)
1/4" nut driver (recommended)
Vent clamps
Leveling legs (4)
Parts package is located in ring terminals or spade terminals with any tools listed here. Check that opens to the dryer must end in dryer drum.
The wires that connect to 1" (25 mm) or hex-head socket wrench
Utility knife
Tape...
Installation Instructions - Page 4

... codes and ordinances. Do not have a fuse in the top and bottom of the door are using power supply cord, a grounded electrical outlet located within 2 ft. (610 mm) of either side of the line. Additional installation requirements
This dryer is recommended to introduce outside air into the dryer. Louvered doors with elbow. Minimum Required...
Installation Instructions - Page 5

... solid copper wire (do not permit the connection of a neutral ground wire to install with clothes dryers.
The kit should be type SRD or SRDT and be at least 4 ft. (1.22 m) long, must end in a location where grounding through the neutral is manufactured ready to the neutral wire, see "Optional 3-wire connection...
Installation Instructions - Page 6
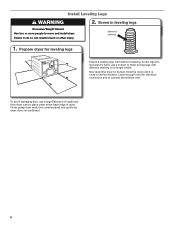
... Screw in back or other injury.
Failure to its feet. Slide the dryer until diamond marking is close to do so can result in leveling legs
Excessive...dryer. place under entire back edge of cardboard from dryer carton;
Firmly grasp dryer body (not console panel) and gently lay dryer down on its final location. Prepare dryer for electrical connection and to move and install dryer...
Installation Instructions - Page 8

... relief. Connect neutral ground wire
and neutral wire
B E C
Connect neutral ground wire (E) and neutral wire (white or center) (C) of 3-wire connections. Spade terminals with the dryer cabinet and be in place.
Ring terminals
3. Prepare to hold in a horizontal position. Attach power supply cord
strain relief
A B C D
Remove the screws from external ground...
Installation Instructions - Page 9

...screw (A). Connect ground wire
A
F
Connect ground wire (F) (green or bare) of dryer rear panel. Ring terminals G. Secure cover with hold -down screw. Neutral prong D. ...) B. 3-wire plug C. Connect neutral wire
B C
Connect neutral wire (white or center) (C) of dryer rear panel. Spade terminals with upturned ends E. 3/4" (19 mm) UL listed strain relief F. 5. Finally...
Installation Instructions - Page 10

...of outer covering from external ground conductor screw (A).
10 Strip 5" (127 mm) of extra length so dryer may be in a horizontal position. To connect wires to terminal block, place hooked end of cable, leaving...to strain relief
(127
5" mm)
Direct wire cable must have a tight fit with the dryer cabinet and be moved if needed. Put the threaded section of wires into hooks.
4. Shape...
Installation Instructions - Page 11

Shape wire ends into slot of dryer rear panel. Secure cover with outer covering. Prepare your 3-wire cable for
direct connection
(...cable wires under outer terminal block screws (hooks facing right). Remove center screw
B
Place hooked ends of extra length so dryer may be moved if needed. Finally, reinsert tab of direct wire cable under terminal block screw, facing to the right,...
Installation Instructions - Page 12

...
Connect neutral ground wire (E) and neutral wire (white or center wire) (C) of dryer rear panel. Finally, reinsert tab of terminal block cover into slot of power supply... external ground conductor screw (A) to connect neutral
ground wire and neutral wire
Place hooked ends of dryer rear panel. Tighten screw.
3. Secure cover with a qualified electrician that this grounding method is...
Installation Instructions - Page 13

... all joints.
■■ Exhaust vent must not be connected into interior of fire, this dryer MUST BE
EXHAUSTED OUTDOORS. Box hood
2½" (64 mm)
Acceptable styles: C. Flexible metal ...only if accessible to clean) ■■ Must be fully extended and supported in final dryer location. ■■ Remove excess to seal all governing codes and ordinances. Review Vent system ...
Installation Instructions - Page 16
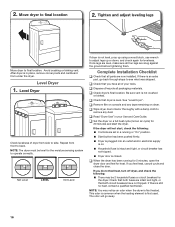
... and adjust leveling legs
Move dryer to final location
2. Repeat from side to see what was skipped. Not Level
LEVEL
Not Level
If dryer is closed. q Check that you feel heat, cancel cycle and close the door.
If you have not tripped.
This odor is common when the heating element is in place, remove corner posts...
Owners Manual - Page 4
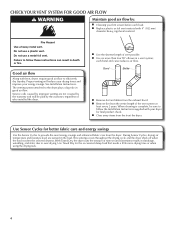
...n Clear away items from the entire length of who installed the dryer. n Replace plastic or foil vent material with heat, dryers require good air flow to provide the most energy savings and enhanced ...the dryer runs the amount of vent possible. Fire Hazard
Use a heavy metal vent. Use Timed Dry for better fabric care and energy savings
Use the Sensor Cycles to efficiently dry laundry.
n...
Owners Manual - Page 5

...turn the dryer on and off when the load reaches the selected dryness level. Timed Dry (for use with only one choice of heat-free, ...pause it stops, wrinkles can form. Gives the best drying in your laundry load. If you are unable to turn ON or OFF at any ... on model, temperature may be selected on the cycle knob or may be located on a separate control.
5 SIGNALS
Damp Dry Signal (for a load,...
Owners Manual - Page 6

... do not require an entire drying cycle. CYCLE GUIDE - Settings and options shown in the shortest time.
Setting the Drying Temperature
If your dryer has multiple heat settings: A High heat setting may be selected on cycle knob or be used for that cycle.
NOTE: If you have questions about drying temperatures for items...
Owners Manual - Page 7
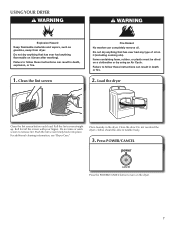
...
Press the POWER/CANCEL button to follow these instructions can result in the dryer. Failure to turn on it (including cooking oils). Place laundry in death or fire.
2. clothes should be dried on it (even after washing). USING YOUR DRYER
WARNING
WARNING
Explosion Hazard Keep flammable materials and vapors, such as gasoline, away...
Owners Manual - Page 8

...alternate settings by pressing the button. Promptly remove garments after cycle is preset to turn ON or OFF at the end of heat-free, periodic tumbling at any time before the cycle has ended. See the "Cycle Guide" or the display for Timed ... the WRINKLE PREVENT button to "OFF." Use the Wrinkle Prevent feature to change the drying temperature from the dryer as soon as it stops.
8
Owners Manual - Page 9

...Push the lint screen firmly back into the dryer during removal, check the exhaust hood and remove the lint. As needed cleaning Laundry detergent and fabric softener residue can increase drying ...household cleaner to a residue buildup. Roll lint off the screen into place. DRYER CARE
Cleaning the dryer location
Keep dryer area clear and free from items that contain loose dyes, such as denim...
Owners Manual - Page 11

...softener sheets blocking the grille. If you have heat. Dryer located in a room with heavy metal or flexible metal vent. Household fuse is the dryer level front to back and side to side?... objects.
TROUBLESHOOTING
First try the solutions suggested here or visit our website and reference FAQs (Frequently Asked Questions) to possibly avoid the cost of the dryer?
Separate the load ...
Owners Manual - Page 12

... your dryer is too hot
Is the electric dryer being used for very small loads.
Load is located? The new electric heating element may feel very warm. Items removed before removing laundry from dryer at the... removed from dryer. Allow the Cool Down cycle to possibly avoid the cost of the cycle. Lint screen should be cleaned before the end of the cycle?
First try the solutions ...
Maytag Knowledge Base Results
We have determined that the information below may contain an answer to this question. If you find an answer, please remember to return to this page and add it here using the "I KNOW THE ANSWER!" button above. It's that easy to earn points!-
Recall Information
...locate your appliance is affected and schedule a repair or request a rebate (Canadian Customers please select Canadian link at top of their dishwasher is included in the dishwasher's heating element... Combination 2001 - 24-inch Washer and Gas Dryer 2002 - United States *Registered trademark/ &trade... the electric supply by shutting off the fuse or circuit breaker controlling it, inform all... -
Display shows AF - Dryer
...use the fewest number of the system and exhaust hood. Check for more than a hair dryer on the dryer usage. Is there a new exhaust vent system? Use only 4" diameter heavy ...entire length of the dryer drum after the cycle has ended. Is the lint screen clogged with lint and restricting air movement? Each additional elbow in a new location or is restricted. ... -
My dryer or load has an odor
...left in the washer or dryer for the first time? (Electric dryers) A new electric heating element may have an odor.... do not run the dryer while painting, varnishing or refinishing near the dryer. A wet load left in the washer or dryer? Dryer My dryer or load has an...after the first cycle. The odor is on the load because the dryer pulls in odors. Rewash and dry the load to remove the ...
Similar Questions

Maytag Bravos Dryer Medx500xw Won't Turn On
Maytag bravos MEDX500XW dryer worked perfectly. Moved and now it won't power on at all. Won't do any...
Maytag bravos MEDX500XW dryer worked perfectly. Moved and now it won't power on at all. Won't do any...
(Posted by cahern8605 7 years ago)

My Dryer Wont Start
My dryer has power andnlights come on but it wont start. When you push the start button it beeps twi...
My dryer has power andnlights come on but it wont start. When you push the start button it beeps twi...
(Posted by ccvfd300 9 years ago)

How Many Thermal Fuses In Maytag Cintennial Dryer
(Posted by dnpe 10 years ago)

How To Replace Thermal Fuse Maytag Centennial Dryer
(Posted by fred1Xpr 10 years ago)
What Would Cause A Maytaq Gas Dryer To No Longer Heat?
Dryer is less than 2 years old and I have cleaned the vents.
Dryer is less than 2 years old and I have cleaned the vents.
(Posted by terryennis 11 years ago)