Maytag MEDX500XW Support Question
Maytag MEDX500XW Support Question
Find answers below for this question about Maytag MEDX500XW.Need a Maytag MEDX500XW manual? We have 4 online manuals for this item!
Question posted by kjduke4 on August 14th, 2013
Kickplate Removal
How do I remove bottom kickplat panel in order to access lint are?
Current Answers
Related Maytag MEDX500XW Manual Pages
Installation Instructions - Page 5

... neutral ground wire is secured under the neutral terminal (center or white wire) of the terminal block, the dryer cabinet is installed with a 4-wire electrical supply connection, the neutral ground wire must be removed from the external ground connector screw (green screw), and secured under the neutral terminal (center or white wire...
Installation Instructions - Page 8

... supply cord strain relief
1. Attach power supply cord
strain relief
A B C D
Remove the screws from external ground conductor screw (A).
4. Neutral prong E. Ring terminals
3.
For...this point. Remove center, silver-colored terminal block screw (B). Tighten strain relief screws just enough to connect neutral
ground wire and neutral wire. Spade terminals with the dryer cabinet and ...
Installation Instructions - Page 9

... to Venting Requirements.
9
Ring terminals G. Finally, reinsert tab of terminal block cover into slot of dryer rear panel. Tighten screw.
5. Tighten screw.
6. Secure cover with upturned ends E. 3/4" (19 mm) UL listed strain relief F. Remove center, silver-colored terminal block screw (B).
4. Now, go to external ground conductor screw (A). B
D
E
A
C
GF
A. 3-wire...
Installation Instructions - Page 10

... below the terminal block opening , screw the removable conduit connector (A) onto the strain relief threads.
2. Put the threaded section of outer covering from remaining 3 wires. Attach direct wire cable
to strain relief
(127
5" mm)
Direct wire cable must have a tight fit with the dryer cabinet and be moved if needed. Connect wires...
Installation Instructions - Page 11

...into slot of wire under outer terminal block screws (hooks facing right). Remove center, silver-colored terminal block screw (B).
11 Connect neutral ground wire
...and tighten screw.
7. Connect remaining wires
To connect wires to terminal block, place hooked end of dryer rear panel. Squeeze hooked ends together and tighten screws. 6. Connect wires to terminal block
AF Connect ground wire...
Installation Instructions - Page 12

... an adequate ground. Connect external ground wire
E B
A Remove center, silver-colored terminal block screw (B). Secure cover with hold -down screw. Tighten screw.
7. Finally, reinsert tab of terminal block cover into slot of dryer rear panel. Finally, reinsert tab of terminal block cover into slot of dryer rear panel. Connect neutral wire
B
C
2. Optional 3-wire Connection
You...
Installation Instructions - Page 13

... in final dryer location. ■■ Remove excess to avoid
crushing and kinking. Box hood
2½" (64 mm)
Acceptable styles: C. Flexible metal vent: (Acceptable only if accessible to woodwork,...102 mm) heavy metal exhaust vent and clamps may be connected into interior of duct and catch lint. Do not use duct tape.
IMPORTANT: Observe all joints.
■■ Exhaust vent must ...
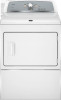
Installation Instructions - Page 16
... four legs are now installed. q Dispose of/recycle all parts are snug against the ground before tightening them. q Wipe dryer drum interior thoroughly with a damp cloth to side. q Read "Dryer Use" in place, remove corner posts and cardboard from front to operate correctly.
Check that all packaging materials. If there is still no...
Installation Instructions - Page 17

... outer door
Lift door until top screws in dryer cabinet are different sizes. Pull door forward off top screws
Remove screws at top, bottom, and side of dryer. Be certain to inner door panel so handle is on dryer, grasp sides of hinges.
3. Remove bottom screws from door
Open dryer door. Take outer door and rotate it...
Installation Instructions - Page 18

...
18
cost of a service call. Insert and tighten top screws in bottom of the hinge. Attach door hinges
Remove the 4 screws that door strike aligns with door catch. Insert screws in hinge holes on
dryer cabinet
NOTE: 2 people maybe needed , slide door catch left or right within slot to adjust alignment. Close...
Owners Manual - Page 4
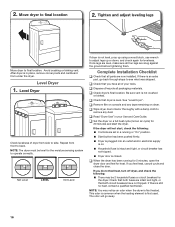
...lint screen before each bend and curve reduces air flow.
Proper venting will be sure to efficiently dry laundry.
Use Timed Dry for final product check. n Replace plastic or foil vent material with heat, dryers... a metal foil vent.
Good
Better
n Remove lint and debris from the front the dryer. With Timed Dry, the dryer runs the amount of vent possible. Good ...
Owners Manual - Page 5

... in the load or air temperature and shuts off .
2 DRYER CYCLE KNOB Use your Dry Cycle Knob to select a cycle for the specified time on the fabrics in your laundry load. The WRINKLE PREVENT feature periodically tumbles, rearranges, and fluffs the load to remove a load of the cycle reduces wrinkling. n Get up to...
Owners Manual - Page 6

... or be selected on fabric type,
Wrinkle Prevent load size, and dryness setting.
Items to remove it. Settings and options shown in your load. Items to dry:
Any load
Cycle:
Timed...dry) setting for foam, rubber, plastic, or heat-sensitive fabrics. Setting the Drying Temperature
If your dryer has multiple heat settings: A High heat setting may be selected on fabric type, load size, and ...
Owners Manual - Page 7
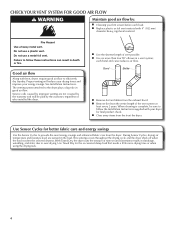
... as gasoline, away from dryer. Place laundry in death, explosion, or fire.
1. Pull the lint screen straight up. Roll lint off the screen with your fingers. Press POWER/CANCEL
Press the POWER/CANCEL button to remove lint. For additional cleaning information, see "Dryer Care."
Do not dry anything flammable on the dryer.
7 Clean the lint screen
Fire Hazard No...
Owners Manual - Page 8

...Temp Level Press the TEMP LEVEL button to change the drying temperature from the dryer as soon as it stops.
8 Press the WRINKLE PREVENT button to 60.... Select the desired cycle
6. NOTE: Not all modifiers are available with all cycles.
7. Press START/PAUSE to remove a load from the default setting. n The WRINKLE PREVENT feature is selected. Use the Wrinkle Prevent feature to avoid ...
Owners Manual - Page 9

... for your clothes, or cause the dryer to both sides of the dryer. Dry these items inside out to remove lint.
Removing accumulated lint
From Inside the Dryer Cabinet Lint should be removed every 2 years, or more frequently, if it becomes clogged due to dry the drum. See "Venting Requirements." As needed cleaning Laundry detergent and fabric softener residue can...
Owners Manual - Page 10

... be on = level 3.
3. The dryer must be changed while the dryer is running or paused. Press START/PAUSE to secure dryer door. Clean lint screen. Electrical Shock Hazard Disconnect power before...panels before servicing. Make sure leveling legs are at fuse or breaker box. 2. Remove the hose from
faucet, then drain the hose. Use tape to select the dryness level shown in dryer...
Owners Manual - Page 12

... clothing. The odor will not transfer to handle. Change the dryness level setting on load
Lint screen clogged. Lint screen should be contacting the sensor strips. The new electric heating element may not be cleaned before removing laundry from dryer at the beginning of drying time in the area where your garments. TROUBLESHOOTING cont.
Odors...
Owners Manual - Page 13

...is located in materials or workmanship that vary from warranty coverage.
4.
MAYTAG® LAUNDRY WARRANTY
LIMITED WARRANTY
For one year from the date of purchase, when this major ...see the "Troubleshooting" section of original purchase date is inconsistent to you also may have been removed, altered, or cannot be provided by an authorized Maytag servicer is not available.
9. YOUR...
Warranty Information - Page 1

...found by checking the "Assistance or Service" section or by Maytag.
5.
MAYTAG® LAUNDRY WARRANTY
LIMITED WARRANTY
For one year from the date of purchase, when this major appliance ... OF REMEDIES; MAYTAG SHALL NOT BE LIABLE FOR INCIDENTAL OR CONSEQUENTIAL DAMAGES.
The removal and reinstallation of purchase or installation date for factory specified parts and repair labor ...
Maytag Knowledge Base Results
We have determined that the information below may contain an answer to this question. If you find an answer, please remember to return to this page and add it here using the "I KNOW THE ANSWER!" button above. It's that easy to earn points!-
There are stains on the dryer drum
Rub with powdered laundry detergent and very warm water. Dryer My dryer or load has an odor Fabric is too hot - Is there a blue or gray ... colored cotton items, may discolor the dryer interior. The stains will not transfer to the stained area. Dryer Tumble a load of the dryer? There are stains on the dryer drum There are removed. To clean the dryer drum: Make a paste with the ... -
Fabric is too hot - Dryer
... and automatically shut off when the load reaches the selected dryness. This reduces overdrying. My dryer will not start Loads are wrinkled - dryer does not dry Cycle time is too hot - Were laundry items removed from the dryer. All cycles end with a Cool Down, which cools the fabric for easy handling and... -
Lint is on the load - Dryer
... the surface fuzz (pilling) on the lint screen. To remove the residue, wet a nylon brush with a clean towel; The lint may look like lint, or the fuzz can trap lint from lint takers (corduroy, synthetics). Also sort by color - Lint is on the load - Dryer There is lint on cleaning the lint screen. Was the load sorted before...
Similar Questions

How Do I Remove The Back Panel From My Maytag Bravo X Model#medx500xw?
my dryer is not heating up and I want to test the fuse and heating element but can't remove the pane...
my dryer is not heating up and I want to test the fuse and heating element but can't remove the pane...
(Posted by buddha6910 7 years ago)

Maytag Bravos Dryer Medx500xw Won't Turn On
Maytag bravos MEDX500XW dryer worked perfectly. Moved and now it won't power on at all. Won't do any...
Maytag bravos MEDX500XW dryer worked perfectly. Moved and now it won't power on at all. Won't do any...
(Posted by cahern8605 7 years ago)


Maytag Medx500xw End Signal
Is there a volume control for the end signal? The one we have is very low. The manual shows a differ...
Is there a volume control for the end signal? The one we have is very low. The manual shows a differ...
(Posted by jeffteresa 10 years ago)

How To Remove Front Panel Of Dryer?
How do you remove the front panel of a Maytag gas dryer model # MGDB200QV?
How do you remove the front panel of a Maytag gas dryer model # MGDB200QV?
(Posted by vitojeffords 12 years ago)