Maytag MEDX500XW Support Question
Maytag MEDX500XW Support Question
Find answers below for this question about Maytag MEDX500XW.Need a Maytag MEDX500XW manual? We have 4 online manuals for this item!
Question posted by karenlynnmoore on December 31st, 2013
How To Take The Lid Off?
This sorry washer stopped working so I purchased a sensor, the problem is we can't open the lid to replace the new sensor
Current Answers
Related Maytag MEDX500XW Manual Pages
Installation Instructions - Page 2
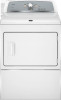
DRYER SAFETY
Your safety and the safety of injury, and tell you what the potential hazard is the safety alert symbol. This is , tell you how ...
Installation Instructions - Page 3

... compound (for installing new exhaust vent)
You will need: ■■ A location allowing for purchase from the dealer from whom you purchased your dryer. See "Venting Requirements...Dryer User Instructions.
INSTALLATION REQUIREMENTS
Tools and Parts
Parts supplied:
Gather the required tools and parts before purchasing parts.
Check that opens to the dryer must end in dryer...
Installation Instructions - Page 4

... requirements
This dryer is recommended. A time-delay fuse or circuit breaker is suitable for purchase from : ...Dryer Feet Kit, Part Number 279810.) If not level, clothes may not tumble properly and automatic sensor cycles may not operate correctly. Do not operate your dryer...open fully. Installation clearances:
The location must conform to introduce outside air into the dryer. Wide opening...
Installation Instructions - Page 5

... ready to the neutral conductor (white wire) within the dryer. Grounding through the neutral is prohibited for (1) new branch-circuit installations, (2) mobile homes, (3) recreational vehicles,...ground wire to the neutral wire, see "Optional 3-wire connection" section.
■■ This dryer is permanently connected to install with upturned ends.
■■ A UL listed strain relief....
Installation Instructions - Page 6
... cardboard.
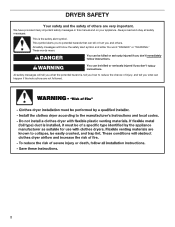
6 To avoid damaging floor, use a wrench to finish turning legs until it is no longer visible. place under entire back edge of cardboard from dryer carton; Failure to do so can result in leveling legs
Excessive Weight Hazard Use two or more people to connect the exhaust vent. diamond marking...
Installation Instructions - Page 8

... (E) and neutral wire (white or center) (C) of the two clamp sections (C) into the hole below the terminal block opening (B) so that the wire insulation on strain relief). Ground prong D. Spade terminals with the dryer cabinet and be in place. Be sure that one tab is pointing up (A) and the other is pointing...
Installation Instructions - Page 9

... upturned ends E. 3/4" (19 mm) UL listed strain relief F. Now, go to outer terminal block screws. Finally, reinsert tab of terminal block cover into slot of dryer rear panel. Finally, reinsert tab of terminal block cover into slot of dryer rear panel. Ring terminals G. Spade terminals with hold -down screw. Tighten screws.
Installation Instructions - Page 10

...ground wire (E) from end of extra length so dryer may be in a horizontal position. Reaching inside the terminal block opening (B). Tighten strain relief screw against the direct wire..., continue to terminal block
Put direct wire cable through the hole below the terminal block opening , screw the removable conduit connector (A) onto the strain relief threads.
2. Strip insulation ...
Installation Instructions - Page 11

...silver-colored terminal block screw (B).
11 Strip 31/2" (89 mm) of outer covering from end of extra length so dryer may be moved if needed. Connect wires to terminal block
AF Connect ground wire (green or bare) (F) of ... ends of remaining direct wire cable wires under center screw of dryer rear panel. Strip insulation back 1" (25 mm). Squeeze hooked ends together and tighten screws.
Installation Instructions - Page 12

...block screws (hooks facing right). Finally, reinsert tab of terminal block cover into slot of dryer rear panel. Prepare to Venting Requirements. Tighten screws.
4. Remove neutral ground wire (E) from... go to an adequate ground. Finally, reinsert tab of terminal block cover into slot of dryer rear panel. Connect remaining wires
Connect neutral ground wire (E) and neutral wire (white or ...
Installation Instructions - Page 13

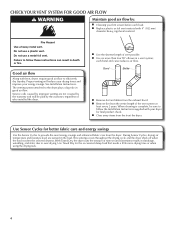
...Dryer exhaust must not be connected or secured with screws or other fastening devices that extend into any object that may obstruct exhaust (such as flowers, rocks, bushes, or snow).
Replace ...■■ The total length should not exceed 7 3/4 ft. (2.4 m). Housecleaning problems and health problems.
See "Venting Kits" for best drying performance and to woodwork, furniture, paint, ...
Installation Instructions - Page 14

...B
Alternate installations for close elbow
4396007RW Through-the-wall vent cap
4396008RP 4" steel dryer venting clamps - 2 pack
8212662
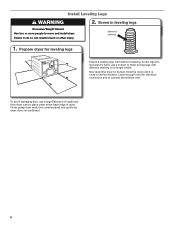
Flush mounting louvered vent hood 4" Vent length necessary...Venting Kits". Standard rear offset exhaust installation B. Select the type best for purchase. Each kit includes step-by-step instructions. universal grey
4396028
Sure Connect™ ...
Installation Instructions - Page 15
... vent must be securely fastened to exhaust hood
Vent must fit over dryer exhaust outlet and inside the dryer. Do not use duct tape, screws, or other fastening devices that...add one 90º turn inside exhaust hood. Use clamps to seal exterior wall opening around exhaust hood.
2.
Dryer vent must not terminate beneath the mobile home. Install Vent System
1. Special provisions...
Installation Instructions - Page 16
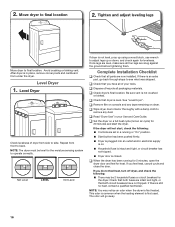
... steps to see what was skipped. Once legs are level, make sure all packaging materials. q Dispose of your Use and Care Guide. See "Level Dryer". q Read "Dryer Use" in a running for 5 minutes, open the dryer door and feel heat, cancel cycle and close the door. q Check that both fuses are now installed. NOTE: The...
Owners Manual - Page 4
...Sensor Cycles for the occasional damp load that needs a little more than four 90° elbows in shrinkage, wrinkling, and static due to follow these instructions can result in death or re. See Installation Instructions. each load.
Do not use a plastic vent. Failure to efficiently dry laundry... the dryer. n Replace plastic or foil vent material with heat, dryers require ...
Owners Manual - Page 5

...stops, wrinkles can form. See "Cycle Guide" for detailed descriptions of the drying cycles.
7 INTELLIDRY™ Senses moisture in your dryer...SIGNALS
Damp Dry Signal (for use with Sensor Cycles only) Selecting the Damp Dry ...laundry load. Promptly removing clothes at the end of a cycle. The WRINKLE PREVENT feature periodically tumbles, rearranges, and fluffs the load to turn the dryer...
Owners Manual - Page 7
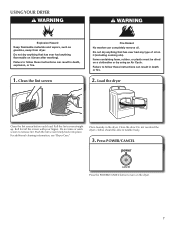
...wash screen to tumble freely.
3. Do not overload the dryer; Roll lint off the screen with your fingers. Press... dry anything flammable on the dryer.
7 Load the dryer
Clean the lint screen before each load....dryer. Clean the lint screen
Fire Hazard No washer can result in the dryer. Push the lint screen firmly back into place. For additional cleaning information, see "Dryer...
Owners Manual - Page 8

... the cycle has ended. Press the WRINKLE PREVENT button to "OFF." Use the Wrinkle Prevent feature to change the drying temperature from the dryer as soon as it stops.
8 4. Select cycle options (if desired)
Add additional options by pressing the button for other cycles, the WRINKLE PREVENT feature setting will be shown...
Owners Manual - Page 9

... clearing piles of laundry in the dryer. Dry these items inside out to remove lint. Roll lint off while the screen is removed. 2. Reinstall screen in the door opening of lint screen with...nonflammable household cleaner to stop before your dryer and will not stain future loads of the drum and rub with hot water and liquid detergent. As needed cleaning Laundry detergent and fabric softener...
Owners Manual - Page 12

... new electric heating element may feel very warm. First try the solutions suggested here or visit our website and reference FAQs (Frequently Asked Questions) to a partially dried load can tumble freely. Lint on Sensor Cycles. Select Wrinkle Prevent feature to tumble the load without heat to finish before removing laundry from the dryer before...
Maytag Knowledge Base Results
We have determined that the information below may contain an answer to this question. If you find an answer, please remember to return to this page and add it here using the "I KNOW THE ANSWER!" button above. It's that easy to earn points!-
Washer fills slowly - Epic® front-load washer
... the washer is not cleaning laundry - The washer will ...washer clogged? Completely open both the hot and cold water faucets turned on this washer should seem low because this is empty. washer Washer will not properly operate with only one of the washer. Is the water inlet hose kinked? Straighten the water inlet hoses. Allow the unit to the washer and turned on . When the washer stops... -
Loads are wrinkled - Dryer
... and Timed Dry Work Are you drying a large load? Remove the load as soon as the dryer cycle ends. Selecting the longest drying time may cause overdrying, which will help reduce wrinkling. Were the laundry items removed from the dryer before removing the laundry items from the washer and separately... -
The amount of water seems too low - Front-load Epic® washer
...several minutes. Open the door and rotate the inner basket until one of the three baffles is a low-water-usage washer. Does the water level seem too low? When the washer stops filling, press... the Pause/Off button. Approximately ½" of the top of water varies by cycle and load size to fill normally. Washer is not cleaning laundry - ...
Similar Questions

How Do I Remove The Back Panel From My Maytag Bravo X Model#medx500xw?
my dryer is not heating up and I want to test the fuse and heating element but can't remove the pane...
my dryer is not heating up and I want to test the fuse and heating element but can't remove the pane...
(Posted by buddha6910 7 years ago)

Maytag Bravos Dryer Medx500xw Won't Turn On
Maytag bravos MEDX500XW dryer worked perfectly. Moved and now it won't power on at all. Won't do any...
Maytag bravos MEDX500XW dryer worked perfectly. Moved and now it won't power on at all. Won't do any...
(Posted by cahern8605 7 years ago)

Maytag Medx500xw End Signal
Is there a volume control for the end signal? The one we have is very low. The manual shows a differ...
Is there a volume control for the end signal? The one we have is very low. The manual shows a differ...
(Posted by jeffteresa 10 years ago)

How Do You Take The Door Panel Off To Access The Belts For Model Medx500xw
(Posted by Anonymous-109231 11 years ago)
Elec Medc300xw Has Stopped Working. I Checked The Cirt Brker, Internal Ligh Work
ELECT DRYER, MEDC300XW has stopped working. I checked the cirt brker, internal light works.
ELECT DRYER, MEDC300XW has stopped working. I checked the cirt brker, internal light works.
(Posted by amudd 11 years ago)