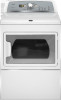
Maytag MEDX700XW Support Question
Maytag MEDX700XW Support Question
Find answers below for this question about Maytag MEDX700XW.Need a Maytag MEDX700XW manual? We have 4 online manuals for this item!
Question posted by Anonymous-104509 on March 24th, 2013
Installing Side Vent
Hi do we get the back panel off to install a side vent?
Current Answers
Related Maytag MEDX700XW Manual Pages
Owners Manual - Page 4
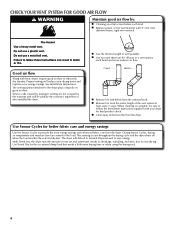
... sure to efficiently dry laundry. The venting system attached to over-drying.
n Use no more drying time or when using the drying rack.
4 When cleaning is complete, be paid by :
n Cleaning your lint screen before each bend and curve reduces air flow.
See Installation Instructions. With Timed Dry, the dryer runs the amount of...
Owners Manual - Page 5
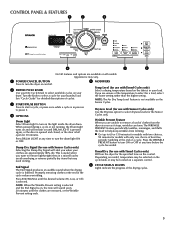
... turn ON or OFF at any time before the cycle has ended. This is in your laundry load. If you are approximately 80% dry. Dryness Level (for use with Timed Cycles only) Will run the dryer for use with only one choice of heat-free, periodic tumbling at the end of clothes...
Owners Manual - Page 7

...) setting for various loads, refer to tumble freely.
7 For additional cleaning information, see "Dryer Care." Do not overload the dryer;
Place laundry in your fingers. Setting the Drying Temperature
Select a drying temperature based on the fabrics in the dryer. Load the dryer
Clean the lint screen before each load. Do not rinse or wash screen...
Owners Manual - Page 10

... on the lint screen. Dry these items inside out to dry the drum. See "Venting Requirements." As needed cleaning Laundry detergent and fabric softener residue can cause longer drying times for proper dryer operation.
Tumble a load of the dryer. Doing so can increase drying time. The screen is probably clogged if lint falls off...
Owners Manual - Page 11
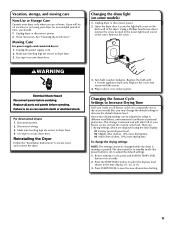
... as you would like, you may change the drying settings:
NOTE: The settings cannot be changed while the dryer is retained and will be adjusted to adapt to secure dryer door. Use tape to different installations, environmental conditions or personal preference.
Turn bulb counterclockwise.
Your sensor drying settings can be on some models...
Owners Manual - Page 12
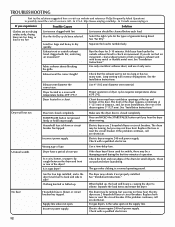
... problem continues, call an electrician. Check with heavy metal or flexible metal vent. Long venting will bounce, causing the dryer to side? See the Installation Instructions. Dryer located in a room with lint. The front of the dryer requires a minimum of 1" (25 mm) of lint or replace exhaust vent with a qualified electrician.
12 Unusual sounds
Wrong type of...
Owners Manual - Page 13
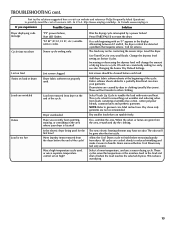
.... Increasing or decreasing the dryness level will not transfer to finish before removing laundry from the dryer before each load.
Dry clean only garments are caused by a power failure?...Lint screen should be gone after the first cycle.
Load is located? Were laundry items removed from dryer. TROUBLESHOOTING cont. Use Timed Dry for the first time?
These will change the...
Owners Manual - Page 14
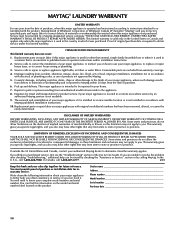
...accident, alteration, misuse, abuse, re, ood, acts of God, improper installation, installation not in accordance with Maytag published installation instructions.
10. This major appliance is intended to repair or replace appliance light... labor to know your complete model number and serial number. MAYTAG® LAUNDRY WARRANTY
LIMITED WARRANTY
For one year from the date of purchase, when this...
Installation Instructions - Page 3

... need:
■■ A location allowing for use with clothes dryers. Putty knife 3 Check that opens to the dryer must end in dryer drum. Parts needed :
Flat-blade screwdriver
#2 Phillips screwdriver
Wire stripper (direct wire installations)
Tin snips (new vent installations)
1/4" nut driver (recommended)
Vent clamps
Leveling legs (4)
Parts package is located in ring terminals...
Installation Instructions - Page 4
..." (687 mm)
A
*29 1/2" (749 mm)
27" (687 mm)
B
A. The combined weight of 1" (25 mm) under entire dryer. (If slope is recommended. Some codes limit, or do not permit, installation of 200 lbs. (90.7 kg). See "Venting Requirements." Closet door with equivalent ventilation openings are acceptable.
■■ Companion appliance spacing should also be...
Installation Instructions - Page 5

... least 4 ft. (1.22 m) long, must determine the type of a neutral ground wire to the neutral wire, see "Optional 3-wire connection" section.
■■ This dryer is installed in ring terminals or spade terminals with a 4-wire electrical supply connection, the neutral ground wire must have 3 10-gauge solid copper wires and match a 3-wire...
Installation Instructions - Page 6

... for leveling legs
Examine leveling legs, find diamond marking. Now stand the dryer on cardboard.
6 Install Leveling Legs 2. Screw in leveling legs
diamond marking
1. Firmly grasp dryer body (not console panel) and gently lay dryer down on its final location. Use a wrench to connect the exhaust vent. To avoid damaging floor, use a large flat piece of...
Installation Instructions - Page 9

...conductor screw (A).
Finally, reinsert tab of terminal block cover into slot of dryer rear panel. Secure cover with hold -down screw. Connect remaining wires
3-wire receptacle (NEMA type 10-30R)
3-prong plug
Connect remaining wires to "Venting Requirements."
Now, go to "Venting Requirements."
3-wire Power Supply Cord Connection
IMPORTANT: Use where local codes permit...
Installation Instructions - Page 11

...
3-wire Direct Wire Connection
IMPORTANT: Use where local codes permit connecting cabinet-ground conductor to "Venting Requirements."
11 Place hooked ends of remaining direct wire cable wires under center screw of terminal ...Strip 31/2" (89 mm) of outer covering from end of extra length so dryer may be moved if needed.
Secure cover with outer covering. 3. Remove center screw
B
AF Connect ...
Installation Instructions - Page 12
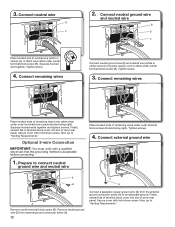
... wire (E) from external ground conductor screw (A). 12
Connect a separate copper ground wire (G) from the external ground conductor screw (A) to "Venting Requirements." Finally, reinsert tab of terminal block cover into slot of dryer rear panel. Connect neutral ground wire
and neutral wire
B E C
Connect neutral ground wire (E) and neutral wire (white or center wire) (C) of...
Installation Instructions - Page 13
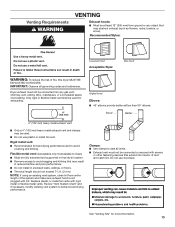
... least 12" (305 mm) from entire length of fire, this dryer MUST BE
EXHAUSTED OUTDOORS. Flexible metal vent: (Acceptable only if accessible to avoid sagging and kinking that extend ...102 mm) heavy metal exhaust vent
■■ Only a 4" (102 mm) heavy metal exhaust vent and clamps may result in reduced airflow and poor performance.
■■ Do not install in enclosed walls, ceilings,...
Installation Instructions - Page 14

...includes step-by-step instructions. For ordering information, see "Venting Kits". Standard rear offset exhaust installation B. Plan Vent System
Recommended exhaust installations
Typical installations vent the dryer from the rear of the dryer. C
D
E A
F G
B
Over-The-Top installation (also available with clamps
4396004
Dryer offset elbow
4396005
Wall offset elbow
4396006RW DuraSafe™...
Installation Instructions - Page 15

...clamp, connect vent to existing vent, make sure vent is secured to use. Vent System Chart
Number of 90° turns or elbows
Type of dryer.
■■ Reduce performance, resulting in "Vent System Chart."
Check that extend into interior of vent to secure vent, because they can catch lint. Install Vent System
1. The "Vent System Chart" provides venting requirements that will...
Installation Instructions - Page 16

... fuse is intact and tight, or circuit breaker has not tripped.
■■ Dryer door is level. After dryer is level, make sure all packaging materials.
Be sure vent is first used. q Check that both fuses are now installed. If the dryer will go back through steps to adjust legs up using a wood block.
Not...
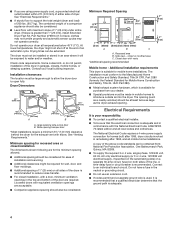
Dimension Guide - Page 1

...) on a separate 30-amp circuit, fused on all sides of installation and servicing. ■■ Additional clearances might be considered.
Wide opening side-swing door B. Angled hood (acceptable)
C
The vent system chart provides venting requirments that may be large enough to allow the dryer door to change without notice. e(10th.7ems)trai2g9htfte.s(8t.a8nmd...
Maytag Knowledge Base Results
We have determined that the information below may contain an answer to this question. If you find an answer, please remember to return to this page and add it here using the "I KNOW THE ANSWER!" button above. It's that easy to earn points!-
Refrigerator or freezer not cold enough - Side by side refrigerator
... was recently installed, wait 24 hours for normal household use. If you are not satisfied with a Cooling On/Off feature, there will be a Cooling On/Off button located on the control panel in ... turned on using the Lock and Fast Ice/Cool buttons on the dispenser panel on the outside of the vents. ... -
Using the temperature controls - Counter-Depth
...Recheck the temperatures before the refrigerator has cooled completely, your dispenser panel. Press LOCK to lower the set point. Press ICE to...cold in the refrigerator or freezer, first check the air vents to 7°C). To view Celsius temperatures, press the ...should be sure they are not blocked before you first install your refrigerator and freezer controls are set point. The ... -
Display shows AF - Dryer
... may be too long or may be removed from the entire length of debris and that the dryer airflow is this a new installation? Use only 4" diameter heavy metal exhaust vent material. Larger or smaller diameter material will reduce good air movement and cause longer drying times. This error code indicates that the...
Similar Questions

Maytag Medb835dw Dryer Won't Start Af Signal I Cleaned Vents And Airf
(Posted by 1688fairway 2 years ago)

Remove Lint Filter Holder
I need to remove the lint filter holder to get all the lint from the dryer. I have found 4 screws, 2...
I need to remove the lint filter holder to get all the lint from the dryer. I have found 4 screws, 2...
(Posted by davehard 2 years ago)

Check Lint Light Comes On
My Maytag MGDB725BW0 is not working properly. When ready to start the dryer the led reads 40 minutes...
My Maytag MGDB725BW0 is not working properly. When ready to start the dryer the led reads 40 minutes...
(Posted by eid00 4 years ago)

Installation Instructions Dryer Vent Kit W10323246
(Posted by jerrymkaplan 10 years ago)

How To Install A Side Vent On A Maytag Dryer
(Posted by kylelti 10 years ago)